A 40-degree TiAlN ball nose end mill is an excellent choice for facing operations, especially on carbon steel. Its combination of a rounded tip for smooth cuts and impressive hardness from the TiAlN coating makes it a reliable and efficient tool for achieving flat, finished surfaces on your projects.
Hey there, fellow makers! Daniel Bates here from Lathe Hub, ready to tackle a common machining challenge that can leave even experienced hands scratching their heads: getting a perfectly flat, smooth surface on your workpieces. You’ve probably spent hours trying different tools, only to end up with chatter marks or an uneven finish. It’s frustrating, right? Well, today, we’re going to dive deep into why a specific tool, the 40-degree TiAlN ball nose end mill, is often the secret weapon for achieving stellar facing results, especially when you’re working with tough materials like carbon steel. Stick around, and we’ll break down exactly how to use it to make your projects shine!
Understanding the Magic: Why a 40-Degree TiAlN Ball Nose End Mill?
Let’s start by demystifying what makes this particular tool so special for facing. When we talk about “facing,” we mean machining the end of a workpiece to make it flat and perpendicular to the axis of rotation or feed. Think of it like sanding down a table leg to make sure it sits perfectly flat on the floor – but with metal or hard plastic!
Why is geometry and coating so important here? Let’s break it down:
- Ball Nose Geometry: Unlike flat-faced end mills, ball nose end mills have a rounded tip. For facing, a 40-degree ball nose isn’t a full hemisphere; it’s more like a gentle curve. This shape is fantastic for facing because it can create a smooth, continuous cutting edge that transitions into the side of the mill. This reduces stress at the center of your cut and helps avoid the dreaded “dimple” you can get with flat end mills if they’re not perfectly centered or if chip evacuation is an issue. A shallower angle like 40 degrees also provides a stronger cutting edge compared to a much sharper radius.
- TiAlN (Titanium Aluminum Nitride) Coating: This is where the real toughness comes in! TiAlN is a super-hard coating applied to the surface of the end mill. It’s like giving your tool a suit of armor. This coating significantly increases the tool’s resistance to heat and abrasion. When you’re machining materials like carbon steel, which can be quite hard and prone to generating a lot of friction, the TiAlN coating is a game-changer. It allows you to cut at higher speeds, feed faster, and extends the life of your end mill dramatically. It also helps prevent chip welding, where hot chips can stick to the cutting edge and ruin your finish.
- 40-Degree Angle: The “40-degree” specifies the shape of the ball nose. It’s not a full sphere, but a specific radius that creates a gentle curve across the cutting face. This angle offers a good balance: it provides enough ball nose characteristic to smooth out the cut and handle slight surface variations, but it’s not so aggressive that it creates excessive cutting forces or ball nose chatter during a facing pass. It’s a sweet spot for many general-purpose facing applications, especially on parts where a very precise, optically flat surface isn’t the absolute highest priority, but a smooth, well-finished surface is.
Together, these elements – the gentle ball nose for a smooth transition, the robust TiAlN coating for heat and wear resistance, and the balanced 40-degree angle – create a versatile tool perfect for creating excellent finishes on challenging materials. It’s a tool designed to make your life easier and your finished parts look better.
When to Reach for the 40-Degree TiAlN Ball Nose
So, when is this specific tool your go-to choice? It excels in several scenarios:
- Facing Parts with Slight Imperfections: If your workpiece has minor runout (it’s not perfectly centered on the lathe) or slight warpage, the ball nose geometry helps to blend these imperfections into a smoother surface rather than creating a sharp distinction.
- Machining Hard Materials: Carbon steel, alloy steels, and even some stainless steels benefit immensely from the heat and wear resistance of the TiAlN coating. This allows for more aggressive cutting parameters without rapid tool wear.
- Achieving a Good Surface Finish: While not always yielding mirror-like finishes on its own (sometimes a dedicated finishing pass with a different tool is needed), the ball nose geometry tends to leave a more consistent, less “stepped” surface when facing, especially on manual machines where feed rate control can vary.
- General-Purpose Facing on Milling Machines: On a milling machine, this tool is excellent for creating a flat surface on the top or side of a block of material. The ball nose helps with a smooth start and finish to the cut.
- Applications Requiring Robustness: If you’re leaning towards faster feed rates or slightly higher depths of cut for efficiency, the strength and durability of this tool with its high-performance coating will be your friend.
It’s important to note that for extremely high-precision, mirror-finish facing, a dedicated flat-faced finishing tool, potentially with a zero or very slight lead angle and a tiny nose radius, might be preferred. However, for a robust, efficient, and generally excellent finish, especially on tougher materials, the 40-degree TiAlN ball nose is a champion.
The Setup: Getting Your Machine Ready
Before we start cutting, proper setup is crucial. This not only ensures a good finish but also keeps you and your machine safe. Let’s get everything dialed in:
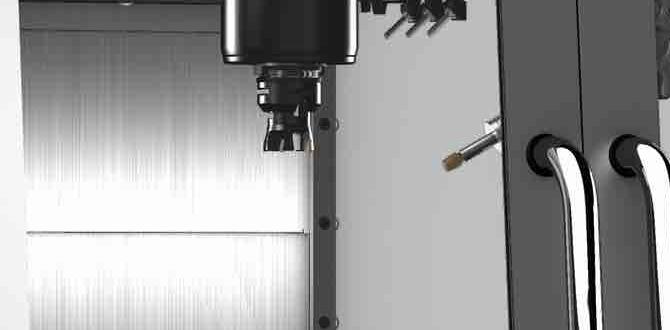
1. Tool Holder and Workpiece Mounting
On a Lathe:
- Tool Holder: Use a rigid tool holder that securely grips the end mill. For facing, ensure the tool is mounted at the correct height. Ideally, the center of the cutting edge should be on the center of the workpiece. If it’s slightly high or low, the ball nose geometry can help compensate more gracefully than a sharp-nosed tool.
- Workpiece: Make sure your workpiece is securely chucked or held. For facing, you want minimal runout. Double-check that it’s indicated in.
On a Milling Machine:
- Tool Holder: A solid collet or tool holder is essential to prevent the end mill from slipping. A standard R8 collet or a CAT/BT style tool holder will work.
- Workpiece: Clamp your workpiece securely to the milling table using vises, clamps, or fixtures. Ensure it’s absolutely stable and won’t move during the cut.
2. Setting the Z-Axis Zero and Tool Engagement
This is perhaps the most critical step for facing. On a manual machine, this is done by feel and observation. On a CNC, it’s programmed, but understanding the principle is key.
For Lathes:
- Mount the ball nose end mill in the tool post.
- Bring the tip of the end mill gently to the face of the rotating workpiece.
- With the spindle stopped, carefully move the cross-slide (Z-axis) so the cutting edge just touches the OD (outer diameter) of the workpiece. You might hear a very faint whisper of material being scraped off.
- Set your Z-axis DRO (Digital Readout) or handwheel to zero at this point. This is your starting point for the facing cut.
For Milling Machines:
- Insert the ball nose end mill into the spindle collet/holder.
- Lower the spindle until the tip of the end mill is near the surface of the workpiece.
- With the spindle running at a low speed, use a piece of paper between the tool and the workpiece. Slowly lower the spindle until you feel the paper drag or tear.
- Set your Z-axis DRO or handwheel to zero. This is your starting point for the facing cut.
Pro Tip: Always start your facing cut slightly outside the edge of the workpiece. Don’t start the cut right at the edge. This allows the tool to enter the material smoothly and helps avoid damage to the tool and work if there’s any slight misalignment.
3. Setting Cutting Parameters (Speeds and Feeds)
This is where your material, the tool, and your machine all come into play. For beginners, it’s always safer to start conservatively and increase if conditions allow. Here are some general guidelines for machining carbon steel with a 40-degree TiAlN ball nose end mill. Always consult the tool manufacturer’s recommendations if available!
A good starting point for carbon steel (e.g., 1018, 4140) might look something like this:
| Operation | Spindle Speed (RPM) | Feed Rate (IPM or mm/min) | Depth of Cut (in or mm) |
|---|---|---|---|
| Rough Facing | 800 – 1500 RPM
(Adjust based on diameter and machine power) |
0.005 – 0.010″ per tooth (or 0.12 – 0.25 mm per tooth)
e.g., for a 2-flute tool: 0.010 – 0.020″ feed per revolution |
0.050″ – 0.100″ (1.2 – 2.5 mm) |
| Finishing Pass (Optional) | 1500 – 2500+ RPM
(Higher RPM often yields better finish) |
0.002 – 0.004″ per tooth (or 0.05 – 0.10 mm per tooth) | 0.010″ – 0.020″ (0.25 – 0.5 mm) |
Important Considerations for Speeds and Feeds:
- Tool Diameter: Larger diameter tools generally run slower.
- Number of Flutes: This tool is likely a 2-flute or 4-flute. For facing, 2 flutes are often preferred for better chip clearance. The “per tooth” values above are crucial.
- Machine Rigidity: A less rigid machine might require slower speeds and lighter cuts.
- Coolant/Lubrication: Using cutting fluid or coolant is highly recommended for carbon steel. It lubricates, cools, and helps flush chips away, significantly improving tool life and surface finish. Look for flood coolant systems or mist systems.
- Chip Evacuation: Ensure chips are being cleared from the cutting area. If chips are building up, you might need to reduce feed rate or increase coolant flow.
- Sound and Vibration: Always listen to your machine. A smooth, consistent cutting sound is good. Grating, squealing, or heavy vibration indicates a problem – stop and re-evaluate your setup or parameters.
For CNC machining, you can use online calculators or CAM software to determine optimal speeds and feeds based on your specific tool and material. A great resource for understanding cutting speeds and feeds is the National Institute of Standards and Technology (NIST), which provides valuable data for machinists. You can often find their guidelines through resources like their Tooling Data web pages.
Step-by-Step: Facing with Your 40-Degree TiAlN Ball Nose End Mill
Now for the fun part – making chips! We’ll cover both lathe and milling machine scenarios.
Facing on a Lathe
This is where a ball nose end mill truly shines for facing, effectively acting as a “fly cutter” or “shell mill” replacement in some cases.
- Prepare the Lathe: Mount the ball nose end mill securely in your tool post. Ensure the workpiece is solidly held, indicated for minimal runout, and that your Z-axis zero is set correctly at the face of the stock.
- Start the Spindle: Start the spindle rotating at your chosen speed. For facing with an end mill in a lathe, you’ll typically be using a relatively slow RPM, especially if your lathe can’t achieve very high speeds in its slowest gear.
- Engage the Cut: Using the cross-slide handle (which controls the Z-axis movement on a lathe), feed the end mill into the face of the workpiece. Start outside the diameter of the stock.
- Facing Pass: Slowly feed the tool across the face of the workpiece. The ball nose will leave a slightly contoured surface if the tool is not perfectly centered, but it’s generally very smooth. Aim to overlap your passes slightly to ensure complete coverage. As you reach the center, the tool will effectively “face off” the remaining material. On a lathe, the tool is usually stationary and the workpiece rotates.
- Plunge Cut (Optional for Center): If your tool setup allows, you might be able to “plunge” the ball nose into the center to blend it in, but often the final pass naturally handles the center.
- Back Off and Inspect: Once you’ve swept across the entire face, retract the tool and stop the spindle. Inspect your work. Is it flat? Is the finish acceptable?
- Adjust and Repeat: If the finish isn’t quite right, you can reduce the depth of cut and make another pass at a slightly higher RPM if possible. Ensure your Z-axis zero hasn’t drifted. For a superb finish, a very light finishing pass with the same tool (or a dedicated finisher) at a reduced depth of cut and increased RPM is often effective.
Facing on a Milling Machine
Here, the end mill rotates, and you feed it across the stationary (or moving) workpiece.
- Prepare the Mill: Mount your workpiece securely in the vise or on the table. Insert the 40-degree TiAlN ball nose end mill into the spindle collet/holder. Ensure your Z-axis zero is set correctly to the top surface of the stock. Turn on your coolant/lubrication system if using one.
- Start the Spindle: Start the spindle rotating at your chosen speed. Ensure you’re using a suitable RPM for your material and tool.
- Set Up for an Up-Cut or Down-Cut (Conventional vs. Climb Milling): For facing, especially with ball nose end mills, traditional “conventional milling” (where the cutter rotates against the feed direction) is often preferred by beginners as it tends to be more stable. However, “climb milling” (where the cutter rotates with the feed direction) can provide a better finish and reduce cutting forces if your machine has zero backlash in its feed mechanisms. For a beginner, stick with conventional milling unless you are confident in your machine’s rigidity and backlash control.
- Engage the Cut: With the spindle running, slowly feed the end mill downwards (if indicated on the top surface) or horizontally into the material (if facing the side of a block). Start your cut slightly outside the boundary of the stock.
- Facing Pass: Feed the end mill across the surface of the workpiece. For a good finish, ensure your feed rate per tooth is consistent. You’ll typically make multiple overlapping passes to cover the entire area. The ball nose geometry means each pass will have a smooth transition into the next.
- Retract and Inspect: Once you have covered the entire surface, retract the end mill from the workpiece and stop the spindle. Check your results. Is the surface flat and smooth?
- Adjust and Repeat: If needed, adjust your depth of cut for a finishing pass. A lighter depth of cut and a slightly higher RPM can often improve the surface finish significantly by letting the ball’s curvature do more of the blending work.
Safety First! Always wear safety glasses. Keep your hands away from moving parts. Ensure the workpiece is secure and that chips are being directed away from you.
Tips for Extended Tool Life and Better Finishes
Even with a tough tool like the TiAlN coated ball nose, a few extra tricks can help it last longer and produce even better results:
- Proper Coolant/Lubrication: Never skimp on this for carbon steel. It’s the best way to keep the TiAlN coating effective and prevent chip recutting and welding.
- Ch Angular Contact Bearings: Chip Control: When facing with a ball nose, chip evacuation is paramount. Coolant flow should be directed where chips exit. If you’re on a manual machine, you might need to periodically stop, clear chips, and then continue.
- Avoid Dwelling at the Center: On a lathe, if you feed straight into the absolute center and dwell, you can create excessive heat and wear on the tip. Try to have the tool sweep through the center rather than just stopping there.