Quick Summary:
Choosing the right tooling for your lathe is key to success. Investing in essential lathe tools like quality chucks, bits, and measuring devices makes machining easier, safer, and yields better results from your first project. This guide covers the must-have lathe tooling for beginners.
Tooling for Lathe: Proven Essential Gains for Beginners
Working with a lathe can feel a bit daunting at first. You might have a beautiful machine, but without the right attachments, it’s like having a powerful car without any wheels. Getting the correct tooling is the secret to unlocking your lathe’s potential and making each cut precise and frustration-free. This article will guide you through the essential tools every beginner needs. We’ll break down what each tool does and why it’s a smart investment for your workshop. Let’s get your lathe ready for action!
Why the Right Lathe Tooling Matters
Think of your lathe as the engine of your workshop. The tooling? That’s your steering wheel, your gears, and your fine-tuned suspension. Without them, you can’t go anywhere effectively. For beginners, this is especially true. Using the wrong tools, or low-quality ones, can lead to:
Poor surface finish: Your workpieces won’t look as smooth or professional.
Inaccurate dimensions: Cuts might be off, making your project unusable.
Increased frustration: Struggling with tools takes the joy out of making.
Safety risks: Slipping tools or unstable workpieces are dangerous.
On the flip side, investing in the right tooling for your lathe brings immediate, tangible benefits. You’ll find your work becoming more precise, your projects finished faster, and your confidence will soar. It’s about making your lathe work for you, not against you.
Essential Lathe Tooling: Your Starter Kit
Let’s dive into the core components you’ll need to get started. These are the workhorses that will handle the majority of your early turning tasks, whether you’re shaping wood or metal.
1. Lathe Chucks: The Grip of Precision
The chuck is arguably the most crucial piece of tooling for your lathe. It’s what holds your workpiece securely to the spindle, allowing it to spin at high speeds without coming loose. There are a few main types, but for beginners, two are most common:
3-Jaw (Self-Centering) Chucks: These are fantastic because all three jaws move in unison. When you tighten one side, the other two follow, naturally centering your workpiece. They are great for round or hexagonal stock and are very quick to use. They come in various sizes, so ensure you get one that fits your lathe’s spindle thread.
4-Jaw (Independent) Chucks: Each jaw on this type of chuck can be moved independently. This is incredibly useful for holding irregularly shaped pieces, mounting faceplates, or achieving very precise alignment for off-center work. While slightly slower to set up than a 3-jaw, their versatility is unmatched.
Why they are essential: A secure grip prevents accidents and allows for accurate turning. Without a reliable chuck, you can’t safely start any turning operation.
Tip: Always ensure you have the correct mounting adapter (backplate) for your lathe’s spindle thread to mount the chuck.
2. Lathe Tool Bits (Cutting Tools)
These are the sharp edges that do the actual work of shaping your material. Lathe tool bits are essentially hardened steel pieces that are held in a tool post and engage with the spinning workpiece. The type of material you’re working with (wood or metal) dictates the bit you’ll need.
For Metal Lathes:
High-Speed Steel (HSS) Bits: These are a great starting point for metal. They are relatively inexpensive and can be ground to various shapes for different operations like facing, turning, and threading. You’ll typically buy them as blanks and grind your own cutting edges, or purchase pre-ground inserts.
Carbide Inserts: These are small, hardened tips that are held in a tool holder. They cut much harder materials at higher speeds than HSS and last longer. While more expensive upfront, they can be more economical in the long run due to their durability and the fact that you only replace the insert, not the whole tool. Common shapes include positive and negative rake inserts.
For Wood Lathes:
Gouge: Used for shaping, roughing out material, and creating curves. There are different types, like spindle gouges (for long, thin pieces) and bowl gouges (for hollowing out).
Skew Chisel: Excellent for scraping cuts, creating smooth surfaces, and parting off work. They have a unique swept-back shape.
Scrapers: Used for finishing passes, especially on end grain or for creating flat surfaces on bowls or platters.
Parting Tool: A narrow, strong blade used to cut a workpiece off from the stock.
Why they are essential: These are your primary cutting implements. Having the right ones for your material ensures clean cuts, efficient material removal, and good surface finish.
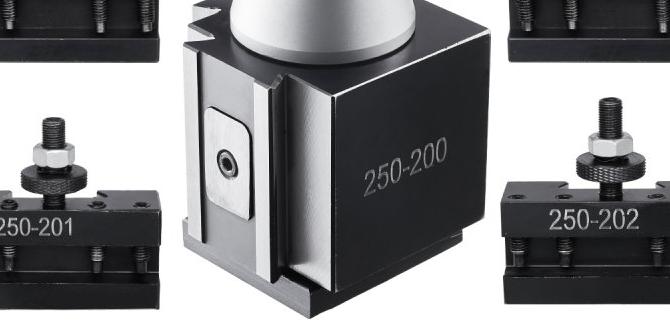
3. Tool Post and Holders
The tool post holds your cutting tools securely on the lathe bed, allowing you to adjust their height and position.
Four-Way Indexing Tool Post: Very common on smaller lathes, this allows you to rotate the tool holder to four different positions, holding four different tools. This means you can switch between roughing, finishing, parting, and drilling tools much faster than repositioning individual tools.
Quick-Change Tool Post (QCTP): A more advanced system, a QCTP allows you to quickly swap out tool holders without readjusting the tool height each time. This is a significant time-saver and accuracy booster, ideal for repetitive tasks or when you’re working on complex projects.
Why they are essential: A stable and adjustable tool post is critical for accurate cutting. It allows you to set the correct cutting angle and height for each tool, which directly impacts the quality of your work and the life of your cutting edges.
4. Lathe Centers: Supporting Your Work
When turning between centers (mounting your workpiece between two points), centers are essential for support and rotation.
Live Center: This center has a revolving bearing. It spins with your workpiece, reducing friction and heat. This is essential for longer pieces that might sag or when drilling through the workpiece.
Dead Center: A stationary center. It’s simpler and cheaper but can score your workpiece due to friction. Best used on the tailstock end for short, lightweight jobs where minimal friction is expected.
Why they are essential: Centers provide critical support for workpieces, especially long shafts or when drilling. A live center minimizes friction and prevents damage to your workpiece.
5. Measuring and Layout Tools
Precision is key in machining. You’ll need tools to measure your work accurately and mark it for cutting.
Calipers:
Outside Calipers: Used to measure the outside diameter of your workpiece.
Inside Calipers: Used to measure the inside diameter of holes or bores.
Dial Calipers / Digital Calipers: These are indispensable for accurate measurements. They can measure inside, outside, and depth, offering much higher precision than simple rule-based calipers. A good quality set is a worthwhile investment.
Micrometers: For extremely precise measurements, typically down to 0.0001 inches or 0.001 mm. You’ll need outside micrometers for external dimensions and possibly inside micrometers for bores.
Rulers and Tapes: Standard tools for quick, less precise measurements.
Scribes: Used to mark lines on your workpiece for cutting or reference.
Center Punch: Used to mark the exact center of a hole before drilling, preventing the drill bit from wandering.
Why they are essential: Machining is about precision. These tools allow you to verify your dimensions, ensure repeatability, and achieve the exact specifications required for your project. Accurate measurement prevents wasted material and ensures your finished parts fit as intended. You can’t make it right if you can’t measure it right.
6. Lathe Dogs (Clamp Dogs)
When turning between centers, a lathe dog is used to transfer the rotational drive from the lathe’s faceplate or drive plate to the workpiece. It simply clamps onto the workpiece and has an extended arm that fits into a slot on the drive plate.
Why they are essential: They allow the lathe’s power to turn the workpiece, ensuring consistent rotation when using centers.
7. Threading Tools (Taps and Dies)
If your projects involve creating or working with threads, you’ll need specialized tools.
Taps: Used to cut internal threads inside a pre-drilled hole.
Dies: Used to cut external threads onto a rod or bolt.
Why they are essential: For creating functional threaded components, taps and dies are necessary. They allow you to make fasteners, assemble parts, or create specialized fittings.
8. Grinding and Sharpening Supplies
Cutting tools, especially HSS bits and chisels for wood, will dull with use. Keeping them sharp is vital for good performance and safety.
Bench Grinder: A bench grinder with different grit wheels is excellent for rough shaping and initial sharpening of metal bits and wood chisels.
Sharpening Stones (Whetstones): For finer honing and achieving a razor-sharp edge on turning tools and chisels. Water stones or oil stones are common.
Honing Guides: Help maintain a consistent angle while sharpening.
Why they are essential: Sharp tools cut cleaner, require less force, and are much safer to use. A dull tool is more likely to slip or chatter, leading to poor results and potential accidents.
Organizing Your Lathe Tooling: Keeping it Safe and Accessible
With all these essential tools, it’s easy for a workbench to become cluttered. Good organization is key to safety and efficiency.
Here’s a quick guide to keeping your lathe tooling in order:
Tool Chests and Drawers: Use dedicated drawers with inserts or foam cutouts to keep bits and measuring tools from rolling around and getting damaged.
Pegboards: Ideal for hanging frequently used chisels, gouges, and wrenches. Ensure they are securely hung.
Tool Holders: Keep your QCTP or indexable tool holders organized and readily accessible.
Labeling: For more complex setups or if you have multiple similar tools, consider labeling them.
A well-organized workspace is a safer and more productive workspace. It reduces the time spent searching for the right tool and minimizes the risk of dropping or damaging delicate instruments.
Understanding Specifications: Choosing the Right Size
When purchasing tooling, especially chucks, Morse taper arbors, and tool holders, you’ll encounter specifications for size and fit. Understanding these will save you a lot of headaches.
| Specification | What it Means | Why it Matters |
|---|---|---|
| Lathe Spindle Thread Size | e.g., 1″-8 TPI (Threads Per Inch) or M30x3.5 | Determines which chuck backplates or faceplates will directly thread onto your lathe. |
| Morse Taper (MT) Size | e.g., MT1, MT2, MT3, MT4 | Standardized taper sizes for morse taper shanks, used for centers, drill chucks, and certain tool holders. Ensure tailstock and headstock tapers match or use adapters. |
| Tool Holder Size (for QCTP) | e.g., 10x10mm, 1/2″ square, 25mm | The maximum size of the tool shank that the tool holder can accommodate. |
| Cutting Insert Size/Code | e.g., CNMG432, TPG431 | Standardized codes that define the shape, size, and edge geometry of carbide inserts. |
Always refer to your lathe’s manual for specific specifications. If unsure, measure your spindle thread diameter and pitch or the taper of your tailstock quill. Many online machining forums and resources can help you identify common thread sizes for different lathe models.
Safety First: Always
Before we wrap up, a critical reminder about safety. Lathes are powerful machines, and proper tooling is part of safety, but it’s not the whole story.
Read Your Manuals: Understand your lathe’s operation and limitations.
Wear Safety Glasses: Always, without exception.
No Loose Clothing or Jewelry: These can get caught in moving parts.
Keep Guards in Place: If your machine has guards, use them.
Secure Your Workpiece: Double-check that your chuck or centers are tight.
Use Sharp Tools: Dull tools are dangerous.
Clear the Chip Tray Regularly: Metal chips can be sharp.
Never Leave a Running Lathe Unattended.
A fantastic resource for machining safety is the Occupational Safety and Health Administration (OSHA), which provides extensive guidelines on safe practices in metalworking environments. While some regulations are for industrial settings, the principles of safe operation are universal.
Beyond the Basics: What’s Next?
Once you’re comfortable with these essential tools and operations, you might want to explore more specialized tooling:
Drill Chucks and Morse Taper Adapters: For drilling holes accurately.
Knurling Tools: To create textured grips on workpieces.
Boring Bars: For accurately enlarging and finishing internal diameters.
Lathe Steady Rests and Follow Rests: To support long, thin workpieces and prevent vibration or bending.
Tool Grinding Jigs: To help achieve precise angles when sharpening HSS tools.
Don’t feel pressured to buy everything at once. Start with the essentials, gain experience, and then gradually add tools as your projects demand them.
Frequently Asked Questions
What are the absolute must-have tools for a beginner metal lathe?
For a beginner metal lathe, the absolute must-haves are a quality 3-jaw chuck with a backplate for your spindle, a set of basic HSS or carbide turning and facing tools, a sharpener for your tools (if using HSS), and a reliable digital caliper. Add a live center and dog for turning between centers.
What’s the difference between HSS and carbide cutting tools?
High-Speed Steel (HSS) tools are tougher and easier to sharpen but wear faster and can’t cut as hard materials or at as high speeds as carbide. Carbide tools are very hard and wear-resistant, allowing faster cutting and a better finish on a wider range of materials, but they are more brittle and can chip or break if subjected to shock or incorrect use.
How do I know what size chuck to buy for my lathe?
You need to know your lathe’s spindle nose thread specification. This is usually found in your lathe’s manual. It’s typically listed as diameter and threads per inch (e.g., 1″-8 TPI) or a metric equivalent. Chucks come with specific backplates that thread onto this spindle nose. You can also find universal backplates to which you can attach chucks with matching bolt patterns.
What is a Morse Taper and why is it important?
A Morse Taper (MT) is a standardized system of conical shanks used on many machine tools. Lathes use MT for their tailstock quills and sometimes for headstock spindles. Tools like centers, drill chuck arbors, and some boring bar holders have Morse Taper shanks. You need to match the MT size of your tool to the MT receptacle on your lathe, or use an adapter. MT2 and MT3 are very common on smaller bench lathes.
Can I use woodworking lathe chisels on a metal lathe, or vice versa?
No, you generally cannot. Woodworking chisels are designed for much softer materials and have different geometries, often being thinner and meant for scraping or paring. Metal lathe tools are made from much harder steels (HSS or carbide) with specific rake and clearance angles designed to shear metal efficiently and withstand higher forces. Using the wrong type of tool