Wood lathe polishing paste for bowls creates a smooth, glossy finish, transforming your turned projects from rough to remarkably professional, even for beginners. Follow this essential guide to master the technique.
Turning a beautiful wooden bowl on your lathe is a fantastic feeling, but what happens when you’re done shaping and it still doesn’t look quite right? Often, the final finish is what makes a good bowl great. If you’re struggling to achieve that showroom shine, you’re not alone. Many beginners find it tricky to get that perfect, glass-like surface on their turned wood. But don’t worry! This guide will walk you through everything you need to know about using wood lathe polishing paste for bowls, step-by-step. We’ll break down what paste is, why it’s so effective, and how to use it safely to get stunning results every time. Get ready to see your bowls transformed!
What is Wood Lathe Polishing Paste?

Imagine a super-fine abrasive suspended in a creamy or waxy base. That’s essentially what wood lathe polishing paste is! It’s a specialized product designed to work with the high speeds of a wood lathe to bring out the natural beauty of wood. Unlike coarser sandpaper, polishing paste contains extremely small abrasive particles that gently smooth the wood surface, refining it to a high gloss. It works by microscopically abrading the surface, removing any remaining tool marks or faint scratches left from the final sandpaper grits.
Think of it as the final polish after you’ve already sanded your bowl as smooth as you can. Even if you’ve gone through grits all the way to 320, 400, or even 600, there are always tiny imperfections. Polishing paste acts like a final, ultra-fine sanding and buffing stage all in one. It’s this ability to refine the surface at a microscopic level that gives your bowls that incredible depth and shine.
Why Use Polishing Paste for Bowls?

Using a polishing paste offers several key advantages for woodturners, especially when finishing bowls:
- Superior Sheen: This is the primary reason. Polishing paste delivers a deep, lustrous shine that is incredibly difficult to achieve with just sandpaper. It brings out the wood’s natural grain and color in a way that truly impresses.
- Refines Fine Scratches: Even after meticulous sanding, microscopic scratches remain. Polishing paste effectively removes these, creating a perfectly smooth surface that catches light beautifully.
- Builds Layers of Finish: Many pastes are designed to work in conjunction with other finishes, like friction polish or wax. The paste refines the wood, and then the top coat seals and protects it, enhancing the gloss.
- Speed and Efficiency: While it requires care, polishing paste can often achieve a high-gloss finish faster than relying solely on increasingly fine grits of sandpaper and buffing wheels.
- Versatility: Different pastes cater to different wood types and desired finishes, offering a flexible solution for various projects.
For bowls, where the entire exterior and often the interior are on display, achieving a flawless finish is crucial. The curves and open surfaces of a bowl are perfect canvases for showcasing the results of a good polishing paste application. It’s the secret weapon for making your turned pieces truly pop.
Types of Wood Lathe Polishing Pastes
Not all polishing pastes are created equal. They generally fall into a few categories based on their abrasive type and intended finish:
Abrasive Types
- Aluminum Oxide: A very common and effective abrasive. It’s sharp and durable, providing consistent cutting action. It’s found in many general-purpose polishing pastes.
- Silicon Carbide: Another excellent abrasive. Silicon carbide particles are harder and tend to break down more evenly than aluminum oxide, often resulting in a slightly finer finish.
- Diatomaceous Earth: This is a very fine, natural abrasive derived from fossilized algae. It’s exceptionally gentle and is often used for final polishing stages or for very soft woods.
- Proprietary Blends: Many manufacturers use their own unique blends of abrasives, often combined with specialized waxes and solvents, to achieve specific cutting and finishing properties.
Finish Characteristics
- High Gloss Pastes: These are formulated to quickly bring wood to a very high shine with minimal effort. They often contain finer abrasives and lubricating agents.
- Buffing Compounds: Sometimes used interchangeably with polishing pastes, these can range from slightly abrasive to very fine polishing agents. They are designed to be buffed into the wood, often with power tools or buffing wheels.
- Micro-Mesh or Abrasive Pads: While not strictly a paste, specialized abrasive pads like Micro-Mesh work on a similar principle, using graded abrasive sizes to achieve a polished finish. Many paste products are designed to be used in conjunction with these or similar systems.
Considerations When Choosing
- Wood Type: Softer woods might require finer abrasives and gentler application to avoid “burning” or gouging. Hardwoods can typically handle more aggressive polishing.
- Desired Sheen: Do you want a satin finish, a semi-gloss, or a mirror-like shine? Choose a paste that aligns with your goal.
- Compatibility with Other Finishes: If you plan to apply wax or another topcoat, ensure the polishing paste won’t interfere. Often, pastes are designed to prep the surface for these topcoats.
- Safety and Odor: Some pastes can be dusty or have strong fumes. If you’re sensitive, look for water-based or low-odor options.
A good starting point for beginners is a general-purpose, water-based or solvent-based polishing paste known for producing a high gloss. Brands like Diamond, Fusion, or HUT Polishes offer excellent options. For more in-depth information on abrasive technologies and woodworking finishes, resources like Wood Magazine’s finishing guides can be invaluable.
Essential Tools and Materials
To use wood lathe polishing paste effectively and safely, you’ll need a few key items:
- Wood Lathe: Of course! Ensure it’s in good working order and securely mounted.
- Bowl Turning Tools: Your standard set of gouges, scrapers, and parting tools for shaping.
- Sanding Supplies: A range of sandpaper grits, from around 80-120 up to at least 320 or 400, and possibly higher (up to 600 or 800 grit for very smooth finishes). Orbital sanders can also be helpful for larger exterior surfaces.
- Wood Lathe Polishing Paste: Your chosen product.
- Applicators:
- Paper Towels or Cotton Cloths: For applying the paste and buffing. Lint-free is best.
- Foam Applicators: Some woodturners prefer foam for even application.
- Buffing Wheels/Pads: If your paste is designed for buffing, you might use a dedicated buffing wheel or pad attachment for your lathe.
- Safety Gear:
- Safety Glasses/Face Shield: Absolutely non-negotiable when operating a lathe.
- Hearing Protection: Lathes can be noisy.
- Dust Mask/Respirator: Especially important when sanding and when the paste produces dust.
- Appropriate Clothing: No loose sleeves, jewelry, or long hair that can get caught.
- Optional:
- Rubbing Alcohol or Mineral Spirits: For cleaning the surface before applying paste, especially with solvent-based pastes.
- Lathe Speed Control: Crucial for managing the speed during the polishing process.
Having everything prepared before you start will make the process much smoother and safer. Think of it like preparing your workbench before a critical woodworking project; good prep equals good results.
Step-by-Step Guide to Using Polishing Paste on Bowls
Achieving a flawless polished finish requires patience and attention to detail. Here’s how to do it:
Step 1: Prepare Your Bowl
This is the most critical step. Your bowl must be sanded to at least 320 or 400 grit before you even open the can of polishing paste. Wood lathe polishing paste is not a substitute for sanding; it’s the final refining step.
- Start with your lowest grit sandpaper (e.g., 80 or 120) and work your way up.
- Ensure you sand evenly, following the grain as much as possible.
- On a bowl, this means sanding in the direction of the curve as you turn the lathe.
- For the inside of the bowl, you might need to use a sanding attachment or sandpaper wrapped around a block.
- Wipe away dust between grits.
- For the final sanding, use grits up to 400, 600, or even 800 if you desire an exceptionally smooth surface to start with.
Once you’ve completed your final sanding grit, clean the bowl thoroughly to remove all dust. A tack cloth or a slightly damp cloth works well. For solvent-based pastes, a quick wipe with mineral spirits can be beneficial to remove any lingering residues.
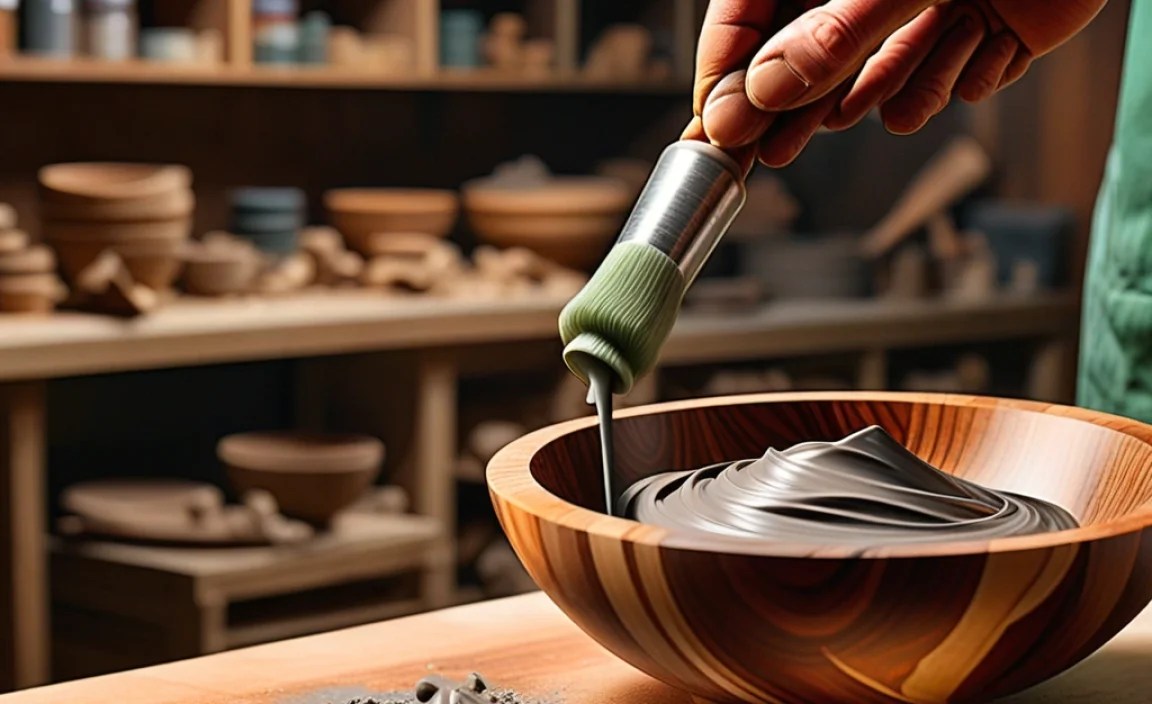
Step 2: Apply the Polishing Paste
This can be done with the lathe running at a slow speed or even stopped, depending on the paste and your preference. A slow speed is generally safer and more controllable for beginners.
Lathe Speed: Start with a slow lathe speed. For a typical bowl (say, 6-8 inches in diameter), speeds between 300-600 RPM can be effective. The goal is to have the paste rub onto the wood without excessive heat generation. You can always increase speed later if needed and you’re comfortable doing so.
Application Method (Cloth/Paper Towel):
- Take a clean paper towel or lint-free cloth.
- Apply a small amount of polishing paste to the cloth. You don’t need a lot – a dab the size of a dime or quarter is usually sufficient for a section of the bowl.
- Hold the cloth against the spinning surface of the bowl. Let the friction of the spinning wood transfer the paste.
- Work your way around the entire surface of the bowl, ensuring even coverage.
- For concave areas (inside the bowl), you might need to fold the cloth or use a specialized applicator to reach.
Application Method (Foam Applicator/Buffing Wheel):
- If using a foam applicator, put a small amount of paste on the foam.
- Gently bring the foam applicator into contact with the spinning bowl surface, working it around evenly.
- If using a buffing wheel designed for paste, you would typically apply the paste to the wheel and then the wheel to the spinning project. This is usually done at higher speeds but requires more caution.
The goal is to get a thin, even layer of paste onto the wood surface.
Step 3: Buff the Paste
Once the paste is applied, it’s time to buff it in and bring out the shine. This is where the magic happens.
- Maintain Slow Speed: Keep the lathe running at a slow to medium RPM.
- Use a Clean Cloth: Take a separate, clean, lint-free paper towel or cloth.
- Buff Vigorously: Hold this clean cloth against the spinning bowl. Apply moderate pressure. The friction will begin to work the paste into the wood and start to polish the surface.
- Work in Sections: Move the cloth around the bowl, covering all areas. You’ll see the paste begin to dry or become clear, and the wood underneath will start to show a gloss.
- Reapply if Needed: If you encounter a spot that isn’t polishing well, you might need to apply a tiny bit more paste to that specific area and buff again, or simply buff more vigorously.
- Increase Speed (Optional, with Caution): Some woodturners like to gradually increase the lathe speed as they buff. This can help generate a bit more friction and a higher shine. However, always be mindful of the speed and your workpiece. If the wood feels like it’s getting too warm or you’re losing control, reduce speed immediately.
Continue buffing until you achieve the desired level of shine. You’ll notice the haze from the paste disappearing as the gloss emerges.
Step 4: Final Buff and Clean-Up
Once you’re happy with the polish, it’s time for the final buff and clean-up.
- Final Buff: Take a third, completely clean and dry, lint-free cloth.
- Lightly Buff: Give the entire bowl a final light buff. This removes any remaining paste residue and gives the surface a final bit of polish to make it super smooth and fingerprint-resistant.
- Inspect: Turn off the lathe and inspect your bowl. Look at it under good light from different angles. You should see a significant improvement in gloss and smoothness.
- Clean Your Tools: Wipe down your tools and applicators, as paste residue can harden if left.
If you are planning to apply a wax or lacquer finish, the bowl is now perfectly prepared for it. Many people find that a simple application of a good quality paste wax after the polishing paste provides an extra layer of protection and a wonderful tactile feel.
Tips for Success
Here are some extra pointers to help you nail that perfect polished finish:
- Start with a Clean Surface: I can’t stress this enough! Any dust or debris will be buffed into your finish, creating an undesirable look.
- Less is More: Don’t over-apply the paste. A thin, even coat is more effective and easier to buff out than a thick glob.
- Consistent Pressure: Try to apply consistent pressure with your buffing cloth for an even shine.
- Work in Good Light: Proper lighting will help you see any areas you’ve missed or that need more attention.
- Consider Wood Properties: Very porous woods might absorb more paste and require a bit more buffing. Dense hardwoods often polish up very quickly.
- Practice on Scraps: If you’re new to polishing paste, try it on some scrap wood first to get a feel for how it works, the speeds, and the amount of pressure.
- Safety First: Always wear your safety glasses. Be aware of your surroundings and keep your hands and tools clear of the rotating workpiece. If dust is an issue, wear a respirator. For more on workshop safety, check out resources from organizations like OSHA’s woodworking safety guidelines.
Remember that practice makes perfect. Each bowl you finish will teach you something new about how the wood behaves and how the paste works. Don’t get discouraged if your first attempt isn’t flawless. Keep at it, and you’ll soon be producing bowls with stunningly polished finishes!
Common Problems and Solutions
Even with a good guide, you might run into a few snags. Here’s how to tackle common issues:
- Cloudy or Hazy Finish:
- Cause: Not enough buffing, too much paste left on the surface, or the paste wasn’t completely worked in.
- Solution: Get a clean cloth and buff more vigorously for a longer period. Ensure you use a final buff with a completely dry cloth to remove all residue. You might need to apply a tiny bit more paste and buff again.
- Uneven Sheen:
- Cause: Inconsistent application of paste or inconsistent buffing pressure.
- Solution: Ensure you applied an even coat of paste. Use consistent pressure and circular motions with your buffing cloth. Work in smaller sections for better control.
- “Burning” or Dark Spots:
- Cause: Lathe speed too high, too much friction from buffing, or applying too much pressure for too long in one spot. This is more common with aggressive pastes or very soft woods.
- Solution: Reduce your lathe speed. Use lighter pressure when buffing. If you notice a dark spot forming, stop immediately, let it cool (if it feels warm), and try to gently buff it out with a clean cloth. You may need to re-sand the affected area if it’s severe.
- Sticking Paste or Cloth:
- Cause: Trying to buff when the paste is still too wet, or using a cloth that’s too thin or tears.
