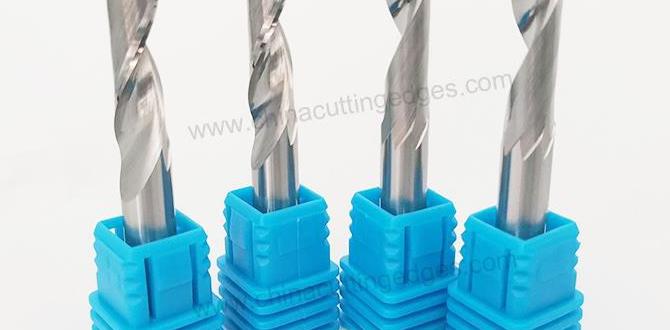
A 1/8-inch carbide end mill is essential for achieving a pristine, mirror-like finish on acrylic. Using the right tool, specifically designed for plastics, ensures clean cuts without melting or chipping, making your projects look professional and smooth.
Working with acrylic can be a bit tricky, especially when you want those super clean, smooth edges that really make a project pop. Many beginners find themselves battling melted plastic, rough cuts, or unsightly chips. It’s frustrating when your hard work doesn’t look quite as sharp as you imagined! But don’t worry, the secret to that perfect, glossy finish often comes down to one small but mighty tool: the 1/8-inch carbide end mill. When chosen correctly, this little powerhouse can transform how you cut acrylic, making the process smoother and your results much more professional. We’ll walk through why it’s so important and how to use it to get that flawless mirror finish you’re aiming for.
Why Your Acrylic Projects Need a 1/8-Inch Carbide End Mill
When you’re cutting acrylic, the goal is to slice through it cleanly, like a hot knife through butter, not to drag and melt your way through. This is where the right cutting tool makes all the difference. For a 1/8-inch diameter end mill, specifically one made from carbide and designed for plastics, it’s a game-changer.
The Magic of Carbide for Plastics
Carbide is a super-hard material that holds its edge much longer than traditional high-speed steel (HSS) bits. This hardness is crucial for cutting plastics like acrylic. Here’s why:
- Heat Dissipation: Acrylic melts at relatively low temperatures. A sharp, durable carbide cutter can slice through the material quickly, generating less friction and therefore less heat, which helps prevent melting.
- Edge Retention: Because carbide stays sharp, it makes cleaner cuts every time. A dull bit will snag and tear the acrylic, leading to a rough surface.
- Smoothness: The precise geometry of carbide end mills, especially those designed for plastics, allows them to shear the material cleanly, leaving behind a polished surface.
The Importance of a 1/8-Inch Diameter
Why 1/8 inch? This size is incredibly versatile for detailed work on acrylic:
- Fine Details: It’s perfect for cutting out intricate designs, small lettering, or precise shapes that larger bits would simply obliterate.
- Edge Quality: Smaller diameter tools can often achieve a better finish on plastics because they remove less material at once, reducing the chance of stress on the acrylic.
- Working with Sheet Stock: For most common acrylic sheet thicknesses (e.g., 1/8″, 1/4″, 1/2″), a 1/8-inch bit is ideal for profiling and cutting paths without excessive material removal or potential for chatter.
The “Mirror Finish” Promise
When we talk about a “pristine” or “mirror finish” on acrylic, we mean an edge that is so smooth and clean it looks polished, almost like a mirror. This isn’t achieved with brute force, but with a clean shear. A specialized 1/8-inch carbide end mill, often with specific flute designs and coatings, is engineered precisely for this – to cut acrylic so cleanly that minimal to no secondary polishing is required. This capability is particularly valuable when working on projects where aesthetics are paramount, such as signage, displays, or decorative art pieces.
Choosing the Right 1/8-Inch Carbide End Mill for Acrylic
Not all 1/8-inch carbide end mills are created equal, especially when it comes to cutting acrylic. You need a tool that’s been designed with plastics in mind. Look for these key features:
Key Features to Look For:
- Specific Flute Design: For acrylic, you generally want a high-performance, single-flute (1-flute) or two-flute (2-flute) end mill. Single-flute bits excel at clearing chips quickly and reducing heat buildup, which is critical for preventing acrylic from melting. Two-flute bits can offer a slightly better surface finish in some cases. Avoid bits with many flutes (like 3 or 4), as they can pack chips and generate excessive heat.
- Polished Flutes: End mills with highly polished flutes help chips flow away from the cutting edge more easily. This further reduces friction and the chance of melted plastic re-welding to the cutter.
- Sharp Cutting Edges: Look for bits with extremely sharp, crisp cutting edges. This is crucial for shearing rather than burning the acrylic.
- Material and Coating: While carbide is the base material, sometimes specific grades of carbide are used. Coatings aren’t always necessary or beneficial for acrylic, so focus on the polished flutes and geometry.
- “Plastic” or “Acrylic” Specificity: Many manufacturers will explicitly label end mills as being suitable for plastics or specifically acrylic. These have been optimized for these materials.
- “Up-cut” vs. “Down-cut” vs. “Compression”:
- Up-cut: Pulls chips up and away from the material. Good for general cutting.
- Down-cut: Pushes chips down into the material. Can help hold thin material down and give a cleaner top edge, but chips can be pushed back into the cut, potentially causing re-melting. Often used in nesting or with vacuum hold-down.
- Compression: A combination of up-cut and down-cut flutes on the same bit. This is excellent for achieving a perfect finish on the top and bottom of the material simultaneously, especially useful for through-cutting thin acrylic.
Shank Diameter Considerations
While the cutting diameter is 1/8 inch, the shank diameter is also important. A common shank for a 1/8-inch cutter is often 1/8 inch as well, but you might also find them with 6mm shanks. A 1/8-inch shank fits standard 1/8-inch collets or chucks. A 6mm shank is very close to 1/4 inch (0.236 inches) and requires appropriate collet reduction or a specific collet if your machine uses metric tooling. Ensure your machine’s collet system can accommodate the shank size of the end mill you choose.
Extra Long for Acrylic?
The term “extra long” can sometimes apply to the overall tool length or the flute length. For acrylic, a longer flute length might be beneficial if you need to cut deeper than typical for the diameter. However, for most standard acrylic sheet cutting, a standard flute length is usually sufficient. The key is the quality of the cutting edge and flute design, not necessarily extreme length.
Setting Up Your CNC for Success
Even with the perfect end mill, how you use it on your CNC router or milling machine is critical. Proper setup prevents frustration and ensures that beautiful mirror finish.
Speeds and Feeds: The Golden Rule
This is perhaps the most crucial part of cutting accurate and clean materials like acrylic. If your speeds and feeds are wrong, you’ll get melting, chipping, or break the bit.
Spindle Speed (RPM):
- For acrylic, you generally want to run at higher spindle speeds. This helps the cutter slice through the material quickly, reducing the time heat has to build up. Start in the range of 18,000 – 24,000 RPM.
- The optimal RPM depends on your specific machine and the exact material of the acrylic.
Feed Rate (IPM or mm/min):
- This is how fast the cutter moves through the material. You need a relatively fast feed rate to ensure the cutter is removing material rather than rubbing and generating heat.
- A good starting point for a 1/8-inch bit in acrylic might be between 20-40 inches per minute (IPM) or about 500-1000 mm/min.
- Chip Load: A more advanced concept is chip load, which is the thickness of the chip each flute is removing. For plastics, a chip load between 0.003″ to 0.005″ is often recommended for a 1/8″ bit. This relates directly to your RPM and feed rate (Feed Rate = RPM x Number of Flutes x Chip Load). Experimentation is key here.
Depth of Cut
For a 1/8-inch end mill, especially in thinner acrylic, you want to take light passes. This means cutting only a fraction of the tool’s diameter (or the material thickness) at a time.
- Recommended Depth of Cut: Start with a depth of cut that is roughly 25-50% of the tool diameter. For a 1/8-inch bit, this means cutting no more than 1/32″ to 1/16″ (0.03″ to 0.06″) per pass.
- Taking multiple shallow passes is far better than one deep pass. This reduces the load on the bit, minimizes heat, and prevents chatter.
Cooling and Lubrication (Optional but Recommended)
While some machinists cut acrylic dry, a little help can go a long way in preventing melting and improving finish.
- Compressed Air: A blast of compressed air directed at the cutting zone is often sufficient to keep the acrylic cool and blow away chips.
- Specialized Coolants: For more demanding cuts or if you consistently experience melting, a dedicated plastic coolant or a misting system can be used. Avoid standard metalworking coolants with oils, as they can contaminate or damage acrylic.
- Water: In some cases, a light mist of water can help. Always test this on scrap first.
Step-by-Step Guide to Cutting Acrylic with Your 1/8-Inch End Mill
Let’s get ready to cut! Follow these steps to achieve that beautiful, clean edge.
1. Prepare Your Workspace and Material
Safety first! Ensure your CNC machine is stable and that you have proper dust collection if needed (acrylic dust can be fine). Secure your acrylic sheet firmly to your worktable using clamps or a vacuum hold-down system. Make sure the material is completely flat and won’t move during the cut.
2. Select and Install Your End Mill
Choose the specialized 1/8-inch carbide end mill for plastics. Install it securely in your CNC machine’s collet. Double-check that it’s seated properly and that the collet is the correct size for the shank diameter (e.g., 1/8-inch collet for a 1/8-inch shank). A slightly loose end mill can cause runout, vibration, and poor cuts.
3. Set Up Your CAM Software (or Manual Controls)
In your CAM software (like Fusion 360, VCarve, Easel, etc.), set up your tool path.
- Tool Definition: Accurately define your 1/8-inch diameter end mill, including its diameter, number of flutes (usually 1 or 2 for acrylic), and any specific geometry if available.
- Cutting Parameters: Input your spindle speed (RPM) and feed rate. Start with conservative settings based on the recommendations above (e.g., 18,000 RPM, 30 IPM).
- Depth of Cut: Set your depth of cut per pass to be conservative, around 1/16″ (0.06″) or less.
- Stepover: This is how much the tool moves sideways between passes. For cutting outlines, you’ll generally want a 100% stepover (cutting along the entire diameter of the tool). For pocketing, a stepover of 30-50% is common.
- Tabs: For pocketing or cutting out parts, remember to add tabs in your CAM software. These are small sections of material left uncut to hold the workpiece in place until the very end, preventing it from shifting or becoming a projectile.
4. Perform a “Dry Run”
Before cutting into your acrylic, run the CNC through the entire program with the spindle OFF. Watch the cutting head to ensure it follows the correct path, stays within the material boundaries, and doesn’t crash into any clamps or fixtures. This is a crucial safety step.
5. Home the Z-Axis and Set Zero
Carefully jog your CNC machine to the surface of the acrylic. Use a reliable method to set your absolute Z-zero. This could be a Z-probe, a touch plate, or manually jogging down until the bit just touches the surface (using a piece of paper as a feeler is common). Ensure your Z-zero is precise.
6. Begin the Cut
Start the CNC program. Keep an eye on the cutting process. Listen for any unusual noises or signs of stress. If you have compressed air, ensure it’s blowing on the cutting area.
Observe the chips: Ideally, you want to see small, wispy chips being ejected. If you see long, stringy strands or melting plastic, stop the machine and adjust your feed rate (increase it) or depth of cut (decrease it). The goal is a clean shearing action.
7. Complete the Cut and Remove Tabs
Once the CNC has finished, carefully remove the finished piece. If you used tabs, you’ll need to carefully cut them free using a utility knife, flush-cut saw, or another small bit on your CNC. Be gentle to avoid scratching the surface of your acrylic.
8. Inspect the Finish
Examine the edges of your cut acrylic. If you followed the steps and used the right end mill, you should have a clean, smooth edge that looks like it’s been polished. For many projects, no further finishing will be needed!
Troubleshooting Common Issues
Even with the best intentions and tools, you might run into a few snags. Here’s how to fix them:
Issue 1: Melting/Welding Plastic
- Cause: Too much heat. This can be from a feed rate that’s too slow, a depth of cut that’s too deep, or insufficient chip evacuation.
- Solution:
- Increase feed rate.
- Decrease depth of cut per pass.
- Ensure your end mill has polished flutes and is designed for plastics.
- Use compressed air or a coolant mist.
- If using a 2-flute, try a 1-flute bit.
Issue 2: Chipping or Cracking
- Cause: The material is being ripped rather than cut. This can happen with a dull bit, a feed rate that’s too fast, or too much vibration.
- Solution:
- Ensure your end mill is sharp and suitable for acrylic.
- Decrease feed rate.
- Ensure your acrylic is securely held and not flexing.
- If “compression” bits are used incorrectly, they can cause edge issues. Confirm correct usage.
Issue 3: Fuzzy or “Friction Welded” Edges
- Cause: Similar to melting, but can also be caused by very low spindle speeds leading to rubbing.
- Solution:
- Increase spindle speed (RPM).
- Ensure your feed rate is appropriate for the RPM.
- Use a sharper, better-suited end mill.
Issue 4: Poor Surface Finish on Top/Bottom
- Cause: Varies depending on where the issue is. Top edge fuzz can be from spindle speed, feed rate or upward force. Bottom edge fuzz can be from the bit exiting the material with too much force or chipping.
- Solution:
- For top edges: Ensure sufficient spindle speed and an appropriate feed rate. Try a down-cut or compression bit.
- For bottom edges: Reduce the Z-axis plunge feed rate at the end of the cut. Ensure the bit isn’t dull. If cutting all the way through, a compression bit is ideal where the up-cut section clears chips and the down-cut section smooths the top.
When to Consider Other Tools or Techniques
While the 1/8-inch carbide end mill is king for precise cuts and excellent finishes on acrylic, there are times when you might augment your toolkit or choose different approaches:
For Larger Areas or Faster Removal:
- Larger Diameter End Mills: If you’re cutting out large shapes quickly and a mirror finish isn’t critical on the edge, you might opt for a 1/4-inch or larger plastic-specific end mill. You’ll likely need to adjust speeds, feeds, and depth of cut accordingly.
- Straight-Cutting Bits: For very simple, large profiles where edge quality is secondary, a standard straight-cutting end mill can do the job efficiently, provided you manage heat.
For Ultra-High Gloss Edges (Beyond Machining):
- Flame Polishing: After cutting with an end mill, the edges can be smoothed to a glass-like shine using a controlled flame from a propane torch. This requires practice and care to avoid melting the entire piece. It’s an