For a successful cut in stainless steel, a high-quality 3/16-inch carbide end mill, often with an 8mm shank and specifically designed for stainless, is your best bet. It offers the durability and heat resistance needed for tough materials, ensuring cleaner finishes and longer tool life.
Working with stainless steel on your mill can be a bit tricky. It’s a tough metal, known for its strength and resistance to corrosion, which is great for the final product but can be a pain when you’re trying to machine it. Many beginners find they burn through tools or get rough surfaces. But don’t worry, with the right setup and the right tool, it’s totally achievable! A proper 3/16-inch carbide end mill is a fantastic choice when you’re facing this challenge.
In this guide, I’ll walk you through exactly why a 3/16″ carbide end mill is your go-to for stainless steel, what to look for when choosing one, and how to use it effectively. We’ll cover everything from speeds and feeds to keeping your workpiece cool, so you can get those clean, precise cuts you’re aiming for. Let’s get your milling jobs on stainless steel running smoothly!
Why a 3/16″ Carbide End Mill is Key for Stainless Steel
Stainless steel is a dream material for many applications, but it presents unique challenges for machinists. Its hardness, tendency to work-harden, and low thermal conductivity mean you need tools that can handle the heat and stress without breaking down. This is where a 3/16-inch carbide end mill shines.
The Toughness of Stainless Steel
Stainless steel, like popular grades 304 or 316, is alloyed with chromium and often nickel. This makes it resistant to rust and corrosion, but it also makes it significantly harder and tougher than mild steel or aluminum. When you try to cut it with less robust tooling, you can run into several problems:
Excessive Heat Buildup: Stainless steel doesn’t transfer heat well. This means the heat generated by cutting stays concentrated at the cutting edge of your tool.
Work Hardening: As you cut stainless steel, the metal immediately around the cut gets harder. This makes subsequent cuts even more difficult, leading to tool wear or breakage.
Chipping and Material Welding: Without the right tool and parameters, the material can chip aggressively or even weld onto the cutting edge, ruining the finish and damaging the tool.
Carbide: The Material of Choice
Tungsten carbide, the primary material in carbide end mills, is incredibly hard and brittle. This toughness is essential for cutting hard materials like stainless steel. Compared to High-Speed Steel (HSS) tools, carbide offers several advantages:
Superior Hardness: Carbide is significantly harder than HSS, allowing it to resist wear and maintain a sharp edge for longer, especially at higher cutting speeds.
Heat Resistance: Carbide can withstand much higher temperatures than HSS before softening. This is crucial for machining stainless steel, where heat is a major factor.
Rigidity: Carbide tooling is generally more rigid, which helps in achieving tighter tolerances and better surface finishes.
The 3/16″ Size Advantage
The 3/16-inch (approximately 4.76mm) diameter is a versatile size. For beginner machinists and hobbyists, it’s often a practical choice for:
Detail Work: It’s small enough to get into tighter areas for profiling or slotting, but substantial enough for general milling operations.
Material Removal: While not a large diameter for heavy stock removal on huge parts, it’s excellent for the detailed work, pockets, and contours common in smaller projects or prototypes.
Machine Capabilities: Many hobbyist and entry-level milling machines have the rigidity and power to effectively use a 3/16″ end mill without overloading the spindle or the machine.
Choosing the Right 3/16″ Carbide End Mill for Stainless Steel
Not all carbide end mills are created equal, especially when it comes to machining stainless steel. Here’s what to look for:
Key Features to Consider
Number of Flutes:
2 Flutes: These are generally preferred for machining stainless steel. They offer more chip clearance, which is vital for preventing chip packing and excessive heat buildup in gummy materials. The reduced number of cutting edges also means less contact with the workpiece at any given moment, which can help reduce heat.
3 or 4 Flutes: More flutes mean more cutting edges for smoother finishes and potentially higher feed rates in less demanding materials. However, for stainless steel, the increased chip load per flute and reduced chip clearance can lead to overheating and tool breakage if not managed carefully.
Coating:
Uncoated: A basic option, suitable for some applications and materials, but generally not ideal for stainless steel where heat and wear resistance are paramount.
TiN (Titanium Nitride): A common, general-purpose coating. It offers some increase in hardness and a reduction in friction, providing moderate benefits for stainless steel.
TiCN (Titanium Carbonitride): Offers superior hardness and wear resistance compared to TiN. It’s better for abrasive materials and higher temperatures, making it a good choice for stainless steel.
AlTiN (Aluminum Titanium Nitride): This is often the gold standard for machining stainless steels and other high-temperature alloys. The aluminum component forms a passive aluminum oxide layer at higher temperatures, providing excellent thermal protection and further reducing friction and wear. For machining stainless steel, AlTiN or similar advanced coatings like TiB2 (Titanium Diboride) or ZrN (Zirconium Nitride) are highly recommended.
Helix Angle:
30° to 45°: Standard helix angles work well for general-purpose milling.
Higher Helix (e.g., 45° or more): A higher helix angle results in a sharper cutting edge and a more shearing action. This can be very beneficial for stainless steel as it helps to “slice” through the material, reducing cutting forces and heat. It also aids in chip evacuation.
Corner Radius:
Square End: A square end mill has a sharp 90° corner. This is good for creating square shoulders and sharp internal corners. However, the sharp corner is also the most vulnerable part of the tool and can be prone to chipping, especially in hard materials.
Corner Radius: A small radius (e.g., 0.010″ – 0.030″ for a 3/16″ end mill) on the corner significantly strengthens the edge. This makes it less prone to chipping and can improve tool life when machining tough materials like stainless steel. It will leave a slight radius at the bottom of your vertical walls, which is often acceptable or even desirable.
Shank:
Straight Shank: The most common type. Ensure it has a decent holding area for your collet or tool holder.
Weldon Shank (or equivalent flat): Some end mills have a flat milled onto the shank. This provides an extra secure grip for set screws in tool holders, preventing the tool from slipping under heavy cutting loads.
8mm Shank: While the keyword specifies 3/16″ (which is slightly less than 5mm), sometimes the “3/16″ refers to the cutting diameter, and the tool might have an 8mm shank for increased rigidity. An 8mm shank, being larger than a standard 3/16” shank holder might take, offers superior stiffness and reduces chatter. If your machine can accommodate it (e.g., using an R8 collet that accepts various shank sizes with adapters or specific collet chucks), an 8mm shank end mill can be very advantageous for stainless steel. Always confirm the actual shank diameter and ensure it fits your tooling system.
Recommended Specifications for Stainless Steel
Based on the above, when looking for a 3/16″ end mill for stainless steel, aim for:
Material: Solid Carbide
Flutes: 2 or 3
Coating: AlTiN, TiCN, or a high-performance ceramic or multi-layer coating.
Helix Angle: 45° or higher is often beneficial.
Corner: Consider a small corner radius for increased edge strength.
Shank: A standard straight shank is fine, but if available and compatible, an 8mm shank can offer better rigidity. Look for a Weldon flat if available.
Where to Find Quality Tools
Reputable tool manufacturers and suppliers are a good starting point. Brands known for quality cutting tools include:
SGS Tool Company
Harvey Tool
Grosfilex
Maritool
Kyocera
Haimer
Always check product descriptions carefully. Look for end mills specifically marketed for stainless steel, high-temperature alloys, or general-purpose machining of tough materials.
Setting Up for Success: Speeds, Feeds, and Coolant
Once you have the right tool, the next crucial step is setting your machining parameters correctly. This is where many beginners struggle with stainless steel.
The Rule of Thumb: Keep it Cool and Slow(er)
Stainless steel generally requires slower surface speeds and, often, slower feed rates than mild steel or aluminum. However, the “slow” part is relative. Carbide tools excel at higher RPMs than HSS. The key is to find the sweet spot where the tool cuts efficiently without overheating.
Speeds and Feeds: A Starting Point
Calculating exact speeds and feeds can be complex, involving many variables like machine rigidity, coolant, tool length, etc. For a 3/16″ 2-flute carbide end mill machining 304 stainless steel, here’s a common starting point. Always remember to consult your tool manufacturer’s recommendations if available.
Here’s a simplified table for 3/16″ (0.1875″) 2-flute AlTiN coated carbide end mill in 304 Stainless Steel:
| Parameter | Recommended Value for 3/16″ Carbide End Mill | Notes |
| :————– | :——————————————- | :——————————————————————————————————————————- |
| Spindle Speed (RPM) | 1,500 – 3,000 RPM | Start on the lower end and increase slowly if conditions allow. Listen to the cut and watch for chip formation. |
| Feed Rate (IPM) | 3 – 7 IPM | This is the speed the tool moves across the material. Aim for a chip load of 0.001″ – 0.002″ per flute. (Feed = RPM Flutes Chip Load) |
| Depth of Cut (Axial) | 0.060″ – 0.120″ | For roughing. For finishing passes, use a much smaller DOC. |
| Width of Cut (Radial) | 0.045″ – 0.125″ (25-70% of diameter) | Deeper radial cuts increase cutting forces and heat. Slotting (100% width) is very demanding. |
Table 1: Sample Machining Parameters for 3/16″ Carbide End Mill in 304 Stainless Steel
Chip Load: This is the thickness of the material each tooth of the end mill is removing. A good chip load is critical. Too small a chip means the tool rubs instead of cuts, generating heat. Too large a chip can overload the tool. For a 3/16″ end mill, aim for a chip load of around 0.001″ to 0.002″ per flute. You can calculate your feed rate using the formula: Feed Rate (IPM) = Spindle Speed (RPM) × Number of Flutes × Chip Load (inches/flute). So, for 2000 RPM, 2 flutes, and 0.0015″ chip load: 2000 × 2 × 0.0015 = 6 IPM.
Depth of Cut (Axial): How deep the end mill cuts into the material along the Z-axis. For stainless steel, taking lighter depths of cut is generally better. You might take multiple passes to reach your final depth.
Width of Cut (Radial): How much of the end mill’s diameter engages the material on the side. Slotting (cutting a full-width slot) is the most demanding. For stainless steel, it’s often better to climb mill or use some form of trochoidal milling (like HSM – High-Speed Machining) where the tool path makes small radial steps and deep axial cuts with a high spindle speed and feed rate, but this typically requires specialized CAM software and machines. For beginners, taking lighter radial cuts (e.g., 25-70% of the end mill diameter) and potentially making multiple passes is safer.
The Crucial Role of Coolant
Machining stainless steel without a good coolant or lubricant is a recipe for disaster. Coolant does two main things:
1. Cools: It carries heat away from the cutting edge, preventing the tool from overheating and extending its life.
2. Lubricates: It reduces friction between the tool and workpiece, allowing for a smoother cut and better finish.
Flood Coolant: A direct stream of cutting fluid is the most effective method for cooling and chip flushing.
Mist Coolant: A fine spray of coolant and air. Better than dry machining but less effective than flood.
Cutting Fluid/Lubricant: For some operations, especially drilling or tapping with specialized tools, applying a specific cutting paste or oil directly can help. For end milling stainless steel, a good quality soluble oil mixed with water (around 10-20% concentration) is a common choice for flood systems.
Through Spindle Coolant (TSC): If your machine has this feature, it’s incredibly beneficial, delivering coolant directly through the spindle, often directly to the cutting edges.
Make sure your coolant is properly mixed and that your system is delivering it effectively to the cutting zone. For milling operations, aiming the stream at the point where the tool enters the material is best.
Climb Milling vs. Conventional Milling
Climb Milling: The tool rotates in the same direction that it is advancing into the material. This results in a thinner chip at the beginning of the cut and a thicker chip at the end. It generally produces a better surface finish and lower cutting forces, which is often preferred for stainless steel. However, it requires a machine with minimal backlash in the feed screws.
Conventional Milling: The tool rotates against the direction of its advance. This generates thicker chips at the start and thinner at the end, leading to higher cutting forces and potential for the tool to “dig in”. Conventional milling is more tolerant of backlash in the machine but can lead to work hardening and a rougher finish in stainless steel.
For beginners and hobbyists using machines with older screw drives, climb milling can be risky due to backlash. If your machine has noticeable backlash, it might be safer to start with conventional milling or invest in a machine that can handle climb milling accurately. Newer CNC machines often handle climb milling very well.
Step-by-Step: Milling Stainless Steel with a 3/16″ Carbide End Mill
Let’s walk through a typical milling operation. Assume you’ve got your 3/16″ carbide end mill, your stainless steel workpiece, and your machine is ready.
Preparation is Key
1. Secure the Workpiece: This is paramount. Use a sturdy vise or clamps to ensure the stainless steel block is held firmly. Any movement during milling can damage your tool, workpiece, or machine. Make sure the clamping pressure is sufficient but doesn’t deform the workpiece. Reference surfaces should be clean and allow for good contact.
2. Install the End Mill:
Clean your collet and the end mill shank thoroughly.
Insert the 3/16″ carbide end mill into a suitable collet chuck or collet. Ensure you have the correct size collet for your shank (3/16″ or 8mm).
Tighten the collet securely in your spindle or tool holder.
If you’re using a Weldon shank, ensure the set screw in your tool holder is properly engaged with the flat.
3. Set Up the Coolant: Ensure your coolant system is functional, mixed correctly, and ready to deliver fluid to the cutting area.
4. Zero Your Axes: Accurately set your X, Y, and Z zero points. For the Z-axis, this is typically done by touching off on the top surface of your workpiece. Use a probe, an edge finder, or a simple piece of paper technique carefully.
Executing the Cut
1. Plunge or Approach: If you need to plunge the end mill into the material (e.g., starting a slot), do so slowly and at a controlled feed rate, ideally with coolant flowing. Some end mills are designed for plunging, others are not. If possible, it’s better to approach from the side of the material.
2. Begin Milling:
Start your spindle at your pre-determined safe RPM.
Engage the feed at the calculated rate.
For initial passes, it’s often wise to use lighter cuts than your maximum recommended values, especially when you’re getting a feel for the machine and material.
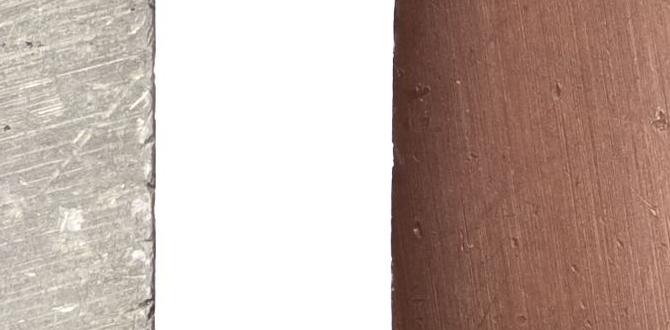
Listen and Watch: Pay close attention to the sound of the cut. A consistent, light ringing or buzzing sound is good. A loud chattering or grinding noise means something is wrong – back off, check your setup, or adjust parameters. Watch the chips being produced. They should be a consistent size and color (usually light gray to tan for stainless steel). Black or blue chips indicate overheating.
3