Quick Summary: Replacing carbide tips on your lathe tools keeps them sharp and efficient. This guide shows you how to choose, install, and maintain these essential inserts for smooth, precise machining without frustration.
Welcome to Lathe Hub! As a lifelong machinist, I know how frustrating dull lathe tools can be. They chatter, leave rough finishes, and make your work so much harder than it needs to be. But there’s a simple, effective solution for many common turning tools: replacement carbide tips. These small but mighty inserts can bring your tools back to life, giving you that clean, precise cut you’re aiming for.
Many beginner machinists worry about the cost and complexity of sharpening traditional tool bits. That’s where carbide tips shine! They are designed to be disposable, meaning once they get dull, you simply swap them out for a fresh one. This saves you time, preserves the tool body, and ensures you always have a sharp edge ready to go. In this guide, I’ll walk you through everything you need to know about replacement carbide tips.
We’ll cover how to select the right tips for your projects, the basic tools you’ll need for the job, and a clear, step-by-step process for securely fitting them onto your tool holders. We’ll also touch on safe practices and some tips for getting the most out of your carbide inserts. Let’s get your lathe cutting like new again!
Why Choose Replacement Carbide Tips?
For anyone new to metal or woodworking lathes, the concept of “disposable” cutting edges might seem strange. However, replacement carbide tips offer a host of advantages, especially for hobbyists and beginners. They are designed for ease of use and consistent performance, taking much of the guesswork out of tool maintenance.
Here’s why they are a popular choice:
- Consistent Sharpness: Each new tip provides a factory-sharpened edge, guaranteeing a predictable cutting performance. You don’t need to worry about grinding angles or achieving the perfect hone.
- Cost-Effective Over Time: While a single carbide tip might seem more expensive than a blank piece of High-Speed Steel (HSS), the longevity and the elimination of sharpening costs often make them cheaper in the long run for many applications.
- Time-Saving: Swapping out a dull tip for a new one takes only a minute or two. This dramatically reduces downtime, allowing you to complete projects faster.
- Versatility: Carbide is incredibly hard and can handle a wide range of materials, including tough metals and hard woods, at higher speeds than traditional HSS.
- Reduced Tool Body Wear: By replacing just the tip, you preserve the main body of your tool holder, which is often an investment in itself.
- Material Specificity: Carbide tips come in various grades and coatings, optimized for different materials and cutting tasks (e.g., roughing, finishing, milling).
Understanding Carbide Tooling
Carbide, or tungsten carbide, is a composite material made from tungsten and carbon atoms. It’s renowned for its extreme hardness and wear resistance, making it ideal for cutting tools that encounter significant friction and stress. When used in lathe tools, these properties translate directly into higher cutting speeds and longer tool life compared to softer materials like HSS.
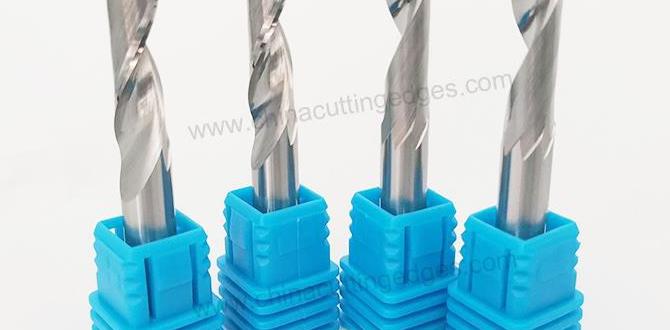
Carbide tips for lathes usually come in a few common forms:
- Round Inserts: These are versatile and often used for general turning, facing, and even some profiling. Their round shape means you can rotate them to a fresh cutting edge as one section wears down.
- Square, Diamond, or Triangular Inserts: These have specific geometries and multiple cutting edges. They are typically held in specialized tool holders with clamping mechanisms.
The quality of carbide can vary, and it’s often graded for specific applications. For beginners, starting with general-purpose grades is usually best. You can learn more about material grades and their applications from resources like Kennametal’s guide to carbide grades, a leading manufacturer in the field.
What You’ll Need: Tools and Supplies
Replacing carbide tips is a straightforward process, but having the right tools makes it even easier and safer. Most common carbide-tipped tools use simple screw-in or clamp-on inserts, so you likely won’t need a workshop full of specialized machinery.
Essential Tools:
- The Carbide Tool Holder/Tool: This is the piece that holds the carbide insert. They come in various diameters and styles for different lathe types and tasks.
- Replacement Carbide Inserts: Make sure you have the correct shape and size for your tool holder.
- Hex Wrench (Allen Key): Most carbide tool holders use a small hex screw to secure or loosen the insert. Ensure you have the correct size for your tool holder.
- Safety Glasses: Absolutely crucial! Always wear safety glasses when working with tools.
- Gloves (Optional but Recommended): To keep your hands clean and provide a better grip.
- Small Brush or Compressed Air: For cleaning out the tool holder before inserting a new tip.
Choosing the Right Replacement Carbide Tips
This is a critical step. Buying the wrong size or shape means the new tip won’t fit or work correctly. Here’s what to look for:
| Factor | What to Consider | Why it Matters |
|---|---|---|
| Shape | Round, Square, Diamond (e.g., CNMG, DNMG), Triangle. Match the shape of the insert designed for your tool holder. | Different shapes have different cutting angles and numbers of usable edges, affecting the type of cuts possible. |
| Size | Measured by diameter (for round) or side length (for geometric shapes). Usually stamped on the insert or in the tool holder’s manual. | The insert must fit snugly into the pocket of the tool holder without excessive play. |
| Hole Type | Center hole, countersunk hole, or no hole. | Ensures proper seating and clearance for the clamping screw. |
| Grade (Material/Coating) | General Purpose ‘P’ grade for steel, ‘M’ grade for stainless steel/exotics, ‘K’ grade for cast iron/non-ferrous. (This is more advanced, but know it exists). | Affects durability, heat resistance, and suitability for different workpiece materials. For beginners, a good general-purpose grade is usually sufficient. |
| Manufacturer/Brand | Stick to reputable brands known for quality. | Consistent quality control ensures inserts perform as expected. |
Pro Tip: If you’re unsure, take a picture of your current tool holder and the dull insert to a local tool supply store. They can help you find direct replacements.
Step-by-Step: Replacing Your Carbide Tip
This process is designed for the most common types of screw-in or clamp-on carbide inserts. Always refer to your tool holder’s specific instructions if you have them.
Step 1: Preparation and Safety
First and foremost, put on your safety glasses. Ensure your lathe is powered off and the spindle is completely stopped. It’s a good habit to remove and store your tool so it’s not sticking out into the lathe’s working area.
If the tool holder has been cutting, the insert and surrounding metal might be warm. Give it a moment to cool if necessary.
Step 2: Loosen the Securing Screw
Locate the small screw that holds the carbide insert in place. This is usually a hex screw (Allen head). Using the correct size hex wrench, turn the screw counter-clockwise. You don’t need to remove the screw completely – just loosen it enough so that the insert can move or be easily lifted out.
Sometimes, the only thing holding the insert is light pressure. Other times, it might be a clamping wedge or screw. For screw-in types, you just need to back the screw off a few turns.
Step 3: Remove the Old Insert
With the screw loosened, carefully remove the old, dull carbide insert. You might be able to wiggle it out with your fingers. If it’s stuck, you can carefully use a pair of pliers or tweezers, but be gentle to avoid damaging the tool holder pocket.
Important Note: Used carbide inserts can be sharp on their worn edges, but more importantly, they are often chipped or broken. Handle them with care. Dispose of them responsibly – they are not typically sharp enough to be useful, but their edges can still cause injury.
Step 4: Clean the Tool Holder Pocket
Before inserting the new tip, it’s essential to clean out the pocket where the insert sits. Use a small brush or a puff of compressed air to remove any chips, dust, or debris. A clean pocket ensures the new insert sits flat and securely, which is vital for proper cutting and to prevent premature tool failure.
A clean seating surface is critical for the best cutting performance and to prevent the insert from being stressed unevenly, which can lead to chipping or breakage.
Step 5: Insert the New Carbide Tip
Orientation is key here. Carefully pick up your new carbide insert. Note its shape and any markings. Place it into the tool holder pocket, ensuring it sits flat and is oriented correctly. For inserts with multiple edges (like squares or diamonds), make sure you’re seating it in a way that allows the securing screw to engage properly and correctly present a sharp edge for cutting.
For round inserts, you might need to rotate it so the screw heads engage with the center hole, or so a flat face is presented to the screw for clamping. If it doesn’t seem to fit right, double-check its orientation and that you have the correct insert.
Step 6: Tighten the Securing Screw
Once the new insert is seated correctly, use the hex wrench to tighten the securing screw. Turn it clockwise. The goal is to secure the insert firmly without overtightening, which could damage the insert or the tool holder. For most small inserts, snug is sufficient. You want it tight enough so that the insert doesn’t move during its entire life, but not so tight that you strip the screw or crack the insert’s seating area.
A common recommendation is to tighten until you feel resistance, then give it perhaps a quarter to half a turn more. The exact torque isn’t critical for most beginner setups, but avoiding excessive force is.
Step 7: Re-install and Test
Re-install the tool holder back into your lathe’s tool post. Bring the new carbide tip up to your workpiece. Rotate your lathe at a slow speed and carefully bring the tool to the spinning workpiece to make a light test cut. Listen for unusual sounds and watch for chatter. A successful cut will be smooth and produce delicate shavings, not dust or ragged chips.
If you experience chatter or poor results, stop the lathe and re-check the seating of the insert and the tightness of the screw. Also, consider your cutting parameters (speed, feed, depth of cut) as they may need adjustment for the new, sharp insert.
Maintaining and Caring for Carbide Inserts
While carbide is tough, it’s also brittle. Unlike steel, it doesn’t deform; it fractures. Proper care prolongs their life and ensures safety.
- Use the Right Insert for the Job: Don’t try to rough out very hard steel with an insert meant for softer metals or plastics.
- Avoid Impact: Always stop the lathe before making adjustments. Never crash a tool into a workpiece or the chuck. This is the quickest way to chip or break an insert.
- Proper Coolant Use: For metals, using a cutting fluid is essential. It cools the cutting edge, lubricates the cut, and helps evacuate chips, all of which reduce stress on the carbide.
- Don’t Force It: If the tool feels like it’s binding or chattering violently, stop immediately. Investigate the cause rather than pushing through. It might be a dull insert, incorrect geometry, or improper setup.
- Understand When to Replace: Even with care, inserts wear out. Look for signs of dulling like increased cutting force, a shiny land on the cutting edge, or a rougher finish on your workpiece. Replace them before they chip or break, which can damage the workpiece or tool holder.
Troubleshooting Common Issues
Even with the best intentions, you might run into a few snags. Here are some common problems and how to fix them:
| Problem | Possible Causes | Solution |
|---|---|---|
| Insert Won’t Seat Flat | Debris in the tool holder pocket; Incorrect insert shape/size; Damaged tool holder pocket. | Thoroughly clean the pocket; Verify you have the correct insert; Inspect the tool holder for damage. |
| Insert Chips or Breaks Easily | Insert is too hard for the material; Excessive cutting forces (dull insert, wrong speed/feed); Impact during cutting; Overtightening the securing screw. | Use a softer grade insert if applicable; Ensure insert is sharp and cutting parameters are correct; Avoid shock; Check screw tightness. |
| Poor Surface Finish | Dull insert; Incorrect cutting speed or feed rate; Wrong insert geometry; Workpiece material issues. | Replace the insert; Adjust speed/feed; Consult insert chart for recommended geometry; Check workpiece for hardness variations. |
| Securing Screw Stripped | Overtightening; Using the wrong size hex wrench; Poor quality screw. | Use the correct, snug torque; Ensure the hex wrench fits perfectly; Consider replacing the screw with a higher quality one. |
For more in-depth information on machining best practices, including speeds and feeds, resources like Engineer’s Handbook provide valuable data.
FAQ
Q1: What is the difference between carbide inserts and traditional HSS lathe tools?
Carbide inserts are very hard and brittle, designed to be replaced when dull. Traditional High-Speed Steel (HSS) tools are softer but tougher, meaning they can be repeatedly ground to resharpen them. Inserts offer more consistent sharpness out-of-the-box.
Q2: How do I know when to replace a carbide insert?
You’ll notice a decline in cut quality – more chatter, rougher surfaces, or increased resistance. Visually, you might see a shiny band (wear land) on the cutting edge. It’s best to replace them before they chip or break.
Q3: Can I use any carbide insert with any tool holder?
No. Inserts must match the specific shape, size, and type of pocket in your tool holder. If they don’t fit snugly and correctly, they won’t cut properly and could break.
Q4: How much do replacement carbide tips cost?
Prices vary widely based on shape, size, grade, and brand. A single general-purpose round insert might cost anywhere from $3 to $15 USD. A pack of 10 might offer a discount.
Q5: What materials can I cut with standard carbide inserts?
General-purpose carbide inserts are often suitable for a wide range of materials including mild steel, aluminum, brass, plastics. Specific grades exist for tougher materials like stainless steel, titanium, and exotic alloys, or for materials like cast iron and wood.
Q6: Do I need special tools to change carbide inserts?
Usually, just a correctly sized hex wrench (Allen key) is needed to loosen and tighten the screw that holds the insert. Always wear safety glasses.
Q7: Can I grind carbide inserts if they get dull?
Carbide is extremely hard. While specialized diamond grinding wheels can sharpen carbide, it’s generally not practical or cost-effective for most hobbyists, especially for inserts designed to be disposable. It’s far easier and more efficient to swap for a new one.
Conclusion
Replacing carbide tips on your lathe tools is a simple yet incredibly effective way to maintain cutting performance and make your machining tasks much more enjoyable. By understanding how to choose the right inserts, following the straightforward replacement steps, and practicing good tool care, you’ll ensure your lathe consistently delivers the smooth, precise results you desire.
Don’t let dull tools hold you back. With the knowledge from this guide, you’re ready to confidently tackle the task of replacing your carbide tips. Keep those tools sharp, work safely, and happy turning!