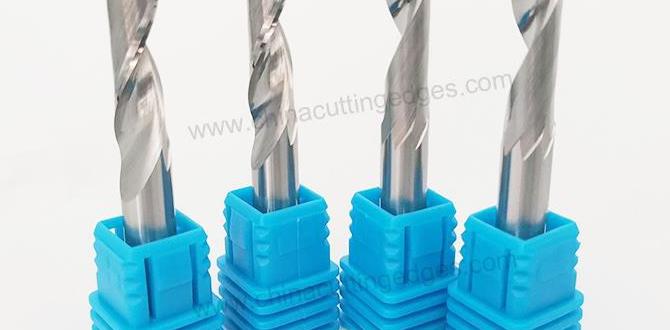
For effortless HDPE plunge milling, a TiAlN ball nose end mill with a 40-degree approach angle is your go-to tool. It minimizes chip packing and heat buildup, allowing for clean, precise cuts even in flexible materials like High-Density Polyethylene (HDPE).
Working with plastics like HDPE can sometimes feel… sticky. You want to create smooth pockets or complex shapes, but your end mill seems to drag, melt the material, or leave a rough finish. It’s a common challenge, especially when plunging straight down into the material. But what if I told you there’s a simple tool that makes this process much easier? Today, we’re diving into the world of the TiAlN ball nose end mill with a 40-degree approach angle and discovering how it can transform your HDPE plunge milling. We’ll cover why it works, what to look out for, and how to use it like a pro, step-by-step.
Understanding the Magic: Why the 40-Degree TiAlN Ball Nose End Mill for HDPE?
You might be wondering, why such a specific tool? It seems a bit niche, right? Well, the success of plunge milling in materials like HDPE comes down to a few key factors: chip evacuation, heat management, and cutting geometry. The 40-degree TiAlN ball nose end mill addresses all of these beautifully.
The Role of the Ball Nose
First, let’s talk about the “ball nose.” Unlike flat-bottomed end mills, a ball nose end mill has a hemispherical tip. This means it doesn’t have a sharp corner at the very center of its cutting face. For plunge milling, especially in softer materials like HDPE, this is a huge advantage. A sharp inside corner on a flat end mill can cause undue stress, snagging, and overheating. The rounded tip of the ball nose distributes the cutting forces more evenly, leading to a smoother entry and reducing the risk of the tool getting “stuck” or melting its way through.
Why 40 Degrees? The Approach Angle Advantage
Now, the 40-degree angle. This refers to the helix angle of the flutes. Many standard end mills have steeper helix angles (like 30 degrees or even less, sometimes called “low helix” or “form helix”). However, for plunge milling, especially in a gummy material like HDPE, a shallower helix angle is often preferred. A 40-degree helix on a ball nose design offers a great balance:
- Improved Chip Evacuation: The shallower angle helps to curl the chips away from the cutting area more effectively. This is crucial because melted plastic and packed chips are the enemies of a clean cut.
- Reduced Heat Buildup: Better chip evacuation means less friction and less heat generated. HDPE can melt easily, leading to poor surface finish and tool wear.
- Smoother Plunge: The combination of the ball nose and the helix angle allows for a more controlled, less aggressive plunge, minimizing vibration and chatter.
The TiAlN Coating: A Shield Against Heat and Wear
The “TiAlN” stands for Titanium Aluminum Nitride. This is a high-performance coating applied to the end mill. Think of it as a tough, heat-resistant armor for your cutting tool. Here’s why it’s so beneficial for HDPE plunge milling:
- Enhanced Hardness: TiAlN coatings significantly increase the surface hardness of the end mill, making it more resistant to wear and abrasion.
- Excellent Thermal Barrier: It acts as a barrier between the cutting edge and the workpiece, reflecting heat away from the tool. This is especially important when machining plastics that generate a lot of friction heat.
- Reduced Friction: The coating helps to reduce friction between the chip and the cutting edge, further aiding in chip evacuation and preventing material buildup.
- Extended Tool Life: Because it protects the end mill from wear and excessive heat, a TiAlN coated tool will last much longer, giving you more cuts for your money.
Essential Tools and Setup for HDPE Plunge Milling
Before you even think about cutting, having the right setup is key. It’s not just about the end mill; a stable machine and proper workholding will ensure your success and, more importantly, your safety.
Your Milling Machine
Whether it’s a benchtop CNC or a full-sized vertical mill, your machine needs to be rigid and capable of precise movements. For HDPE, you don’t usually need extreme spindle speeds or immense power, but stability is non-negotiable. Ensure your machine is well-maintained, with no excessive play in the axes or spindle.
Workholding: Keeping it Secure
HDPE is a relatively soft and flexible material, which means it can easily be pushed around by the cutting forces. Proper workholding is paramount to prevent the material from shifting, vibrating, or moving during the cut. This not only leads to inaccurate parts but can also be dangerous.
- Clamps: Use sturdy clamps that firmly hold the HDPE sheet or block to your machine bed or vise. Ensure the clamps don’t interfere with the cutting path.
- Double-Sided Tape: For lighter cutting or sheet materials, high-strength double-sided tape (like VHB tape) can be surprisingly effective at holding HDPE down.
- Vise Jaws: If using a vise, consider using soft jaws (made from aluminum or plastic) to avoid damaging the HDPE and to provide a better grip without crushing the material.
- Fixturing: For repetitive parts, consider creating a custom fixture. This could be a simple wooden jig or a more robust CNC-machined plate designed to hold your HDPE securely.
The TiAlN Ball Nose End Mill (40-Degree Helix Angle)
As we’ve discussed, this is your primary tool. When selecting one, consider:
- Diameter: Choose a diameter that suits the desired pocket size and detail level. Common sizes range from 1mm to 12mm or more for hobbyist and professional machines.
- Number of Flutes: For HDPE, 2-flute or 3-flute end mills are generally recommended. Fewer flutes offer better chip clearance, which is critical for plastics.
- Coating: Always look for the TiAlN coating.
- Reach: Ensure the flute length is sufficient for your planned plunge depth.
You can find these specialized end mills from reputable tooling manufacturers or online industrial supply stores. Always check product descriptions carefully to confirm the helix angle.
Other Helpful Items
- Safety Glasses: Absolutely essential. Always wear them!
- Dust Collection: HDPE can create fine dust. A dust shoe or vacuum system will keep your workspace clean and safe.
- Coolant/Lubricant (Optional but Recommended): While HDPE doesn’t require extensive cooling like metals, a light mist of coolant or a specialized plastic cutting lubricant can help manage heat and improve cut quality. Isopropyl alcohol can also sometimes be used as a light coolant for plastics.
- Deburring Tool: For cleaning up any small burrs after machining.
- Calipers: For measuring your workpiece before and after.
Step-by-Step: Your First Effortless HDPE Plunge Mill
Let’s get down to business. Follow these steps to achieve an excellent HDPE plunge mill with your 40-degree TiAlN ball nose end mill. Remember, clear communication between you and your machine is key!
Step 1: Secure Your Material
Place your HDPE sheet or block onto your milling machine bed or in your vise. Use the workholding methods discussed earlier (clamps, tape, etc.) to ensure the material is absolutely stable. Double-check that it cannot move in any direction. If you’re using a vise, ensure the jaws are snug but not so tight they deform the HDPE.
Step 2: Mount the End Mill
Insert your 40-degree TiAlN ball nose end mill into your machine’s collet or tool holder. Ensure it’s seated correctly and tightened securely. A poorly seated tool can lead to runout, poor cut quality, and potential tool breakage.
Step 3: Set Up Your Zero Point
Determine the starting point for your plunge. This is usually the surface of the HDPE. You can use your machine’s edge finder, a probe, or carefully jog the tool down to touch off on the surface. Set your X, Y, and Z zero points accordingly in your CNC controller or for manual operation.
Step 4: Determine Cutting Parameters (Speeds and Feeds)
This is where things get a little technical, but we’ll keep it simple. The goal is to optimize for chip evacuation and minimize heat. These are starting points, and you may need to adjust based on your specific machine, end mill, and HDPE thickness.
Starting Speeds and Feeds for HDPE (Use as a Guideline Only)
| End Mill Diameter | Spindle Speed (RPM) | Feed Rate (IPM / mm/min) | Plunge Rate (IPM / mm/min) |
|---|---|---|---|
| 1/8″ (3.175mm) | 15,000 – 20,000 | 15 – 25 ipm (380 – 635 mm/min) | 5 – 10 ipm (127 – 254 mm/min) |
| 1/4″ (6.35mm) | 12,000 – 18,000 | 20 – 35 ipm (508 – 889 mm/min) | 7 – 15 ipm (178 – 381 mm/min) |
| 1/2″ (12.7mm) | 8,000 – 15,000 | 30 – 50 ipm (762 – 1270 mm/min) | 10 – 20 ipm (254 – 508 mm/min) |
Important Notes on Speeds and Feeds:
- Surface Speed: The recommended spindle speeds are based on typical optimal surface speeds for plastics. Higher RPMs are often used with smaller diameter tools.
- Feed Rate: The feed rate impacts chip load. You want a chip load that’s neither too small (rubbing, generating heat) nor too large (overloading the tool or machine).
- Plunge Rate: Your plunge rate should be significantly slower than your cutting feed rate. This is crucial for smooth entry and to prevent excessive heat buildup directly below the tool.
- Machinery’s Handbook: For more detailed information on calculating speeds and feeds, especially for different materials and tools, consult resources like Machinery’s Handbook.
- Listen to Your Machine: Above all, pay attention to the sound of the cut. If it’s screaming, chattering, or the plastic is melting, your parameters are likely too aggressive. Slow down!
Step 5: Program or Set Your Toolpath
For CNC users, this involves creating your CAM program. For plunge milling with a ball nose end mill, you’ll typically define a pocket or contour operation. Ensure your plunge depth and the final depth of the pocket are correctly set. For manual milling, you’ll be controlling these depths with your DRO (Digital Readout) or quill feed.
Pro Tip: If you’re plunge milling a deep pocket, consider doing it in multiple shallower passes rather than one deep plunge. This is much safer and leads to better results. For example, if you need to plunge 1 inch deep, do it in 4 passes of 0.25 inches.
Step 6: Test Cut (Optional but Recommended)
If you’re unsure about your settings or path, perform a small test cut on a scrap piece of HDPE. This helps you verify speeds, feeds, and the toolpath without risking your main workpiece.
Step 7: The Plunge Cut!
Initiate the milling operation. Watch and listen carefully.
- CNC: Start the program and monitor the machine’s performance. Be ready to hit the emergency stop if anything seems wrong.
- Manual: Carefully feed the end mill down into the HDPE using your quill feed or handwheel. Maintain a consistent, steady rate.
The goal is to see clean chips being ejected and to avoid any signs of melting or excessive force. The 40-degree TiAlN ball nose end mill should make this process feel remarkably smooth.
Step 8: Complete the Pocket/Feature
Once the initial plunge is complete, the end mill will then proceed to mill out the rest of the pocket or feature according to your programmed toolpath. Maintain awareness of the cutting sounds and material ejection.
Step 9: Finishing Touches
After the cut is finished and the machine has stopped, allow the chips to settle. Carefully remove the workpiece. You may find some small burrs around the edges of the pocket. These can typically be cleaned up with a deburring tool, a sharp knife, or a light sanding.
Optimizing for Better Results
Even with the right tool, there are always ways to refine your process for even better outcomes.
Chip Management is King
We’ve stressed this, but it’s worth repeating. Ensure your dust collection system is active. If you’re manually clearing chips with an air hose, do so carefully and from a safe distance. The better you clear chips, the cooler the cut, and the cleaner the result.
Cooling Considerations
While TiAlN helps, HDPE’s low melting point means heat is still a factor.
- Mist Coolant: A fine mist coolant system can significantly improve surface finish and tool life.
- Air Blast: A directed jet of compressed air can help cool the cutting zone and blow away chips.
- Lubricants: Specialized plastic cutting lubricants can be applied sparingly. Avoid heavy oils that can attract dust.
The key is to manage heat without making a huge mess or creating excess stress on the material.
Tool Wear Inspection
Even with TiAlN, end mills don’t last forever. Periodically inspect your end mill for signs of wear, such as a dull cutting edge, an enlarged radius on the tip, or signs of material buildup. Replacing a worn end mill before it causes poor cuts or breaks is essential.
Material Properties Matter
Not all HDPE is created equal. “Recycled” HDPE, for instance, can sometimes have inconsistent properties or contain impurities that affect cutting performance. Virgin HDPE generally machines more predictably. If you’re experiencing unusual issues, consider the grade of HDPE you’re using.
Common Pitfalls and How to Avoid Them
Even with the best tools, things can go wrong. Here are some common problems when machining plastics and how to prevent them:
- Melting/Gooey Chips:
- Cause: Too slow a feed rate, too high a spindle speed, insufficient chip clearance, dull tool.
- Solution: Increase feed rate (chip load), decrease spindle speed, ensure tool flutes are clear, use a sharper tool, consider light coolant.
- Chatter/Vibration:
- Cause: Loose workholding, worn machine components, incorrect speeds/feeds, too large a depth of cut.
- Solution: Improve workholding rigidity, check machine tram and wear, adjust speeds/feeds, reduce depth of cut, use a stiffer tool.
- Poor Surface Finish:
- Cause: Dull tool, inadequate chip evacuation, incorrect speeds/feeds, material inconsistencies.
- Solution: Use a sharp, quality end mill, ensure good chip evacuation, optimize speeds/feeds, try a lubricant, consider a finishing pass with a higher surface speed.
- Tool Breakage:
- Cause: Excessive plunge rate, feeding into material too quickly, material suddenly grabbing, tool deflection, worn tool.
- Solution: Slow down plunge and feed rates, ensure workholding is secure, use a sharper tool, reduce DOC, check for tool wear.
Remember, practice makes perfect. Don’t be discouraged if your first attempt isn’t flawless. Each cut is a learning opportunity.
FAQ: Your Beginner Questions Answered
Q1: What is the main benefit of a ball nose end mill for HDPE?
A ball nose end mill has a rounded tip, which prevents a sharp corner from digging into soft materials like HDPE. This allows for smoother plunging and reduces