Carbide end mills are surprisingly effective for machining Inconel 718, offering a smart solution for this notoriously tough material. With the right approach, these tools can make a big difference, turning a challenging job into a manageable one for machinists.
Carbide End Mill: Genius For Inconel 718
Working with Inconel 718 can feel like trying to cut through hardened steel with a butter knife. It’s strong, it’s tough, and it really likes to work-harden, meaning it gets even harder as you try to machine it. This makes traditional cutting tools wear out quickly and can lead to frustrating results. But what if there was a tool that could handle Inconel 718 without breaking the bank or your patience? Enter the humble yet powerful carbide end mill. It might sound too simple, but with the right type and technique, carbide is a genuinely brilliant choice for tackling this superalloy. Let’s explore why and how you can use it successfully.
Why Inconel 718 is a Machining Challenge
Before we dive into how carbide mills save the day, it’s helpful to understand why Inconel 718 is such a beast. It’s a nickel-chromium superalloy, designed for extreme environments. Think jet engines, rocket parts, and high-temperature chemical processing. Its strength and resistance to corrosion come from its unique metallurgical structure. This same structure makes it:
- Hard: It has a high tensile strength, meaning it resists being pulled apart.
- Tough: It can deform a lot before breaking. This toughness transfers into the material when you’re cutting.
- Work-Hardening: As you cut, the friction and pressure near the cutting edge can actually make the material harder right where you’re trying to cut it. This rapidly dulls conventional tools.
- Low Thermal Conductivity: It doesn’t transfer heat away from the cutting zone very well. Heat builds up quickly at the tool tip, leading to faster wear and potential melting or welding of the material to the tool.
These properties mean that many standard cutting tools, like those made from High-Speed Steel (HSS), simply can’t keep up. They get dull, chip, or break long before the job is done. This is where specialized tooling and techniques become essential.
The Smart Choice: Carbide End Mills
Carbide, specifically Tungsten Carbide, offers a fantastic solution for machining Inconel 718. Why is it so good?
- Superior Hardness: Tungsten carbide is incredibly hard, much harder than HSS. This allows it to maintain its sharp edge for longer, even when cutting through tough materials.
- High Red Hardness: It can withstand high temperatures without losing its hardness. Given Inconel 718’s tendency to generate heat, this is a massive advantage.
- Rigidity: Carbide tools are stiffer than HSS. This means less deflection and chatter, leading to cleaner cuts and better accuracy.
While carbide is brittle compared to steel, its inherent hardness and heat resistance make it the go-to material for machining alloys like Inconel. For a beginner, this means less tool breakage due to dullness and a better chance of getting a decent finish.
Choosing the Right Carbide End Mill for Inconel 718
Not all carbide end mills are created equal, especially when you’re dealing with a material like Inconel 718. Here’s what to look for:
1. Material Type
You want a solid tungsten carbide end mill. Sometimes, end mills are made with a carbide substrate and are coated. For Inconel, a good quality solid carbide is often sufficient, but coatings can provide an extra layer of protection and performance. For beginners, a simple, well-made solid carbide end mill is a great starting point.
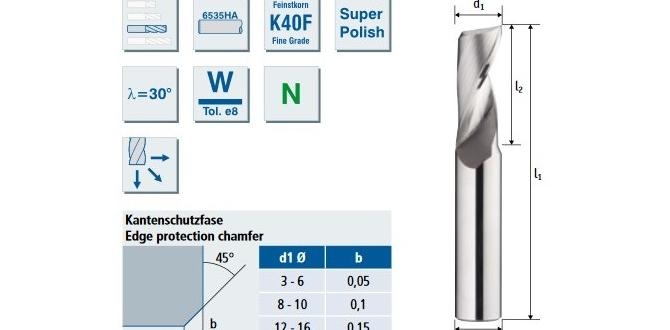
2. Geometry and Flute Design
This is crucial for managing Inconel’s properties. You’ll want to consider:
- Number of Flutes: For Inconel, fewer flutes are generally better. A 2-flute or 3-flute end mill is often recommended. More flutes can lead to chip packing and excessive heat buildup because there’s less space for chips to escape. Fewer flutes allow for better chip evacuation and cooler cutting.
- Helix Angle: A higher helix angle (e.g., 30-45 degrees) can help with chip evacuation and reduce cutting forces. However, very high helix angles can sometimes reduce tool rigidity. A balance is key.
- Corner Radius: A small corner radius can help to strengthen the cutting edge and prevent chipping. It can also help in managing the cutting forces.
3. Coatings
Coatings add another layer of performance by reducing friction, increasing hardness, and improving heat resistance. For Inconel 718, beneficial coatings include:
- TiAlN (Titanium Aluminum Nitride): Excellent for high-temperature applications like Inconel. It forms a protective aluminum oxide layer at high temperatures, which further enhances heat resistance and lubricity.
- AlTiN (Aluminum Titanium Nitride): Similar to TiAlN, offering great performance in high-heat conditions and extended tool life when machining tough alloys.
As a beginner, a TiAlN or AlTiN coated end mill will give you the best chance of success and longer tool life.
4. Shank and Length
For rigidity, a .250 inch (1/4 inch) shank is standard for smaller diameter end mills. Ensure it’s a straight shank suitable for your collet or tool holder. Standard length is generally fine for most beginner projects. Avoid extra-long end mills as they are more prone to deflection and vibration, which is detrimental when machining difficult materials like Inconel 718.
Recommended End Mill Specifications for Beginners
For your first foray into machining Inconel 718 with an end mill, consider these general specifications for a carbide end mill 1/8 inch 1/4 shank standard length for Inconel 718 heat resistant:
| Feature | Recommendation | Why it Matters for Inconel 718 |
|---|---|---|
| Material | Solid Tungsten Carbide | Hardness and heat resistance are essential. |
| Diameter | 1/8 inch (or larger, depending on the feature you’re cutting) | Smaller diameters require higher spindle speeds and careful feed rate management. The 1/8 inch size is versatile for many lighter-duty tasks. |
| Shank Diameter | 1/4 inch | Standard size, fits common collets and tool holders, offering good rigidity for its size. |
| Length | Standard length | Minimizes tool deflection and vibration for better stability. |
| Flute Count | 2 or 3 flutes | Allows for better chip evacuation, reducing heat and preventing chip packing. |
| Coating | TiAlN or AlTiN | Significantly enhances heat resistance and reduces friction, prolonging tool life. |
| Corner Radius | Small (e.g., 0.010″ – 0.020″) | Reinforces the cutting edge, preventing chipping and improving tool life. |
Machining Strategies: Bringing it All Together
Even with the right tool, the way you use it is just as important. Machining Inconel 718 requires a different mindset and approach compared to softer metals like aluminum or mild steel.
1. Use High-Quality Coolant or Lubricant
This is non-negotiable when machining Inconel. You need effective cooling and lubrication to:
- Prevent the tool from overheating.
- Reduce friction between the tool and workpiece.
- Help flush chips away from the cutting zone.
- Prevent work hardening by keeping the material cooler.
For Inconel 718, synthetic or semi-synthetic coolants are often recommended, sometimes with added extreme pressure (EP) additives. Flood coolant systems are ideal. For smaller machines, a mist or spray system can be effective.
2. Slow Spindle Speed and Moderate Feed Rate
Contrary to what you might do with softer metals, Inconel 718 benefits from a slower spindle speed (RPM) and a carefully controlled, not-too-slow, feed rate.
- Slow RPM: This reduces the heat generated by friction.
- Moderate Feed Rate: The feed rate needs to be fast enough to ensure the carbide cutter is actually cutting and not rubbing. Rubbing generates a lot of heat and doesn’t remove material efficiently. You want to see small, well-formed chips, not fine powder or glowing metal.
Exact speeds and feeds depend heavily on your machine’s rigidity, the depth of cut, and the specific end mill. Start conservatively and adjust based on chip formation and tool condition. A good starting point for a 1/8 inch carbide end mill might be around 3,000-5,000 RPM with a feed rate of 0.001-0.002 inches per tooth.
3. Minimize Depth of Cut
Take shallow passes. This reduces the load on the cutting tool and the machine, helps manage heat, and prevents excessive tool deflection. It’s much better to take several light passes than one deep one. Leave a small “parting cut” or “finishing pass” of about 0.002-0.004 inches (0.05-0.1 mm) for the final operation to ensure accuracy and a good surface finish.
4. Maintain Rigidity
Chatter and vibration are the enemies of Inconel machining. Ensure your workpiece is securely clamped, your tool holder is tight, and your machine is in good condition. The shortest possible tool extension (sticking the end mill out of the collet/holder as little as possible) will significantly improve rigidity.
5. Climb Milling vs. Conventional Milling
For Inconel, climb milling (where the cutter rotation direction causes the tool to feed into the workpiece) is often preferred. It tends to put less stress on the cutting edge and can result in a better surface finish. However, ensure your machine has minimal backlash (slop) in its feed mechanisms, as this can cause unpredictable cutting. If you have a machine with significant backlash, conventional milling might be safer.
6. Chip Evacuation is Key
As mentioned, Inconel 718 produces tough, stringy chips that can re-cut and cause overheating. Ensure your coolant is doing its job of flushing chips away. If clearing your workpiece and you see packed chips, you’re pushing too hard or not cooling effectively.
For more on the physics of machining and tool wear, resources from organizations like the National Institute of Standards and Technology (NIST) can provide deeper insights into material properties and machining processes.
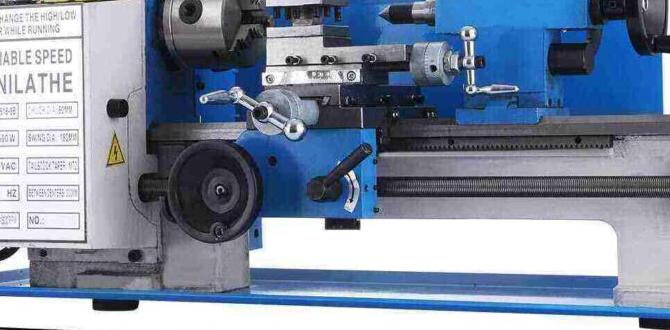
Step-by-Step: Milling a Slot in Inconel 718 with a Carbide End Mill
Let’s walk through a basic example: milling a simple slot using a 1/8 inch carbide end mill. Assume you have a CNC mill or a milling machine with power feed.
Tools and Materials Needed:
- Inconel 718 workpiece
- 1/8 inch solid carbide end mill (2 or 3 flute, TiAlN/AlTiN coated, standard length, 1/4″ shank)
- End mill holder or collet chuck
- Vise or other secure workholding
- Machining lubricant/coolant system (flood, mist, or spray)
- Calipers for measurement
- Safety glasses and appropriate PPE
Steps:
- Set Up Your Machine: Ensure your milling machine is clean and in good working order. Securely clamp your Inconel 718 workpiece in the vise. Make sure the vise jaws have good grip and the workpiece is supported.
- Install the End Mill: Insert the 1/8 inch carbide end mill into a clean collet or tool holder. Tighten it securely, ensuring minimal overhang (stick-out) for maximum rigidity.
- Set Up Coolant: Ensure your coolant system is ready. For flood coolant, turn it on. For mist/spray, set it to an appropriate flow.
- Zero Your Axes: Locate the starting point for your slot on the Inconel workpiece. Use your machine’s probing or edge finder to set your X, Y, and Z zeros. For Z zero, touch off on the top surface of the workpiece.
- Program or Set Speeds and Feeds: Based on the recommendations (e.g., 3,000-5,000 RPM, 0.001-0.002″ per tooth feed rate), set your machine parameters. For a 1/8″ end mill (0.125″), 2 flutes, this means a feed rate of roughly 0.002″-0.004″ per minute for the X/Y axis movement.
- Begin the Cut (Plunge – if necessary): If you need to plunge the end mill straight down into the material to start forming the slot, do so very slowly. Some end mills are not designed for plunging. If you can, start the slot from an edge or by drilling a lead-in hole.
- Make the First Pass:
- Set your depth of cut for the first pass to a shallow value, perhaps 0.010″ to 0.020″ (0.25mm to 0.5mm).
- Initiate the feed in the X or Y direction.
- As the end mill cuts, observe the chips being produced. They should be small, well-formed, and not powder-like or glowing.
- Listen to the cutting sound; it should be a consistent, controlled machining sound, not a screaming rub or a violent chatter.
- Complete the Slot Path: Work your way across the programmed path for the slot. Ensure the entire area is covered.
- Step Down for Subsequent Passes: After the first pass, retract the tool slightly. Increase the depth of cut to the next desired level (e.g., another 0.010″ to 0.020″). Repeat step 6 and 7 until you reach your target slot depth.
- Finishing Pass: For critical dimensions and a good surface finish, make a final pass taking only a very shallow depth of cut (e.g., 0.002″ to 0.004″). This pass should be at your desired final cutting speed and feed rate.
- Retract and Inspect: Once the slot is complete, carefully retract the end mill. Turn off the coolant if necessary (some prefer to leave it running until the tool clears). Measure the slot for accuracy and inspect the surface finish.
- Repeat for Other Features: If you have more features to mill, ensure your tool is still in good condition. If the tool feels dull or you’re getting poor chip formation, it may be time for a new end mill.
Troubleshooting Common Issues
Even with the best tools, you might encounter problems. Here’s how to address them:
Problem: Rapid Tool Wear or Breakage
- Cause: Heat buildup, excessive cutting forces, poor chip evacuation, insufficient rigidity.
- Solution: Lower spindle speed, increase feed rate slightly, take shallower depths of cut, improve coolant flow, ensure workholding and tool rigidity. Check for work hardening. Ensure you are using the correct end mill type (coated, few flutes).
Problem: Poor Surface Finish (Rough, Fuzzy)
- Cause: Chatter/vibration, tool dullness, rubbing instead of cutting, incorrect feed rate.
- Solution: Increase rigidity (shorter tool stick-out, tighter workpiece clamping). Slow down spindle speed slightly while maintaining or increasing feed rate to ensure cutting, not rubbing. Resharpen or replace the end mill if dull. Ensure coolant is adequate.
Problem: Work Hardening
This is inherent to Inconel 718. The best way to combat it is through effective coolant and proper cutting parameters.
- Solution: Ensure constant and effective cooling. Take shallow cuts. Maintain a consistent, sufficient feed rate to avoid rubbing.
Problem: Chips Packing in Flutes
- Cause: Insufficient chip evacuation space, improper feed rate, too much depth of cut.
- Solution: Use an end mill with fewer flutes (2 or 3). Ensure coolant is flushing chips effectively. Increase feed rate slightly or reduce depth of cut. Retract the tool periodically and clear chips manually (