Achieve a mirror-like finish on Tool Steel A2 with a carbide end mill by selecting the right tool geometry, employing proper cutting parameters, and using appropriate lubrication. This guide simplifies the process, ensuring excellent results even for beginners.
Hey there, fellow makers! Daniel Bates from Lathe Hub here. Ever stared at a piece of Tool Steel A2 and thought, “How am I going to get a beautiful, smooth finish on that?” It’s a common challenge, especially when you’re starting out with milling. Tool Steel A2 can be a bit tricky, but with the right carbide end mill and a few proven techniques, you can achieve that stunning, almost mirror-like finish that makes your projects SIGH worthy. Don’t worry, we’ll break it down step-by-step so you feel confident. Let’s get started on making that A2 steel shine!
Understanding Tool Steel A2 and Why Finishing is Key
Tool Steel A2 is a popular choice for tooling and die applications because it offers a great balance of hardness, toughness, and wear resistance. Think of things like blanking dies, forming tools, and even some cutting implements. Its ability to hold a sharp edge and resist deformation makes it ideal for demanding jobs.
The challenge with A2, especially for creating a fine finish, lies in its hardness. As a “cold work” tool steel, it’s heat-treated to achieve significant hardness, typically in the range of 55-60 HRC (Hardness Rockwell C). This means it’s tough and can work-harden if you approach it incorrectly. If you’re aiming for a precise, smooth surface – a finish that’s almost like a mirror – you need to treat it with respect and precision. A rough or unsatisfactory finish on A2 can impact the performance and longevity of the part you’re making. It’s the difference between a functional component and one that truly looks and performs professionally. We’ll guide you through selecting the right carbide end mill and the techniques to get that perfect shine.
Choosing the Right Carbide End Mill: Your Precision Partner
When it comes to achieving a fine finish on tough materials like A2 tool steel, the type of end mill you choose is paramount. A generic end mill just won’t cut it (pun intended!). We need something specifically designed for this task.
For Tool Steel A2, a carbide end mill is almost always your best bet. Why carbide? It’s significantly harder and more rigid than high-speed steel (HSS), meaning it can withstand higher cutting speeds and temperatures. This is crucial for working with hardened steels like A2. But not all carbide end mills are created equal. We need to look for specific features:
Key Features of an Effective Carbide End Mill for A2 Finishing:
Number of Flutes: For finishing cuts, you generally want more flutes.
- 2 Flutes: Good for plunging and slotting, offering excellent chip clearance. Not ideal for high-quality finishing.
- 3-4 Flutes: A good balance for general milling and some finishing. Better surface finish than 2 flutes but still can have chip packing issues.
- 4-6 Flutes (or more): This is your sweet spot for finishing! More flutes mean a smoother engagement with the workpiece. They provide better support for each cutting edge and reduce vibration, which is critical for a fine surface finish. They also break chips into smaller, more manageable pieces, reducing the risk of them getting recut and damaging your finish.
Coating: A specialized coating on the carbide can make a world of difference.
- TiCN (Titanium Carbonitride): A good all-around coating that adds hardness and abrasion resistance.
- AlTiN (Aluminum Titanium Nitride) or TiAlN (Titanium Aluminum Nitride): Excellent for high-temperature applications like milling hardened steels. They form a protective oxide layer at high temperatures, preventing the tool from welding to the workpiece and extending tool life. This is often the preferred choice for finishing A2.
- ZrN (Zirconium Nitride): Offers good lubricity and can provide a very smooth finish.
For A2, an AlTiN or TiAlN coated end mill is highly recommended.
Corner Radius/Chamfer: To prevent chipping and improve surface finish, the cutting edges often have a small radius or chamfer.
- Square End Mill: Sharp corners can chip easily on hardened materials, leading to a poor finish.
- Corner Radiused/Chamfered End Mill: A small radius (e.g., 0.010″ to 0.030″) or a slight chamfer on the corners strengthens the cutting edge and helps produce a smoother surface. For finishing, a slight corner radius is generally better.
Helix Angle: This is the angle of the cutting flute.
- High Helix Angle (e.g., 45° or 60°): These provide a shearing action that results in a smoother finish and quieter cutting. They are excellent for finishing operations.
- Low Helix Angle (e.g., 30°): Better Chip evacuation for roughing, can be prone to chatter on harder materials when finishing.
A high helix angle is usually preferred for finishing.
Shank Diameter: Ensure the shank diameter matches your machine’s collet or tool holder. Common sizes for hobbyist and professional shops include 1/4 inch, 3/8 inch, 1/2 inch, and metric sizes like 6mm, 8mm, and 12mm. For precision finishing, using a high-quality collet with minimal runout is essential.
Recommended Carbide End Mill for A2 Finishing:
Based on these factors, a good starting point for finishing Tool Steel A2 would be:
Material: Solid Carbide
Flute Count: 4 flutes (minimum), 5 or 6 flutes are even better.
Coating: AlTiN or TiAlN
Edge Prep: Small corner radius (e.g., 0.015″) or slight chamfer.
Helix Angle: 45° or High Helix (e.g., 60°)
Brand: Reputable brands like Melin, Niagara Cutter, Harvey Tool, or Kyocera are known for quality.
When searching online, you might look for something like “carbide end mill 4 flute AlTiN Xmm shank for hardened steel finish.” For example, a “carbide end mill 3/16 inch 4 flute AlTiN 6mm shank” would be a starting point if your machine uses 6mm tooling and you need a smaller diameter. The goal is a tool that is sharp, rigid, and designed to glide through the material, not tear at it.
Setting Up Your Milling Machine for Success
Before you even think about plunging that end mill into your A2 steel, your milling machine needs to be set up correctly. This is where rigidity and accuracy become your best friends.
A wobbly machine or worn-out components will fight against your efforts every step of the way. Even with the best end mill, a less-than-riginal setup will lead to chatter, vibration, and a poor surface finish. Think of it like trying to paint a masterpiece with a shaky hand – it’s going to be messy!
Essential Machine Setup Checks:
1. Rigidity: Ensure your machine is on a solid base and all ways (the sliding surfaces of your machine) are properly adjusted and lubricated. Loose gibs are a surefire way to introduce chatter.
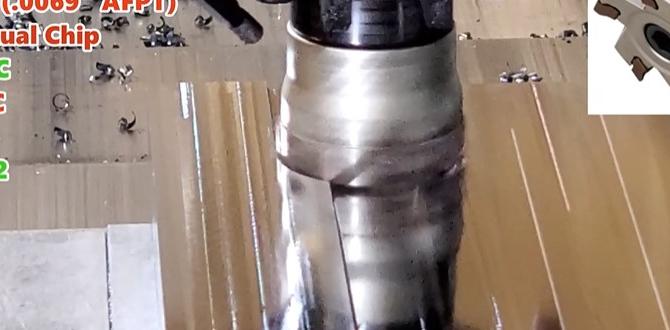
2. Spindle Runout: This is CRITICAL. Runout is the wobble of the spindle. Even a tiny amount of runout will cause the cutting edges of your end mill to engage and disengage unevenly, destroying your finish. Use an indicator to measure runout at the spindle taper. Ideally, it should be less than 0.0002″. A well-maintained machine should have very low runout.
3. Tool Holder/Collet: Use a high-quality collet system. Cheap collets or worn ones can introduce runout and vibration. Ensure the collet nut is tightened properly. For critical finishing, a shrink-fit holder offers the best concentricity (almost zero runout).
4. Workholding: Your workpiece MUST be held securely. Use precisely machined vise jaws, clamps, or fixtures. Any movement of the workpiece will result in an inconsistent finish and potentially damage your part or tool. Make sure your vise is square to the machine’s travel.
5. Cleanliness: Thoroughly clean the workpiece, machine table, and tool holder. Swarf (metal chips) getting into the wrong places can cause issues.
With A2 steel, which can be brittle due to its hardness, a rigid setup is non-negotiable. It allows the end mill to cut cleanly without being deflected, leading to the smooth, bright finish you’re aiming for.
Mastering Cutting Parameters for a Mirror Finish
This is where the magic happens! Choosing the right cutting speed (often called surface speed or SFM – Surface Feet per Minute) and feed rate (how fast the tool advances into the material) is crucial for achieving a good finish on A2. These aren’t just random numbers; they are calculated to create a clean chip and prevent the tool from overheating or chipping.
For finishing, we’re looking for a shallow depth of cut, a moderate to fast surface speed, and a feed rate that generates a very fine chip. The goal is to “glide” through the material, not force the tool.
Understanding Surface Speed (SFM) and Feed Per Tooth (FPT):
Surface Speed (SFM): This is the speed at which the cutting edge of the tool is moving across the workpiece material. Because carbide tools are hard, they can run much faster than HSS. For carbide finishing on hardened A2 steel, you’ll be in the range of 200-400 SFM. However, a more practical way for beginners to think about this is by calculating Spindle Speed (RPM).
Spindle Speed (RPM): This is what your machine’s spindle actually does. The formula is:
$$RPM = (SFM times 3.25) / Diameter_of_End_Mill$$
Always use the diameter of the end mill you are using.
Feed Per Tooth (FPT): This refers to how much material each cutting tooth removes on each rotation. For finishing, you want a very small FPT to ensure a fine chip and smooth surface. This is often in the range of 0.0005″ to 0.002″ per tooth.
Feed Rate (IPM – Inches Per Minute): This is the actual speed your machine’s axis moves. It’s calculated as:
$$Feed_Rate (IPM) = FPT times Number_of_Flutes times RPM$$
Recommended Starting Parameters for Carbide End Mill Finishing on A2:
Let’s use an example: You have a 3/16″ (0.1875″) diameter, 4-flute, AlTiN coated, carbide end mill for finishing. You’re targeting a surface speed of 250 SFM.
1. Calculate Spindle Speed (RPM):
$$RPM = (250 SFM times 3.25) / 0.1875″$$
$$RPM = 812.5 / 0.1875 approx 4333 RPM$$
2. Choose Feed Per Tooth (FPT): For a fine finish, let’s start with a conservative 0.001″ FPT.
3. Calculate Feed Rate (IPM):
$$Feed_Rate (IPM) = 0.001″ / tooth times 4 text{ flutes} times 4333 RPM$$
$$Feed_Rate (IPM) approx 17.33 IPM$$
These are starting points! It’s always wise to consult the end mill manufacturer’s recommendations if available. They often provide detailed charts for specific materials and coatings.
Important Considerations for Cutting Parameters:
Depth of Cut (DOC): This should be shallow for finishing. A good rule of thumb for finishing is a DOC of 0.005″ to 0.020″. A radial depth of cut (how much of the end mill’s diameter is engaged sideways) should also be shallow, especially if you are doing a full-slotting operation which requires a lot of engagement. For peripheral finishing (taking passes along the side of the part), you can take a larger radial depth of cut, but for slotting, keep it small.
Axial Depth of Cut (Stepdown): This is the amount you plunge into the material or the vertical distance each pass moves. For finishing, this should be very small, e.g., 0.005″ to 0.010″.
Radial Depth of Cut (Stepover): When milling the periphery of a part, this is the sideways distance between passes. For a good surface finish, a stepover of 20-50% of the end mill diameter is common. For a truly “mirror-like” finish, you might opt for a smaller stepover.
* Climb Milling vs. Conventional Milling: For finishing, climb milling is almost always preferred. In climb milling, the cutter rotates in the same direction as the feed of the workpiece. This creates a thinner, finer chip and results in a smoother surface finish. Conventional milling, where the cutter rotates against the feed direction, generates a thicker chip and can lead to a rougher finish and increased tool wear. Always ensure your machine has minimal backlash (the “play” in the lead screws) if using climb milling, as this can cause problems.
Some modern CNC machines have “high-feed” or “trochoidal” milling strategies that can be very effective for finishing. These involve using a large stepover and a very shallow axial depth of cut with a high-feed end mill, which can increase material removal rates while maintaining a good finish.
The Importance of Lubrication and Coolant
Cutting hardened Tool Steel A2 generates significant heat. Without proper cooling and lubrication, this heat can lead to tool breakage, premature wear, and a terrible surface finish.
For finishing operations, especially in A2, you want to manage this heat effectively. The coolant serves two main purposes: cooling the tool and workpiece, and lubricating the cutting zone to reduce friction and help shear the material cleanly.
Lubrication Methods for Milling A2:
1. Flood Coolant: This is the most common method on larger milling machines. A continuous flow of coolant (often a water-soluble oil or synthetic) is pumped onto the cutting area. This is very effective for cooling but can sometimes wash away fine chips, which might be undesirable if you’re aiming for a perfect polish.
2. Mist Coolant: A fine mist of coolant and air is directed at the cutting zone. This provides excellent cooling and lubrication with less mess than flood coolant. It’s a good option for finishing as it flushes chips away efficiently.
3. Soluble Oils/Synthetics: These water-based coolants are excellent for cooling and offer good lubricity. They need to be mixed at the correct concentration, usually higher for tougher metals. For A2, a concentration of 10-15% is often recommended. [You can find excellent safety and mixing guidance on concentrations from organizations like the Occupational Safety and Health Administration (OSHA) on metalworking fluids.]
4. Minimum Quantity Lubrication (MQL): This system uses a very small amount of specialized cutting fluid atomized into a fine mist. It’s very efficient and produces minimal waste.
5. Cutting Paste/Stick: For very small operations or manual mills where flood coolant is impractical, a high-quality cutting paste or stick can be applied directly to the end mill’s cutting edges. This provides localized lubrication. For A2, a paste designed for extreme pressure is ideal.
Key Takeaway: Do NOT run dry when milling hardened steel like A2. Always use a coolant or lubricant. For finishing, you want a fluid that keeps the cutting zone cool without creating excessive foam or carrying away swarf too aggressively if you’re trying to get a polished look.
Step-by-Step Guide: Achieving that Mirror Finish
Now let’s put it all together. Follow these steps carefully to get the best possible finish on your Tool Steel A2 part.
- Prepare Your Workpiece:
- Ensure A2 steel is properly hardened and tempered to your desired specification. For finishing, ensure the surface is relatively clean and free from scale or heavy oxidation.
- If the surface is very rough, a pre-finishing pass with a coarser tool might be necessary to remove bulk material, leaving a consistent surface for your final finishing passes.
- Mount the Workpiece Securely:
- Use robust workholding – a good vise, toe clamps, or fixture.
- Verify that the vise is square to the X and Y axes of your milling machine.
- Install the Carbide End Mill:
- Ensure your spindle is clean.
- Insert the correct diameter carbide end mill into a clean, high-quality collet.
- Tighten the collet nut securely.
- Double-check for any signs of runout using an indicator. If it’s too high,