Quick Summary:
For precise machining, a 3/16″ carbide end mill with an 8mm shank is crucial. Selecting one with low runout ensures smooth cuts, excellent surface finish, and consistent accuracy, preventing vibration and tool wear for hobbyists and professionals alike.
Hey there, fellow makers! Daniel Bates here from Lathe Hub. Ever tried to make a precise cut, only to find your tool wobbling and leaving a rough, inconsistent finish? It’s frustrating, right? Especially when you’re working with a small but mighty tool like a 3/16″ carbide end mill with an 8mm shank. This size is fantastic for detailed work, but if that tiny end mill has too much “play” – what we call runout – your projects won’t turn out as crisp as you’d hoped. This guide is all about understanding and choosing the right end mill to get those super-smooth, accurate results you’re aiming for. Let’s dive in!
Runout might sound like a scary technical term, but it’s actually quite simple. Imagine a perfectly straight spinning top. Now imagine one that wobbles as it spins. That wobble is runout. In our machining world, it’s the amount an end mill deviates from its true rotational axis. For a precision tool like a 3/16″ carbide end mill with an 8mm shank, anything more than a tiny bit of runout can ruin a perfectly good project. It means poor surface finish, shorter tool life, and potentially damaged workpieces. But don’t you worry, because finding a solution is easier than you might think. We’ll cover what causes it, how to spot it, and most importantly, how to get an end mill that minimizes it.
Why Low Runout Matters for Your 3/16″ Carbide End Mill
When you’re working with small, intricate details – and that 3/16″ size is perfect for them – precision is everything. A carbide end mill is already a champion for its hardness and ability to cut tough materials. But its real magic happens when it spins perfectly true. Low runout is the unsung hero of a clean cut.
Think about it: if your end mill is wobbling even a little bit, it’s not cutting a consistent path. Instead, it’s digging in and skimping over parts of the material. This leads to a few common problems:
- Rough Surface Finish: Instead of a smooth, almost polished look, you’ll see chatter marks and an uneven texture. This is often the first sign you’ll notice.
- Reduced Accuracy: If the tool isn’t cutting where you expect it to, your dimensions will be off. For small parts, this can make the difference between a perfect fit and a useless piece.
- Shorter Tool Life: When an end mill wobbles, certain flutes get overworked, while others barely touch the material. This uneven stress can lead to premature chipping or wear on the cutting edges.
- Increased Vibration: A wobbling tool vibrates more. This can be noisy, uncomfortable, and even dangerous, putting stress on your machine’s spindle and bearings.
- Difficulty in Machining Hard Materials: Materials like hardened steel or certain alloys demand extreme precision. Any runout will fight against your efforts to get a clean cut.
For a 3/16″ end mill, especially one with an 8mm shank (which is a good, sturdy size for this diameter), achieving low runout is paramount. This combination is often chosen precisely for its ability to handle finer details and achieve better results in hobbyist and small-scale professional setups where perfect balance and accuracy are key.
Understanding Runout: What Is It and What Causes It?
Let’s break down “runout” in simple terms. Imagine you’re trying to draw a perfect circle with a wobbly pencil. The line wouldn’t be smooth, right? Runout is the machining equivalent of that wobbly pencil. Specifically, we’re usually talking about two types of runout when it comes to end mills:
- Radial Runout: This is the wobble that happens perpendicular to the cutting axis. Think of the tip of the end mill tracing a tiny circle as it spins.
- Axial Runout: This is when the end mill isn’t perfectly aligned with its own axis of rotation. It’s like the tip is dipping up and down slightly as it spins.
Both types can cause the problems we discussed. But what makes runout happen in the first place? It’s usually not just one thing, but a combination of factors:
Common Causes of Runout
- Manufacturing Tolerances: Even the best tools have tiny imperfections. The manufacturing process for the end mill itself, or the holder it goes into, can introduce a small amount of runout. Cheaper tools often have wider tolerances.
- Tool Holder Issues: This is a big one! The way the end mill is held in your machine’s spindle (the tool holder, collet, or chuck) plays a massive role. If the holder isn’t precise, or if it’s worn out, it will transfer that inaccuracy to the end mill. A worn collet or a slightly out-of-round spindle bore can be major culprits.
- Improper Insert/Tool Installation: If the end mill isn’t seated correctly in the holder, or if set screws aren’t tightened uniformly, it can lead to off-axis clamping.
- Tool Wear and Damage: Even a perfectly manufactured end mill can develop runout if it’s been chipped, dulled unevenly, or slightly bent from a crash.
- Spindle Condition: The spindle in your milling machine itself needs to be in good shape. Worn bearings can cause the entire spindle assembly to wobble.
For a 3/16″ carbide end mill with an 8mm shank, you’re looking at a tool designed for finesse. That’s why focusing on the factors that minimize runout is so important. We want that 8mm shank to be held as perfectly as possible in the spindle to let the 3/16″ carbide cutter do its job cleanly.
Choosing Your 3/16″ Carbide End Mill for Low Runout
So, you’re in the market for a 3/16″ carbide end mill with an 8mm shank, and the phrase “low runout” is your mantra. How do you actually find a tool that lives up to that promise? It’s about looking at the specifications and understanding what contributes to precision.
Key Features to Look For
When you’re browsing online or in a tool catalog, keep an eye out for these features:
- Reputable Manufacturer: This is often the first and best indicator. Well-known brands that specialize in cutting tools invest heavily in quality control and precision manufacturing. They have more to lose if their tools don’t perform. Think of brands like Guhring, Sandvik Coromant, Iscar, or even high-quality smaller manufacturers.
- Tool Specifications (Runout Tolerance): Some high-end manufacturers will actually list the acceptable runout tolerance for their end mills. While this is more common for larger, more expensive tooling, it’s worth checking. If they specify low runout, it’s a good sign they’ve engineered it that way.
- Grind Quality: A finely ground flute and cutting edge are indicative of good manufacturing. Look at product photos closely, if available. A dull, uneven finish on the cutting edges can suggest lower quality control.
- Material (Carbide Grade): While not directly related to runout, the grade of carbide matters for performance and durability. For general-purpose machining of metals like aluminum, steel, or brass, a medium-grain carbide (often designated by a letter like ‘K’ or a specific sub-grade) is usually a good bet. For very hard materials, you might look for a finer grain.
- Number of Flutes: For a 3/16″ end mill, you’ll typically see 2, 3, or 4 flutes.
- 2-Flute: Excellent for chip evacuation, especially in softer materials like aluminum or plastics. Usually has more clearance for deeper cuts.
- 3-Flute: A good all-around choice for many metals, offering a balance of chip clearance and surface finish.
- 4-Flute: Provides the best surface finish but can load up with chips in softer materials. Ideal for finishing passes in steel or when you need a very smooth surface.
The number of flutes doesn’t directly impact runout, but choosing the right one for your material can prevent chip packing, which can indirectly lead to issues.
- Coating: Coatings like TiN (Titanium Nitride), TiAlN (Titanium Aluminum Nitride), or AlTiN (Aluminum Titanium Nitride) can improve tool life and performance by reducing friction and heat. While not directly impacting runout, they contribute to overall cutting efficiency.
The Shank Matters: 8mm Precision
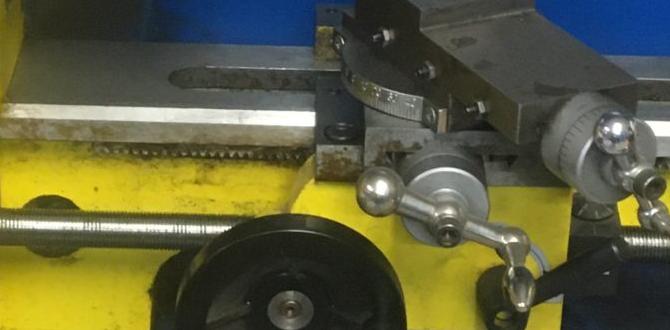
You specifically mentioned the 8mm shank. This is a common metric size, often found in smaller milling machines and CNC routers. The key here is that the 8mm shank needs to be precisely manufactured and fit snugly into your collet or tool holder. Even a perfectly made end mill can suffer from runout if the holder it’s in is sloppy or worn.
When selecting your tool, ensure the shank diameter is stated as nominal (e.g., 8mm). High-precision tools might even have very tight tolerances on the shank diameter. If your machine uses collets, using a matched collet for that 8mm shank is essential.
How to Minimize Runout in Your Setup
Even with the best end mill, your setup is critical. Think of it like this: a fantastic screwdriver won’t help if the screw head is stripped. Here’s how to ensure your 3/16″ carbide end mill with an 8mm shank performs at its best.
1. Invest in Quality Tool Holding
This is arguably the most important step after choosing a good end mill. The collet or tool holder is what grips the end mill and connects it to the spindle. Precision in this interface is non-negotiable for low runout.
- High-Quality Collets: If your machine uses ER collets (a very common system), invest in a set of precision collets that meet DIN 6499 standards (often referred to as “high precision” or “tool maker” quality). These are manufactured to very tight tolerances. For an 8mm shank, you’ll want an 8mm collet.
- Collet Chucks: A good quality collet chuck (like a Weldon or Morse taper shank with an ER collet receptacle) can also significantly improve accuracy compared to a basic drill chuck.
- Tool Holder Condition: Regularly inspect your tool holders for wear, damage, or debris. Clean them thoroughly before inserting a new tool.
For an 8mm shank, an ER32 or ER25 collet system is common. Ensure you have the correct size collet to match the shank as closely as possible to minimize the gripping surface that could introduce wobble.
2. Proper Tool Installation
It sounds simple, but how you put the end mill into the holder makes a difference:
- Cleanliness is Key: Ensure both the end mill shank and the inside of the collet/holder are perfectly clean and free of oil, coolant residue, or chips.
- Seat the Tool Correctly: Insert the end mill into the collet so that it’s seated properly. Don’t just tighten it loosely. Ensure it goes in a reasonable depth – usually, about 2/3 of the shank length is recommended for rigid clamping, but check your tool holder’s specific instructions.
- Tighten Uniformly: If using a collet nut, tighten it evenly. If your tool holder has set screws, tighten them incrementally and evenly to avoid distorting the collet or holder.
- Avoid Overtightening: While you want a secure grip, overtightening can deform the collet or holder, introducing runout.
3. Spindle Maintenance
Your milling machine’s spindle is the heart of its precision. If the spindle itself has issues, even the best end mill and holder will struggle.
- Check for Spindle Runout: You can measure spindle runout directly using a dial indicator mounted to the machine. If the spindle itself exceeds acceptable runout (often specified in the machine’s manual, typically <0.0005″ or <0.012mm for a good machine), it’s a more significant repair issue.
- Bearing Condition: Listen for any unusual noises from the spindle bearings. Worn bearings will cause wobble.
- Proper Lubrication: Ensure your spindle is lubricated according to the manufacturer’s recommendations.
4. Material and Cut Strategy
Sometimes, how you cut can highlight existing runout or even cause issues.
- Test Cuts: After installing a new end mill or suspecting runout, perform a light test cut on scrap material. Use a dial indicator to measure the resulting surface finish for any consistent rise and fall. You can also visually inspect it for chatter.
- Appropriate Feed and Speed: Using feed rates and spindle speeds that are too high, or too low, can exacerbate tool vibration. Consult machining resources for recommended parameters for your material and tool size. A good resource for this is the National Institute of Standards and Technology (NIST) Manufacturing Extension Partnership (MEP), which provides excellent guidance on manufacturing best practices.
- Chip Load: Ensure your chip load (the thickness of material removed by each cutting edge per revolution) is appropriate. Too small a chip load can cause rubbing and chatter, while too large can overload the tool.
By taking these steps, you’re ensuring that your 3/16″ carbide end mill with its 8mm shank is given the best possible chance to perform with minimal runout, leading to those clean, accurate cuts.
Practical Considerations for Your 3/16″ 8mm Shank End Mill
Beyond just runout, there are other practical aspects to consider when working with this specific tool size combination. These will help you get the most out of your investment and ensure successful machining.
Material Suitability
A 3/16″ (which is about 4.76mm) carbide end mill with an 8mm shank is a versatile tool. It’s excellent for:
- Aluminum: Its sharpness and ability to leave a good finish make it ideal for aluminum.
- Plastics: Carbide cuts through plastics cleanly, preventing melting and sticking if speeds and feeds are managed well.
- Brass and Copper Alloys: These softer metals machine beautifully with sharp carbide tools.
- Mild Steel: With appropriate speeds, feeds, and coolant, it can handle mild steel for smaller jobs.
- Woodworking (with caveats): While carbide is used in woodworking, the geometry of milling end mills differs from router bits. For precision woodworking, specific “straight flute” or “V-groove” bits might be better suited, but a standard end mill can work for basic shaping or pocketing.
It’s generally less suited for very hard steels or exotic alloys where specialized tooling (larger diameters, different flute counts, or dedicated high-performance carbide grades) might be necessary.
Speeds and Feeds: A Starting Point
Finding the “perfect” speeds and feeds is an art, but here’s a general guideline for a standard 2- or 4-flute, uncoated carbide 3/16″ end mill. Always start conservatively and listen to your machine and the sound of the cut!
For general-purpose machining:
| Material | Spindle Speed (RPM) | Feed Rate (IPM / mm/min) | Chip Load per Tooth (in / mm) |
|---|---|---|---|
| Aluminum | 8,000 – 20,000+ | 15-40 IPM (380-1000 mm/min) | 0.002 – 0.005 in (0.05 – 0.12 mm) |
| Mild Steel | 4,000 – 8,000 | 8-20 IPM (200-500 mm/min) | 0.001 – 0.0025 in (0.025 – 0.06 mm) |
| Plastics (e.g., Delrin, ABS) | 10,000 – 20,000+ | 20-50 IPM (500-1270 mm/min) | 0.003 – |