Can you build a DIY steady rest for your wood lathe? Absolutely! A DIY steady rest is a game-changer for turning long, thin, or wobbly workpieces on your wood lathe. It prevents vibration and flexing, ensuring smoother cuts and better results. Building one yourself is an achievable project that significantly enhances your lathe’s capabilities. This guide will walk you through it step-by-step.
Welcome to Lathe Hub! If you’ve ever struggled with wobbly wood on your lathe, you know how frustrating it can be. That long spindle, that delicate turning – it just seems to dance around, making clean cuts impossible. This is where a steady rest comes to the rescue. It’s a fantastic tool that supports your workpiece, keeping it stable and true. For beginners, it might seem like advanced equipment, but don’t worry! We’re going to build a simple, effective DIY steady rest that will make a world of difference in your turning projects.
Why You Need a Steady Rest for Your Wood Lathe
Turning long, slender pieces of wood on a lathe presents a unique challenge. Without proper support, the workpiece can vibrate excessively, leading to rough finishes, tool catches, and even potential injury. This is where a steady rest becomes not just a helpful accessory, but a proven essential.
A steady rest attaches to the lathe bed and extends an arm to support the free end of your workpiece. This support minimizes flex and vibration, allowing for much finer control during the turning process. Imagine turning a long table leg or a slender lamp base – without a steady rest, these projects become significantly more difficult and prone to errors.
Here’s why it’s an essential tool for any serious woodturner:
- Reduces Vibration: The primary function is to dampen the vibrations that occur when turning long or thin workpieces.
- Prevents Flexing: It stops thin pieces from bending away from your tool, allowing for more accurate shaping.
- Improves Finish Quality: With reduced vibration and flex, you’ll achieve a smoother, cleaner surface finish.
- Enables Turning Longer Pieces: It opens up possibilities for projects that would otherwise be too challenging to turn safely.
- Increases Safety: A stable workpiece is a safer workpiece. Less chatter means fewer unexpected tool movements.
Understanding the Components of a DIY Steady Rest
Before we dive into building, let’s break down what makes a steady rest tick. Most DIY designs share common elements, adaptable to different lathe sizes and user preferences. Understanding these parts will help you appreciate the design and make modifications if needed.
At its core, a steady rest consists of a stable base that mounts to the lathe bed, an adjustable frame, and support arms (often lined with rollers or a smooth material) that press against your workpiece. Here are the key components:
- Base/Mounting Bracket: This is the part that affixes your steady rest securely to the lathe bed. It needs to be robust and adjustable to position the steady rest correctly relative to your workpiece.
- Frame/Body: This forms the main structure that holds the support arms. It often allows for adjustments in height and width.
- Support Arms: These arms extend from the frame to make contact with the turning workpiece. The number of arms can vary (usually three), and they are typically lined with low-friction material or small wheels to allow the workpiece to spin freely without damage.
- Adjustment Screws: These fine-tune the position of the support arms, allowing you to apply just the right amount of pressure to the workpiece.
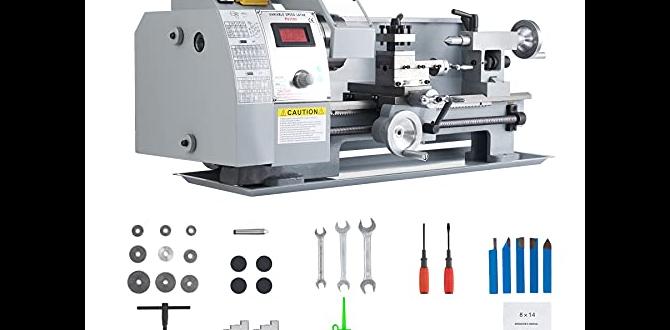
Materials and Tools You’ll Need for Your DIY Steady Rest
Gathering your materials and tools before you start is crucial for a smooth building process. For a robust and functional DIY steady rest, you’ll need a few key items. We’ll focus on a design using common workshop materials, making this project accessible.
This list is for a typical DIY steady rest. You might adjust based on the specific design you choose or the materials you have on hand. Safety glasses are non-negotiable for any workshop project!
Essential Materials:
- Wood: Hardwood is best for structural components due to its strength and stability. ¾-inch or 1-inch thick hardwood boards are good choices.
- Metal Stock: For mounting hardware and any reinforced areas, you might use flat steel bar or angle iron.
- Fasteners: Wood screws, machine screws, nuts, and washers. You’ll need various sizes.
- Threaded Rod or Bolts: Typically used for the adjustment screws. Longer machine screws can also work.
- Support Arm Liners: Options include:
- Small, high-quality ball bearings (metal or plastic).
- Bronze bushings.
- Furniture caster cups (if you can find ones sized appropriately for your rollers).
- Thick felt or leather for a simpler, friction-based rest (less ideal for heavy duty).
- Wood Glue: For strong, permanent joints in wooden parts.
- Finish: Oil or varnish to protect the wooden parts.
Tools You’ll Need:
- Measuring Tape and Pencil: For accurate layout.
- Saw: A table saw, miter saw, or even a good handsaw for cutting wood to size.
- Drill and Drill Bits: For pilot holes and clearance holes.
- Screwdriver/Drill Bits: To drive screws.
- Wrenches or Socket Set: For tightening nuts and bolts.
- Clamps: Essential for holding pieces together while glue dries.
- Sandpaper: For smoothing edges and surfaces.
- Optional: Router (for decorative edges or dados), Metal File (for deburring metal parts).
Step-by-Step Guide: Building Your DIY Steady Rest
Let’s get building! This guide outlines the construction of a common and effective DIY steady rest design. Remember to always measure twice and cut once. Safety first – wear your safety glasses!
Step 1: Design and Measure
First, you need to determine the size of the steady rest needed for your lathe and the types of projects you envision. Measure the distance from your lathe bed to the center height of your spindle. This will help you determine the overall height of your steady rest. You’ll also need to consider the maximum and minimum diameter of workpieces you want to support. Sketch out a basic design based on these measurements.
For a common benchtop lathe, the center height can range from 5 to 8 inches. Let’s assume a center height of 6 inches for this example.
You can often find plans for DIY steady rests online from reputable woodworking resources. For instance, sites like Wood Magazine offer detailed plans and tips that can be adapted.
Step 2: Construct the Base/Mounting Bracket
This part needs to securely attach to your lathe bed. For many lathes, the bed has T-slots. You can create a bracket using hardwood and metal L-brackets or flat steel bar that fits into these slots.
Cut two pieces of hardwood (e.g., 1″ thick) to form the sides of the base. Cut a section of wood or metal that will act as the bridge connecting these two sides and will interface with your lathe’s T-slots. Drill holes in the metal or wood bridge to accept T-nuts or specialized lathe bed clamps, allowing you to secure the rest to your machine.
| Component | Material Suggestion | Dimensions (Example) | Notes |
|---|---|---|---|
| Base Sides (x2) | ¾” or 1″ thick Hardwood | 6″ (height) x 4″ (width) | Taper lower edge for clearance if needed. |
| Base Bridge | 1″ x 2″ Hardwood or Steel Bar | 6″ (length) | Must be designed to fit lathe bed slots. |
| Mounting Hardware | T-nuts, Bolts, Washers | To fit lathe bed slots | Ensure a snug fit. |
Step 3: Build the Main Frame
The main frame will encompass the support arms. This is often a U-shaped or A-shaped structure.
Cut two vertical uprights from your hardwood. These should be tall enough to accommodate the adjustment screws for your support arms. The width will depend on the size of your lathe and desired clearance. Then, cut a horizontal cross member that connects the tops of the uprights. You might also add a bottom brace for extra rigidity. Use glue and screws for strong joints. Drill holes at appropriate heights for your adjustment screws.
Step 4: Fabricate the Support Arms
You’ll typically need three support arms. These are the parts that will contact your workpiece.
Cut three identical pieces of hardwood for the arms (e.g., 1″ x 2″ x 6″). Drill a hole at one end of each arm to accept the adjustment screw. At the other end, where the arm meets the workpiece, you need to install your chosen support material. For ball bearings, you can drill a hole slightly smaller than the bearing diameter and press-fit them, or more commonly, mount small metal plates with holes to hold the bearings. If using bushings, drill a hole to match the bushing diameter and glue it in place.
Tip for Ball Bearing Rollers: Aim for at least three bearings per arm for good support: one on top and two on the sides. Ensure they are mounted such that the workpiece can spin freely.
Step 5: Install the Adjustment Screws
These screws allow you to push the support arms against the workpiece. You can use long machine screws or threaded rod.
For machine screws: Drill clearance holes through your main frame (where the arms pivot or slide) and into the back of the support arms. Then, drill slightly smaller pilot holes into the adjusting screw, or even better, tap threads into the main frame for the screws to thread into, and drill clearance holes in the arms.
For threaded rod (more robust): Cut lengths of threaded rod. Drill holes through the main frame and the support arms that match the diameter of your threaded rod. Use nuts on either side of the frame and arm to secure and adjust the position of the support arm. You might want to attach knobs or handles to the ends of the adjustment screws for easier turning.
Step 6: Assemble the Steady Rest
Now, put it all together.
Attach the main frame assembly to the base/mounting bracket. This connection might involve screws or bolts, depending on your design. Test the fit on your lathe bed to ensure it’s stable.
Mount the U-shaped carriages for the support arms onto the main frame. These carriages should allow the arms to slide in and out to adjust their position. Then, insert your adjustment screws and attach the support arms to these screws.
Place your support arms into their mounts. Ensure they can move freely but are also held securely. Test the adjustment screws – they should smoothly push the arms inward.
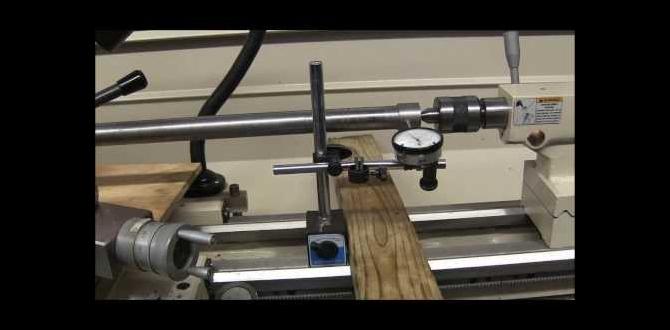
Step 7: Mount and Test
Securely attach the steady rest to your lathe bed. Make sure it’s snug and doesn’t wobble. Position it so the support arms are roughly aligned with where your workpiece will extend. Start with your lathe set at a low speed.
Carefully bring a piece of scrap wood up to the steady rest. Adjust the support arms so they make gentle contact with the wood. The goal isn’t to clamp it, but to provide steady support. Turn the lathe on at a very low RPM. Listen for any excessive noise or vibration. Gradually increase speed and check the workpiece for stability. You may need to fine-tune the position of the steady rest along the bed and the pressure of the support arms.
A good bench check is to see if you can get a clean cut on a piece of dowel that is significantly longer than it is in diameter. For example, try turning a 1″ diameter, 18″ long piece of maple.
Considerations for Different Wood Lathes
Not all wood lathes are created equal, and your DIY steady rest might need adjustments based on your machine’s specific design. Understanding these variations will help you adapt the general plan.
Lathe Bed Types
Most commercial wood lathes use a standard cast iron bed with T-slots. Your DIY mounting bracket needs to interface with these slots. If you have a tube-style bed or a different mounting system, you’ll need to design a bracket that clamps securely to it. This might involve fabricating custom clamps or using rubber padding to prevent marring the lathe’s surface.
For example, some older or specialized lathes might have a flat bed. In such cases, you might need to use C-clamps or create a frame that straddles the bed and uses pressure to stay in place. Always prioritize a secure, non-slip attachment.
Center Height
As mentioned, the center height of your lathe’s spindle is critical. Your steady rest’s frame needs to be tall enough to bring the support arms up to this level. Measure this accurately before cutting any parts. If you have a lathe with variable speed, ensure your steady rest can handle higher RPMs if you plan to use them.
Workpiece Capacity
Think about the largest and smallest diameters you commonly turn. Design your steady rest’s frame and support arms to accommodate this range. Some designs use sliding carriages for the support arms, allowing for very wide adjustment. Others might have fixed positions that work for a specific range.
For very large diameter workpieces, you might need a sturdier frame and arms, possibly incorporating metal for increased rigidity. For smaller, delicate items, you might opt for softer liners on the support arms, like thick felt or leather, to avoid marring.
Enhancements and Modifications
Once you have your basic DIY steady rest built and working, you can consider enhancements. These aren’t strictly necessary but can improve performance, durability, and ease of use.
- Ball Bearing Upgrades: For the smoothest operation, use high-quality, sealed ball bearings. Consider mounting them on small metal plates that can be easily replaced if they wear out. Some advanced designs use three bearings per arm: one on top and two on the sides, to cradle the workpiece.
- Wheel Options: Instead of bearings, some turners use small, smooth-running wheels. Urethane or nylon wheels can offer good durability and a smooth surface. Ensure they are mounted securely and rotate freely.
- Teflon or UHMW Liners: For simpler, cost-effective designs without bearings or wheels, you can line the support arms with strips of Teflon or Ultra-High Molecular Weight (UHMW) polyethylene. These materials offer very low friction and will allow the workpiece to spin without excessive drag. You can find these materials at industrial supply or plastic sheeting suppliers. UHMW plastic is a popular choice for its durability and low friction properties.
- Quick-Release Mechanisms: If you frequently attach and detach the steady rest, consider adding quick-release levers or clamps to the mounting bracket instead of standard T-nuts. This can save a lot of time during setup.
- Dust Collection Integration: For longer turning sessions, dust can accumulate. Some turners add a small port to their steady rest frame to connect a shop vacuum, helping to keep the work area cleaner.
- Adjustable Height Base: If you work on different lathes or need fine-tuning of the center height, you could modify the base with a sliding mechanism or shim slots to adjust its height slightly.
Safety First! Tips for Using Your DIY Steady Rest
Your new DIY steady rest is a fantastic tool, but like any workshop equipment, it requires careful use to ensure your safety. Always remember these crucial points:
Never fully clamp the workpiece. The support arms should offer gentle, consistent contact, not bind the wood. The workpiece must be able to rotate freely. Too much pressure will cause undue stress on your lathe’s bearings and motor, and can lead to a dangerous catch.
Use lower speeds. Especially when starting out or turning long, thin, or potentially unbalanced pieces, begin at the slowest possible speed on your lathe. Gradually increase the speed only after you are confident the setup is stable.
Inspect regularly. Before each use, check that your steady rest is securely mounted to the lathe bed. Ensure the support arms are in good condition, and any bearings or wheels are spinning freely. Loose parts can be a major hazard.
Center height alignment is key. The steady rest works best when its support arms are aligned with the spindle’s center line. Misalignment can cause uneven pressure and vibration.
Listen and watch. Pay attention to any unusual noises or vibrations from the lathe or the workpiece. If