Tialn Ball Nose End Mill for Inconel 625: Finishing Made Simple
Discover how to effectively use a Tialn ball nose end mill with Inconel 625 for superior finishing. Learn essential techniques, settings, and best practices to achieve smooth, precise results in your machining projects. This guide makes a challenging material accessible.
Hey folks, Daniel Bates from Lathe Hub here! Ever stare at a piece of Inconel 625 and think, “How am I supposed to get a clean finish on this tough stuff?” You’re not alone. Many of us have faced the challenge of machining this superalloy, especially when aiming for that smooth, polished look. It can be frustrating when your tools chatter, chip, or just don’t deliver the finish you need. But don’t sweat it! Today, we’re demystifying the process. We’ll dive into how a Tialn ball nose end mill can be your best friend for Inconel 625 finishing. Get ready to learn the tricks that will make this tough job feel a whole lot easier. Stick around, because by the end of this, you’ll be ready to tackle those high-nickel alloys with confidence!
Understanding Inconel 625 and the Need for Specialized Tools
Inconel 625 is a marvel of material science. It’s an alloy known for its incredible strength, resistance to corrosion, and ability to perform under extreme temperatures. Think jet engines, marine applications, and chemical processing equipment – that’s where Inconel 625 shines. However, these fantastic properties come with a trade-off: it’s notoriously difficult to machine. It’s significantly harder than standard steels or aluminum, meaning it work-hardens quickly, generates a lot of heat during cutting, and can quickly dull or break conventional tooling.
This means that standard machining practices and tools often just won’t cut it (pun intended!). You need tools that are not only robust but also engineered with specific geometries and coatings to handle the unique challenges of machining nickel-based alloys like Inconel 625. This is where specialized end mills, like a Tialn ball nose end mill, come into play, especially when aiming for a high-quality surface finish.
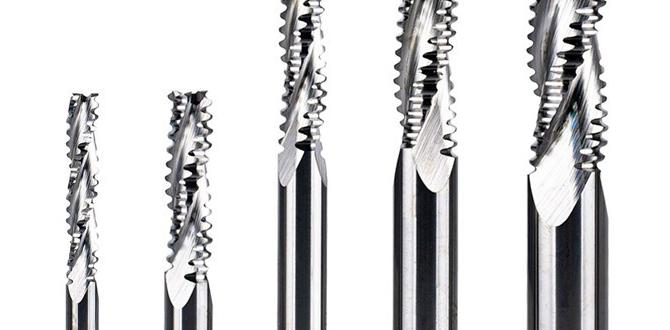
What is a Ball Nose End Mill?
Before we get into the specifics of Tialn coating and Inconel 625, let’s quickly clarify what a ball nose end mill is. Unlike flat-bottomed end mills, a ball nose end mill has a fully radiused cutting edge at its tip. This hemispherical shape is perfect for creating:
- Contoured surfaces
- Radiused pockets
- 3D shapes
- Smooth, sweeping fillets
The radius at the tip allows for a smooth transition from one cutting pass to another, which is crucial for achieving a good surface finish, especially on complex 3D geometries. It also helps to distribute the cutting load more evenly compared to a square-shouldered end mill when cutting curves.
The Power of Tialn Coating for Inconel Machining
Now, let’s talk about the “Tialn” part. Tialn is a coating applied to the surface of the cutting tool. Think of it as a super-tough, wear-resistant shield for your end mill. Tialn stands for Titanium Aluminum Nitride. This specific type of coating offers several key advantages, especially when machining difficult materials like Inconel 625 for finishing operations:
- Extreme Hardness: The Al in Tialn forms an aluminum oxide layer at high temperatures. This layer is incredibly hard and acts as a thermal barrier, protecting the tool’s core from the intense heat generated during machining.
- Abrasion Resistance: Nickel alloys like Inconel 625 are abrasive. The hard composition of Tialn resists wear and abrasion, allowing the tool to maintain its sharp edge for longer periods.
- Reduced Friction: The coating helps to reduce the friction between the tool and the workpiece, leading to smoother cutting and less heat buildup.
- Extended Tool Life: By combating heat and wear, Tialn coatings significantly extend the life of the end mill, making your machining more economical and efficient.
- Improved Surface Finish: A sharper, more stable cutting edge enabled by the coating directly translates to a cleaner, smoother surface finish on the workpiece.
When you combine a ball nose geometry with a Tialn coating, you get a tool specifically designed to excel at creating smooth, curved surfaces on demanding materials like Inconel 625.
Why a 40-Degree Helix Angle Matters for Finishing
You might also see end mills specified with a particular helix angle. For finishing Inconel 625 with a ball nose end mill, a 40-degree helix angle is often recommended. Here’s why:
- Chip Control: A moderate helix angle like 40 degrees helps to evacuate chips effectively without creating excessive cutting forces that could lead to chatter or tool deflection. Good chip evacuation is vital to prevent re-cutting chips, which drastically increases heat and wear.
- Smooth Cutting Action: This angle contributes to a smoother, more shearing cut, which is beneficial for surface finish. It reduces radial forces, minimizing the tendency for the tool to wander.
- Versatility: While higher helix angles are great for softer materials and faster cutting, and lower angles for rigidity, 40 degrees often strikes a good balance for tougher alloys where a superior finish is the priority. It’s less aggressive than a high helix but more efficient at chip evacuation than a very low helix.
This specific combination of ball nose geometry, Tialn coating, and a 40-degree helix angle creates a tool built for precision and durability on challenging materials.
Choosing the Right Tialn Ball Nose End Mill for Inconel 625
When you’re ready to purchase, keep these points in mind:
- Material: Ensure the end mill is made from a high-quality carbide substrate. This provides the necessary rigidity and heat resistance to hold up under the demands of Inconel machining.
- Coating: Specifically look for “Tialn” or a similar high-performance PVD coating designed for high-temperature alloys.
- Geometry: Confirm it’s a ball nose end mill. Check the specified radius. Common radii include 0.5mm, 1mm, 2mm, etc., depending on your desired feature size.
- Number of Flutes: For finishing operations in difficult materials, 2 or 3 flutes are often preferred. Fewer flutes offer better chip clearance and can reduce the risk of chatter. More flutes can provide a smoother finish at higher feed rates but can also increase heat and chip packing issues in tough alloys. For Inconel finishing, 2-flute tools are a very common and effective choice.
- Helix Angle: As discussed, a 40-degree helix angle is a good starting point for finishing these materials.
Always refer to the manufacturer’s specifications. Reputable tool manufacturers will often provide guidance on which of their tools are best suited for specific materials and applications. For more insights into tool selection, check out resources from organizations like the Sandvik Coromant Knowledge Center, which offers in-depth material machining advice.
Setting Up Your Machine for Success
Getting the right tool is only half the battle. Your machine setup and cutting parameters are equally critical for success when machining Inconel 625 with a Tialn ball nose end mill.
Essential Tools and Setup Checklist:
- Rigid Machine: A sturdy, well-maintained milling machine is non-negotiable. Vibration is the enemy of good finishes and tool life. Ensure your machine has minimal backlash and a rigid spindle.
- High-Quality Collet/Holder: Use a high-precision collet chuck or side-lock holder to ensure the shortest possible tool overhang. This maximizes rigidity and minimizes deflection.
- Through-Spindle Coolant (Recommended): Inconel generates immense heat. Through-spindle coolant (TSC) is highly beneficial for evacuating chips and cooling the cutting zone effectively, especially with smaller diameter tools or deeper cuts.
- Appropriate Lubricant/Coolant: While TSC is great, having a good quality cutting fluid designed for high-temperature alloys is also important. Flood coolant can be used if TSC isn’t available, but it’s often less effective for heat extraction in this scenario.
- Sharp Tool: Always start with a brand-new or freshly sharpened end mill.
Key Machining Parameters:
These are starting points and will need to be adjusted based on your specific machine, tool diameter, and desired finish. Always start conservatively and incrementally increase parameters as you gain confidence.
Speeds and Feeds for Inconel 625 (with Tialn Ball Nose End Mill – ~40° Helix)
When machining Inconel 625, it’s crucial to understand that the “speeds and feeds” need to be quite different from what you’d use for softer materials like aluminum or mild steel. The goal is to cut efficiently without allowing the material to work-harden excessively.
Surface Speed (SFM – Surface Feet per Minute): For Inconel 625 with a Tialn coated carbide end mill, a good starting point for the surface speed is often in the range of 30-60 SFM. This is significantly lower than for steels, reflecting the material’s toughness.
Feed Per Tooth (IPT – Inches Per Tooth): This is critical for managing chip load and preventing work hardening. Start with a very conservative value, especially during finishing passes. For a ball nose end mill, the effective feed rate changes based on the depth of cut. A good starting point for finishing might be around 0.001 – 0.003 IPT. For larger diameter tools, you might be able to go slightly higher.
Depth of Cut (DOC): Keep radial and axial depths of cut small for finishing passes. A common recommendation is to use a radial depth of cut that is 25-50% of the tool diameter. For axial depth of cut in finishing, aim for very light passes, often no more than 0.010″ to 0.020″ depending on the tool diameter and desired surface finish. The shallower the DOC, the better the finish, but longer machining time is required.
Spindle Speed (RPM): This is calculated using the surface speed and tool diameter:
RPM = (SFM 3.82) / Tool Diameter (inches)
For example, if you are using a 1/2″ (0.5″) diameter end mill and targeting 40 SFM:
RPM = (40 3.82) / 0.5 = 305.6 RPM. You should typically round this down.
Table: Example Starting Parameters for 1/2″ Tialn Ball Nose End Mill
| Parameter | Value (Starting Point) | Notes |
|---|---|---|
| Tool Diameter | 0.500″ | Your actual tool size |
| Number of Flutes | 2 | Good for chip clearance in tough alloys |
| Coating | Tialn | Essential for Inconel |
| Helix Angle | 40 Degrees | Balances chip evacuation and cutting smoothness |
| Surface Speed (SFM) | 30-50 SFM | Lower end for roughing, higher for finishing if stable |
| Spindle Speed (RPM) | 240 – 382 RPM | Calculated based on SFM and diameter (e.g., 40 SFM for 0.5″ dia = ~305 RPM) |
| Feed Per Tooth (IPT) | 0.001″ – 0.003″ | Start low, especially for finishing. Consider chip thinning if using CAM software with high step-overs. |
| Axial Depth of Cut (e.g., Z-depth) | 0.010″ – 0.020″ | Keep it shallow for finishing |
| Radial Depth of Cut (Stepover) | 0.125″ – 0.250″ (25-50% of tool diameter) | For finishing, a smaller stepover (e.g., 0.050″ or less) will yield a better surface finish, even though it takes longer. |
| Coolant | Through-Spindle Coolant (TSC) or Flood Coolant / Neat Oil | Essential. High pressure and volume are beneficial. |
Remember to use your CAM software or machining handbook to verify these parameters or generate your toolpaths. Kennametal’s Machining Advisor is another excellent resource for getting optimized cutting data suggestions for various materials and tools.
The Machining Process: Step-by-Step for Finishing
Let’s walk through the actual machining process, focusing on achieving that sought-after smooth finish on Inconel 625 using your Tialn ball nose end mill.
- Secure the Workpiece: Ensure your Inconel 625 part is rigidly clamped. Any movement here will result in poor finish quality and potential tool damage. Use appropriate workholding like vices with hardened inserts, clamps, or fixtures designed for challenging materials.
- Set Up the Tool: Place your Tialn ball nose end mill into your high-precision collet holder. Insert it into the machine spindle. Ensure the tool is set to the correct length, and minimize the tool stick-out (overhang) as much as possible to maintain rigidity.
- Establish Work Zero: Carefully find the X, Y, and Z zero (origin) on your workpiece. For Z zero, it’s common to touch off on the top surface of the part.
- Program Toolpaths: Use your CAM software or program your G-code manually to define the finishing toolpaths.
- Contour Finishing: For curved surfaces, typically you’ll use a contour toolpath. Ensure the tool path is programmed with a small step-over (e.g., 5-10% of the tool diameter) to achieve a fine surface finish.
- Ball Nose Compensation: If your CAM software supports it, use cutter radius compensation (CRC) or a similar function to accurately follow the programmed path without needing to manually adjust for tool radius variations.
- Lead/Lag Angles: For true 3D machining, consider how the tool enters and exits the material to avoid dwell marks.
- Apply Coolant: Before starting the cut, ensure your coolant system is running and delivering coolant effectively to the cutting zone. For Inconel, through-spindle coolant is ideal.
- Perform a Dry Run (Optional but Recommended): If you’re new to the operation or have a complex program, run the toolpath without cutting material (air cutting) to visualize the tool movement and ensure there are no unexpected collisions or rapid movements into the part.
- Initiate the Cut: Start the spindle at the programmed RPM and begin the cutting operation. Listen carefully to the sound of the cut. A healthy cut should sound like a smooth, consistent “hiss” or “scream.” A chattering or grinding sound indicates a problem.
- Monitor the Process: Keep a close eye on the cutting operation.
- Chip Formation: Observe the chips being produced. They should be relatively fine and break easily, not long, stringy curls.
- Heat: While it’s hard to see directly, a properly cooled cut shouldn’t be smoking excessively.
- Tool Wear: Visually inspect the tool if possible during breaks or at the end of a cycle.
- Make Adjustments: If you hear chatter, reduce the feed rate slightly or the depth of cut. If the chips look bad, double-check your speeds and feeds, and coolant flow. Inconel can be unforgiving, so small, controlled adjustments are key.
- Complete the Finishing Pass: Allow the toolpath to complete its full range of motion. Once done, retract the tool from the workpiece.
- Inspect the Result: After the cycle finishes, carefully inspect the surface finish. Look for smoothness, absence of tool marks, and dimensional accuracy.
Troubleshooting Common Issues
Even with