A wood lathe steady rest kit is essential power for turning long, thin workpieces, preventing wobbling and breakage for smoother, safer finishes. It provides crucial support, enabling beginners to tackle challenging projects with confidence.
Wobbly wood on your lathe? Are you struggling to turn long, slender pieces without them vibrating themselves into a mess, or worse, snapping off unexpectedly? It’s a common frustration for woodturners, especially when you’re just starting out. That’s where a wood lathe steady rest kit comes in. Think of it as a helping hand for your workpiece, keeping it stable and true. This guide will walk you through what a steady rest is, why it’s so vital, how to choose the right kit, and how to get it set up and working for you. Let’s get your longer turning projects back on track and making them achievable with confidence!
Understanding Your Wood Lathe Steady Rest Kit

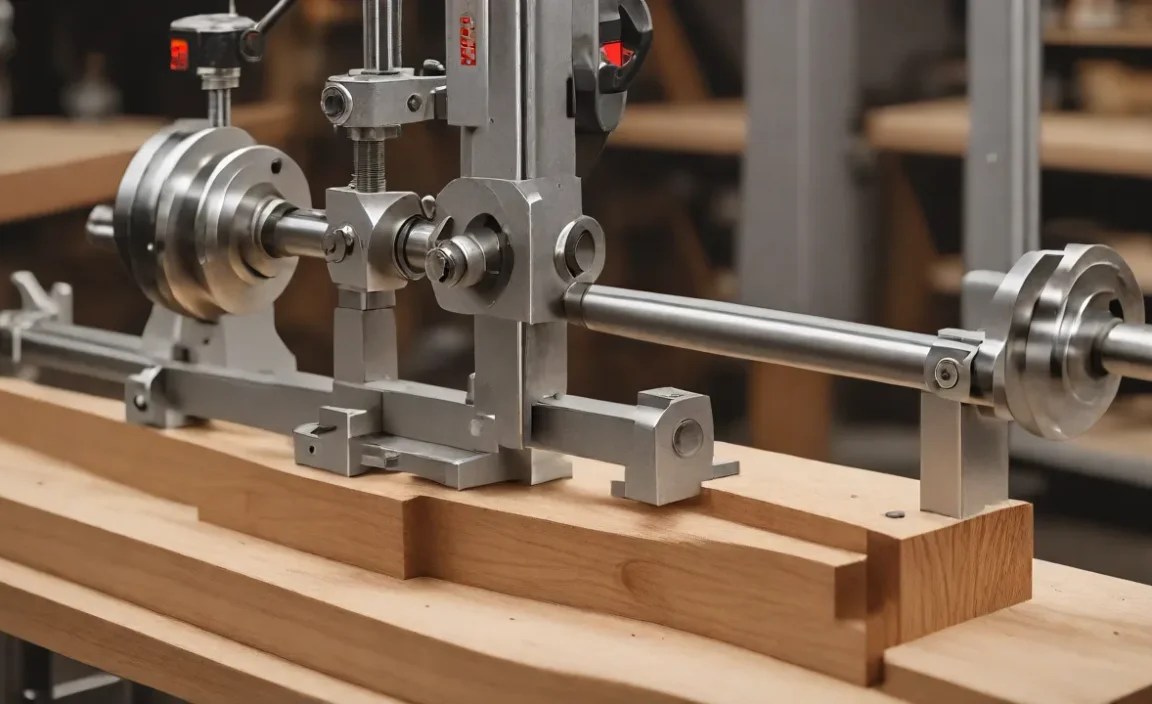
So, what exactly is a wood lathe steady rest kit, and why is it such a game-changer for woodturners? At its core, a steady rest is an accessory that bolts to your lathe bed and supports the rotating workpiece, typically at a point between the headstock and the tailstock. It’s designed to counteract the forces that cause vibration and flexing, especially in long or thin pieces of wood.
Imagine trying to spin a very long, skinny spaghetti noodle. It’s going to wobble and flex all over the place, right? A workpiece on a lathe, especially a larger one, can behave similarly. Without proper support, this wobbling (or “chatter”) can lead to:
- Poor surface finish: Rings, uneven surfaces, and generally rough results.
- Workpiece breakage: A sudden snap can be dangerous, sending wood chips flying.
- Tool digging in: Vibration makes it harder to control your tools, leading to unintentional gouges.
- Frustration: It’s simply much harder to achieve smooth, accurate shapes.
A steady rest, by gently supporting the spinning wood, dramatically reduces these issues. It’s like having an extra set of hands for your project, ensuring stability from start to finish. This is particularly crucial for beginners who are still developing their feel for the wood and their tool control. A steady rest builds confidence by making challenging forms much more manageable.
The “Kit” Aspect: What’s Included?
When we talk about a “wood lathe steady rest kit,” it usually means you’re getting all the necessary components to outfit your lathe with this support system. While specific parts can vary between manufacturers and models, most kits will include:
- The Main Body/Frame: This is the primary structure that attaches to your lathe bed.
- Support Arms or Rollers: These are the parts that actually contact the workpiece. They can be fixed arms, adjustable arms, or rollers. Rollers are often preferred as they reduce friction and potential marring of the wood.
- Mounting Hardware: Bolts, nuts, and sometimes special brackets needed to secure the steady rest to your specific lathe model.
- Adjustment Mechanisms: Knobs, screws, or levers that allow you to position and tighten the support arms against the workpiece.
- Instructions: A manual for assembly and use.
Choosing a kit designed for your specific lathe model is usually the easiest way to ensure a good fit and proper function. Some popular brands even offer universal-fit kits, but always check compatibility before purchasing.
Why is a Steady Rest “Essential Power” for Woodturning?

The term “essential power” might sound a bit strong, but for many woodturning projects, a steady rest truly unlocks capabilities and amplifies your ability to create. It provides the necessary support to overcome inherent limitations, especially when dealing with certain types of wood or shapes.
Key Benefits and Applications:
- Turning Long and Thin Spindles: This is the classic use. Think table legs, chair spindles, candlestick holders, or any long, relatively narrow turning. Without a steady rest, these pieces are prone to significant vibration and bending, making them very difficult to turn accurately and to a smooth finish.
- Working with Unbalanced or Irregular Blanks: When you start with a blank that isn’t perfectly round or is significantly oddly shaped (like some character turnings), it can be unbalanced. A steady rest can help manage this imbalance as you gradually shape the wood.
- Preventing Breakout on Bowls and Platters: While primarily for spindle work, steady rests can sometimes be employed for bowl turning. If you’re turning a very wide, thin platter, and you’re concerned about the rim flexing and chipping as you work on the face, a steady rest can offer support at the outer edge. This is less common than its spindle use but can be helpful.
- Achieving Finer Finishes: By minimizing vibration, a steady rest allows your tools to glide more smoothly over the wood. This leads to a cleaner surface finish right off the tool, meaning less sanding and a more professional result.
- Enhancing Safety: A vibrating or flexing workpiece is more unpredictable. A steady rest keeps the wood firmly in place, significantly reducing the risk of the piece breaking apart or your tool catching and causing a dangerous kickback. Safe turning is paramount, and a steady rest is a key safety component for many operations.
- Boosting Confidence for Beginners: Tackling longer pieces can be intimidating. Knowing you have the support of a steady rest empowers beginners to attempt projects they might otherwise shy away from, fostering skill development and creative freedom.
The “power” of a steady rest lies in its ability to enable the user to achieve results that would otherwise be impossible or extremely difficult. It’s not just about making things easier; it’s about making them possible and doing so safely.
Choosing the Right Wood Lathe Steady Rest Kit

With various options available, choosing the right wood lathe steady rest kit for your needs is important. Here’s what to consider:
1. Lathe Model Compatibility:
This is the most critical factor. Steady rests are designed to attach to the lathe bed. Different lathe beds have different widths and mounting points. Always check the specifications of the steady rest kit to ensure it’s designed for your specific make and model of wood lathe. Some manufacturers offer dedicated steady rests, while others have universal models that might require minor adaptations. Websites like Woodworker’s Journal often have reviews and guides that discuss compatibility.
2. Type of Support Arms/Rollers:
- Fixed Arms: These are simple and often less expensive. They might have felt or leather pads to protect the wood. Their rigidity is good, but they require careful adjustment to center.
- Adjustable Arms: These offer more flexibility in positioning. They might have screw-driven adjustments for fine-tuning.
- Rollers: These are generally the preferred option. The rotating rollers significantly reduce friction, preventing marring of the workpiece and allowing for smoother movement. They can also be more forgiving if there’s slight lateral movement during turning.
3. Size and Capacity:
Consider the range of workpiece diameters you intend to work with. Steady rests are rated for a maximum workpiece diameter. Ensure the steady rest you choose can accommodate the larger turnings you plan to undertake. For example, a steady rest designed for small hobby lathes might only handle up to 4-inch diameter workpieces, while a larger, industrial-grade rest might handle 10 inches or more.
4. Material and Build Quality:
A well-built steady rest should be made of sturdy materials like cast iron or heavy-duty steel. This ensures it can withstand the forces involved in supporting a spinning workpiece without flexing or deforming. Check reviews for feedback on durability and stability.
5. Ease of Installation and Adjustment:
As a beginner, you want a steady rest that is relatively straightforward to mount onto your lathe and easy to adjust. Look for features like clear markings and accessible adjustment knobs.
6. Price:
Steady rests can range from under $100 for basic models to several hundred dollars for heavy-duty, professional-grade units. Determine your budget and try to find the best quality within that range. Remember, a good steady rest is an investment in your turning capabilities and safety.
7. Brand Reputation:
Consider well-known woodworking tool brands. Companies that specialize in lathe accessories often have a good understanding of what users need. Reputable brands often provide better customer support and product quality.
For a great overview of lathe accessories and their functions, you can often find valuable information from resources like WoodWeb.com, which caters to professional woodworkers and can provide insights into equipment choices.
Step-by-Step: Installing Your Wood Lathe Steady Rest Kit

Installing a wood lathe steady rest kit is usually a straightforward process, but it’s essential to follow the steps carefully to ensure it’s mounted securely and functions correctly. Always refer to the specific instructions that came with your kit.
Tools You’ll Likely Need:
- Wrenches (to fit the mounting hardware)
- Allen keys (if included in the hardware)
- Measuring tape or ruler
- Safety glasses
- Gloves (optional, for handling parts)
Installation Process:
- Disengage power: Crucially, ensure your lathe is unplugged or the main power switch is OFF before you begin any installation. Safety first!
- Identify Mounting Location: Examine your lathe bed. Most steady rests are designed to bolt directly onto the ways (the horizontal rails) of the lathe bed. Determine where you want to position the steady rest. For long spindles, you’ll typically place it somewhere in the middle, allowing you access to support the workpiece.
- Assemble the Main Body (if necessary): Some kits come fully assembled, while others may require attaching the support arm assembly to the main frame. Follow the included diagrams.
- Position the Steady Rest: Loosely attach the main body of the steady rest to the lathe bed using the provided mounting bolts and any specific brackets. Don’t tighten them fully yet. You’ll need to adjust its position.
- Rough Alignment: With the steady rest loosely mounted, position it along the lathe bed. If you have a workpiece already mounted on the lathe (e.g., a long dowel or spindle you’ve started to turn), you can use this as a guide. Bring the steady rest close to the workpiece.
- Adjust Support Arms/Rollers: Adjust the support arms or rollers so they are roughly aligned with the diameter of your workpiece. For roller types, ensure the rollers are free to spin. For fixed arms, you’ll position them so they are ready to embrace the wood once it’s truly centered.
- Center the Steady Rest: This is vital. The steady rest must be perfectly centered on the axis of rotation of your lathe. If it’s not, it will cause the workpiece to bind or be constantly pushed off-center.
- Method 1 (Using a Centering Tool): Some steady rests come with a centering jig or tool.
- Method 2 (Measurement): Measure the distance from the center of the headstock spindle to the steady rest mounting point on one side of the lathe bed. Then measure to the corresponding point on the other side of the bed. The steady rest is centered when these measurements are equal, and the support arms are equidistant from the bed’s center line.
- Method 3 (With Workpiece): If you have a round piece of stock mounted, you can bring the steady rest up, adjust the arms to lightly touch the wood, and then carefully tighten everything. The tailstock can help support the workpiece while you do this.
- Tighten Mounting Bolts: Once the steady rest is in your desired position and centered, carefully but securely tighten the mounting bolts to the lathe bed. Ensure it does not shift.
- Final Adjustment of Support Arms: With the steady rest firmly mounted, bring the workpiece into position (you might need to temporarily move the steady rest out of the way if you’re starting a new piece, or adjust the arms if the workpiece is already in place). Adjust each support arm or roller so it makes gentle, firm contact with the workpiece. The goal is to provide support without constricting the wood. You want it snug enough to prevent vibration but not so tight that it prevents the wood from rotating freely.
- Test Rotation by Hand: Before turning on the lathe, carefully rotate the workpiece by hand to ensure the steady rest arms are not binding and that the workpiece spins freely without wobble. Check that the rollers (if applicable) turn with the wood.
- Power On and Test: Plug in the lathe and start it at a slow speed. Listen for any unusual noises or vibrations. Watch the workpiece. If everything seems stable, gradually increase the speed. Make fine adjustments to the support arms as needed.
Remember, practice makes perfect. It might take a few tries to get the steady rest perfectly positioned and adjusted for different types of stock. Always prioritize a secure mount and proper centering.
Using Your Steady Rest for Turning Projects
Now that your wood lathe steady rest kit is installed, let’s talk about how to use it effectively during your turning projects. The key is to understand when and how to apply its support.
When to Engage the Steady Rest:
- Spinning long, thin workpieces (spindles).
- Working with unbalanced blanks that tend to vibrate.
- When you notice significant wobble or chatter during turning, especially as rpm increases.
- To improve surface finish on challenging shapes.
How to Use It During Turning:
- Initial Shaping (Without Steady Rest): Often, you’ll begin by turning your workpiece around the center of the headstock and tailstock to get a basic cylindrical shape, especially if your blank is very long. Use the tailstock for support. During this phase, you might turn a section of the wood down to a diameter that the steady rest can comfortably accommodate.
- Mounting the Steady Rest: Once you have a workable diameter, or if you need support immediately, install and center the steady rest as described previously.
- Applying Steady Rest Support: Gently adjust the steady rest’s support arms or rollers to make firm contact with the workpiece. The workpiece should rotate smoothly, and the steady rest should minimize any wobble. Aim for a snug fit that provides support without binding.
- Turning with Support: With the steady rest engaged, you can now proceed with more detailed turning, such as shaping the spindle, creating tenons, or turning decorative features. Your tools will feel more stable, and you’ll achieve a cleaner finish.
- Adjusting as you Turn: As you remove wood and the diameter of your workpiece changes, you may need to readjust the steady rest arms. The key is to maintain consistent, firm support without overtightening, which could cause the wood to bind or snap.
- Re-Applying Tailstock Support (If Needed): For very long pieces, you might still use the tailstock for initial roughing or for specific operations, then retract it and engage the steady rest for the middle section. It’s common to use both supports at different stages.
- Finishing and Removing: Once you are finished turning the supported section, you can carefully back off the steady rest arms. If the workpiece is still being supported by the tailstock, you can then remove the steady rest. If the tailstock has been removed, ensure your work is securely mounted to the faceplate or chuck before removing the steady rest, or proceed to the next stage of sanding/finishing.
Tips for Success:
- Lubrication: If your steady rest uses rollers, a tiny bit of light machine oil can ensure smooth operation, though many rollers are sealed and don’t require it. For fixed arms with pads, ensure the pads are clean and smooth.
- Avoid Overtightening: This is the most common mistake. Overtightening will bind the workpiece, making it hard to turn and potentially dangerous. The steady rest is for support and stability, not for clamping.
- Keep it Clean: Dust and debris can accumulate on the steady rest, affecting its performance and potentially scratching your workpiece. Keep it and your lathe bed clean.
- Practice on Scrap: Before tackling a valuable project, practice using your steady rest on scrap wood. Get a feel for the adjustment and how it affects the turning.
- Maintain Even Pressure: Try to ensure the pressure from the steady rest is evenly distributed around the workpiece.
A well-used steady rest can transform your woodturning experience, opening up a world of longer, thinner projects. For more advanced techniques and safety in woodturning, resources like the American Association of Woodturners (AAW) offer excellent guides and learning materials.
Table: Wood Lathe Steady Rest Types and Considerations
Here’s a quick comparison of different aspects to consider when looking at steady rest kits:
| Feature | Description | Pros | Cons | Best For |
|---|
