Tialn Ball Nose End Mill 40 Degree: Brilliant Brass Trochoidal Milling
The Tialn 40-degree ball nose end mill is an excellent tool for trochoidal milling of brass. This specialized end mill, often coated with Tialn for enhanced durability and cutting performance, allows for efficient and precise material removal in brass. Its 40-degree helix angle combined with a ball nose geometry is ideal for achieving smooth surface finishes and intricate details in brass components, making trochoidal milling a highly effective technique for this often gummy material.
Hey everyone, Daniel Bates here from Lathe Hub! Ever find yourself wrestling with brass on the milling machine, wishing for cleaner cuts and less chatter? You’re not alone. Brass can be a beautiful material to work with, but it can also be a bit tricky. That’s where smart tooling and techniques come in. Today, we’re diving into something special: the Tialn ball nose end mill with a 40-degree helix angle, and how it makes trochoidal milling brass a breeze. Imagine getting those complex shapes and smooth finishes without the usual headaches. This tool and method can really transform your brass projects. Ready to unlock some brass-milling magic? Let’s get started!
Understanding the Tialn Ball Nose End Mill 40 Degree
So, what exactly is a Tialn ball nose end mill with a 40-degree helix, and why is it so good for brass? Let’s break it down.
What is a Ball Nose End Mill?
A ball nose end mill is a type of cutting tool used in milling operations. Unlike flat-bottomed end mills, its cutting tip is perfectly rounded, forming a semi-circle. This shape is fantastic for milling curved surfaces, creating fillets, pockets with rounded corners, and 3D contours. The “ball nose” refers to this rounded tip.
The Tialn Coating: What it Does
The ‘Tialn’ in Tialn ball nose end mill refers to a specific coating applied to the tool. Tialn, which stands for Titanium Aluminum Nitride, is a high-performance ceramic coating. It’s known for its exceptional hardness, excellent heat resistance, and reduced friction. When applied to an end mill, Tialn can:
- Increase tool life significantly.
- Allow for higher cutting speeds and feed rates.
- Improve surface finish on the workpiece.
- Reduce the need for excessive coolant.
- Help prevent material buildup (like brass gunking up the flutes).
Think of Tialn as a tough, slippery shield for your cutting edge, making it cut cleaner and last longer, especially in demanding materials like brass.
The 40-Degree Helix Angle: Why it Matters
The helix angle on an end mill refers to the angle of the cutting flutes. Standard end mills often have a 30-degree helix angle. A 40-degree helix angle, on the other hand, offers several advantages, particularly for softer, gummier materials like brass:
- Improved Chip Evacuation: A steeper helix helps to lift and clear chips more effectively from the cutting zone. This is crucial for brass, which tends to produce long, stringy chips that can pack up and cause problems.
- Smoother Cutting Action: The steeper angle often results in a more gradual engagement with the material, leading to less vibration and a smoother cut. This reduces chatter and improves the surface finish.
- Reduced Cutting Forces: It can also lead to lower cutting forces, meaning less stress on the tool, the workpiece, and your machine.
When you combine the ball nose geometry with a Tialn coating and a 40-degree helix, you get a tool specifically designed for efficient and high-quality machining of materials like brass.
Why Trochoidal Milling is Brilliant for Brass
Now, let’s talk about the technique: trochoidal milling. This isn’t your typical “straight in and out” milling. It’s a dynamic, almost dancing, cutting method that’s incredibly effective for brass.
What is Trochoidal Milling?
Trochoidal milling, also known as dynamic contour milling, is a high-speed machining strategy. Instead of making a full pocket with one large conventional toolpath, trochoidal milling uses a series of small, continuous, overlapping circular or looping paths. The tool moves in a looping, trochoidal motion, constantly engaging and disengaging small amounts of material.
How it Works with a Ball Nose End Mill
When you use a ball nose end mill, especially one with a Tialn coating and a 40-degree helix, for trochoidal milling, several things happen:
- Precise Material Removal: The ball nose geometry allows the tool to smoothly transition into and out of these looping paths, creating rounded internal corners and a consistent depth of cut.
- Reduced Heat Build-up: Because the tool is only ever engaging a small chip load, less heat is generated in the cutting zone compared to conventional pocketing. The Tialn coating further helps to dissipate this heat.
- Minimized Cutting Forces: The small, consistent chip loads mean significantly reduced forces on the tool and workpiece. This is a godsend for delicate brass parts and helps prevent the material from deforming.
- Superior Chip Evacuation: The combination of the 40-degree helix and the dynamic motion ensures chips are constantly cleared from the flute, preventing them from recutting or packing up.
- Excellent Surface Finish: The continuous, smooth motion results in a very fine surface finish, often with a distinctive, almost wavy pattern.
This method is particularly beneficial for brass because it’s prone to gumming up tooling and can create significant cutting forces. Trochoidal milling, with the right tool, tames these issues effectively.
Essential Setup: Tools, Machine Settings, and Safety First
Getting ready for trochoidal milling with your Tialn ball nose end mill involves a few key steps to ensure success and, most importantly, safety.
What You’ll Need:
- Tialn Coated 40-Degree Ball Nose End Mill: Choose the right diameter for your project. For brass, you might consider using a slightly smaller diameter than the pocket width to allow for the trochoidal motion.
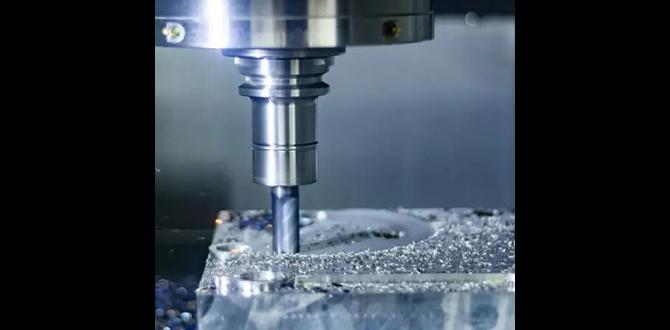
- Milling Machine: A CNC mill is ideal for precise control of trochoidal toolpaths, but it can be done manually with care.
- Workholding: Securely clamp your brass workpiece. Use a vise, clamps, or fixtures that won’t be damaged by the tool or interfere with its path.
- Riser Blocks (Optional): If your machine bed is not flat or you need to raise the workpiece, riser blocks can be useful. Ensure they are stable and properly secured.
- Coolant/Lubricant: While Tialn reduces the need for heavy coolant, a light mist or flood coolant can still help keep temperatures down and further improve chip evacuation and surface finish. Specialized brass lubricants can be very effective.
- Safety Glasses: Absolutely non-negotiable. Always protect your eyes!
- Hearing Protection: Milling can be noisy.
- Dust Mask: Brass particles can be harmful if inhaled.
- Machining Software (if CNC): CAM software is essential for generating trochoidal toolpaths.
- Calipers/Measuring Tools: For verifying dimensions.
Machine Settings: A Starting Point
These settings are a general guideline. Always consult your end mill manufacturer’s recommendations and perform test cuts. Brass hardness can vary!
| Parameter | Recommended Setting (for typical brass) | Notes |
|---|---|---|
| Spindle Speed (RPM) | 5,000 – 15,000 RPM | Higher speeds are generally better for brass. |
| Feed Rate (IPM or mm/min) | 0.002 – 0.005 inches per tooth | Start conservatively and increase if cutting is smooth. This is the “chipload.” |
| Stepover (Radial) | 10% – 30% of tool diameter | For trochoidal milling, this is the width of the looping path. Smaller stepover = smoother finish, more passes. |
| Stepdown (Axial) | 5% – 15% of tool diameter (or less) | For initial passes. This can be increased as you gain confidence. |
| Coolant | Mist or Flood, or Dry with Air Blast | Use a lubricant designed for brass if possible. |
| Engagement Angle | 10 – 30 degrees | This is crucial for trochoidal milling, dictating how much of the tool engages the material at any given moment. |
Important Note on Feed Rate: Per tooth feed rate is key. Calculate it by multiplying your desired chip load by the number of flutes on your end mill. For example, a 2-flute end mill with a 0.003″ chipload would have a feed rate of 0.006″ IPM.
Safety First!
Machining involves risks. Always prioritize safety:
- Secure Workpiece: Ensure your brass is clamped firmly. A loose workpiece can be thrown by the cutter, causing damage or injury.
- Tool Guarding: Keep all machine guards in place.
- No Loose Clothing or Jewelry: These can get caught in moving machinery.
- Proper Tooling: Ensure your end mill is sharp, undamaged, and correctly installed.
- No Touching: Never touch a spinning tool or workpiece.
- Emergency Stop: Know where your machine’s emergency stop button is and ensure it’s functional.
- One Step at a Time: Especially when learning, take small, controlled steps.
For more detailed safety guidelines, consult resources like OSHA’s metalworking fluid safety standards and general machine shop safety practices from reputable institutions like NIST.
Step-by-Step: Tialn Ball Nose End Mill Trochoidal Milling in Brass
Let’s get down to the hands-on part. Follow these steps to achieve brilliant brass trochoidal milling.
Step 1: Prepare Your Workspace and Machine
Ensure your milling machine is clean and in good working order. Check that the spindle runs true and that your vise or workholding is rigidly mounted to the machine table. Load your Tialn 40-degree ball nose end mill into the collet and tighten it securely.
Step 2: Secure Your Brass Workpiece
Place your brass stock in the vise or onto your chosen workholding. Make sure it’s positioned so that the area you need to mill is accessible. Clamp it down firmly, ensuring there are no high points that could interfere with the tool path. Use soft jaws if necessary to prevent marring the surface if it’s a visible part.
Step 3: Set Up Your Zero Points (Origin)
On your CNC mill, set the X, Y, and Z zero points accurately. For manual milling, establish your reference points carefully. The Z-zero is typically set at the top surface of the workpiece. Ensure your tool is also correctly zeroed in the Z-axis by jogging it down to touch the surface (using probes or paper method).
Step 4: Program or Set Your Toolpath (CNC vs. Manual)
For CNC Machinists:
- Open your CAM software.
- Import or create your geometry.
- Select your Tialn 40-degree ball nose end mill as the cutting tool.
- Choose a trochoidal milling or dynamic contouring strategy.
- Input the parameters we discussed: spindle speed, feed rate (using chip load), radial stepover (10-30%), axial stepdown (small, like 0.01″-0.05″ for initial passes), and engagement angle (10-30 degrees).
- Generate the toolpath and simulate it to check for collisions and efficiency.
- Carefully transfer the G-code to your machine controller.
For Manual Machinists:
- This is more challenging and requires practice. You’ll be moving the machine’s handwheels to create the looping motion.
- Start by plunging the tool into the brass to the desired depth (start shallow!).
- Move in a controlled circular or looping path. Imagine cutting a small, overlapping circle.
- As you complete one loop, step the feed in the direction of the overall cut you want to create.
- The key is consistent, small movements. It’s about gradually removing material rather than aggressive cuts.
- Keep a close eye on chip formation and tool load.
Step 5: Run the First Pass (Dry Run for CNC)
For CNC: Execute a “dry run” without the workpiece. This means running the program with the spindle on but the tool held above the table, or at a safe height above the workpiece. This verifies the toolpath motion and positioning.
Once you’re confident, perform the first cutting pass with the workpiece in place. Ensure coolant is flowing appropriately. Listen to the machine and watch the chips. If it sounds smooth and the chips are small and green/yellowish (typical for brass), you’re on the right track. If it’s screeching or vibrating, stop immediately and check your settings.
For Manual: Start with a very shallow cut. Make a few looping passes, gradually increasing depth as you gain confidence and observe the cutting action. Always prioritize control and a smooth sound over speed.
Step 6: Adjust and Continue Milling
Based on the first pass, you might need to make minor adjustments:
- If cutting is too light: Slightly increase the feed rate or step-down in your CAM program (or carefully advance the handwheels manually).
- If cutting is too heavy/chattery: Decrease the feed rate, step-down, or engagement angle. Ensure the tool is clean.
- If chips are packing: Increase coolant flow or adjust the feed rate/helix angle if possible (though the 40-degree helix is already good for this).
Continue making passes, incrementally increasing the depth of cut as your machine and tool allow. The beauty of trochoidal milling is that it allows for relatively deep cuts while maintaining light chip loads.
Step 7: Finish and Inspect
Once you’ve reached your final depth, you may want to perform a final finishing pass. For trochoidal milling, this often involves a slightly higher feed rate or a reduced stepover to achieve the smoothest possible surface. After the milling is complete, carefully remove the workpiece. Inspect your finished part for dimensional accuracy, surface finish, and any signs of damage or stress.
Tips for Machining Brass with Tialn Ball Nose End Mills
Brass can be a rewarding material, but it has its quirks. Here are some extra tips to make your trochoidal milling experience even better:
- Use the Right Brass Alloy: Different brass alloys have varying machinability. Free-machining brass alloys (like C36000) are generally the easiest to work with.
- Sharp Tooling is Crucial: A dull Tialn coated tool will perform poorly and can lead to rubbing instead of cutting, which is terrible for brass.
- Don’t Force It: Brass can gall and build up on the tool if you’re trying to take too heavy a cut or using the wrong parameters. Let the tool and the speed/feed do the work.
- Chip Breakers (Advanced): While a ball nose end mill doesn’t have traditional chip breakers like some flat end mills, the 40-degree helix acts as a form of chip control, especially when combined with the trochoidal motion.
- Consider Finishing Passes: For extremely critical surface finishes, you might run a final pass at a slightly higher feed rate and with a very small step-down.
- Coolant Choice Matters: Water-soluble coolants or specific brass machining lubricants can significantly reduce friction and help keep the workpiece and tool cool. Compressed air can also be very effective for chip evacuation.
- Machine Rigidity: A rigid machine setup is key. Any flex in the machine, spindle, or workholding will translate into poor surface finish and potential tool breakage.
- Experiment: The settings provided are starting points. Every machine, tool, and brass alloy is slightly different. Don’t be afraid to make small, controlled adjustments to find the sweet spot for your specific setup