TIALN ball nose end mills are essential for achieving smooth, accurate 3D surfacing on cast iron, significantly improving finish quality and tool life.
Hey folks, Daniel Bates here from Lathe Hub! Have you ever tried to machine cast iron and ended up with a rough, uneven surface, or worse, a tool that’s worn out too quickly? It can be a real head-scratcher, especially when you’re aiming for those intricate 3D shapes. Cast iron is a fantastic material, but it can be a bit unforgiving if you’re not using the right tools and techniques. Don’t worry, though! Today, we’re diving deep into a specific type of cutting tool that’s a total game-changer for this exact problem: the TIALN ball nose end mill. We’ll break down exactly why it’s so good for cast iron 3D surfacing and how you can use it to get those professional-looking finishes right in your own workshop. Stick around, and we’ll get you cutting cast iron like a pro!
Why Cast Iron Can Be Tricky for Machining
Cast iron, while incredibly useful, presents some unique challenges when it comes to machining, especially for 3D surfacing. Its strength, hardness, and inherent brittleness can quickly wear down standard cutting tools, leading to poor surface finish and increased material waste. The abrasive nature of cast iron means that friction and heat build up rapidly, which is the enemy of most cutting tools. Traditional milling strategies might struggle to create the smooth, continuous cuts needed for complex geometries, often leaving behind ridges or chatter marks. This is where specialized tooling and coatings become not just helpful, but essential for success.
The Problem with Standard End Mills on Cast Iron
For 3D surfacing, especially on materials like cast iron, standard end mills often fall short. Their geometry might not be optimized for the sweeping, multi-axis movements required, and their material composition can’t withstand the abrasive wear and heat generated. This leads to a cascade of issues:
Rapid Tool Wear: The abrasive particles in cast iron grind away at the cutting edge of standard High-Speed Steel (HSS) or even uncoated carbide end mills very quickly. This means you achieve less cutting distance before the tool is no longer effective.
Poor Surface Finish: As the tool wears, it loses its ability to create a clean cut. This results in a rougher surface, often with visible tool marks, chatter, and an inconsistent finish that is frustrating for any machinist, especially when aiming for smooth contours.
Increased Heat Generation: Without proper lubrication or a heat-resistant coating, the friction between the cutting tool and the cast iron generates excessive heat. This heat can lead to material deformation, further tool wear, and even potential damage to the workpiece.
Lower Material Removal Rates: To compensate for poor tool life and finish, machinists often have to reduce their cutting speeds and depths of cut. This significantly slows down the machining process, making projects take much longer and reducing overall productivity.
Brittleness Issues: Cast iron is brittle. Aggressive or inconsistent cutting forces from an inappropriate tool can lead to chipping or fracture of the workpiece, ruining the part and potentially creating safety hazards.
Introducing the TIALN Ball Nose End Mill
So, what’s the secret weapon for tackling cast iron’s challenges, particularly in 3D surfacing? It’s the TIALN coated ball nose end mill. Let’s break down what makes it so effective.
What is a Ball Nose End Mill?
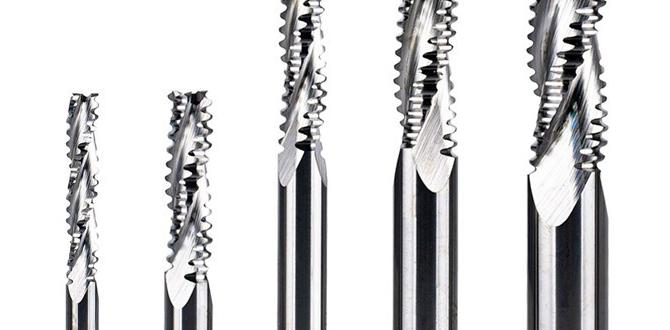
First off, let’s clarify what a ball nose end mill is. Unlike flat-bottomed end mills, a ball nose end mill has a hemispherical cutting tip. This shape is absolutely crucial for 3D contouring and surfacing.
Full Radius Tip: The tip is a perfect half-sphere.
Center Cutting: Most ball nose end mills are center-cutting, meaning they can plunge and cut down into material as well as do peripheral milling.
Ideal for Contours: The curved tip allows for smooth, rounded transitions and the creation of complex 3D shapes without sharp corners. It’s like using a pencil with a fine tip for detailed drawing versus a blunt marker.
What is TIALN Coating?
Now, let’s talk about the TIALN coating. TIALN stands for Titanium Aluminum Nitride. This is a super-hard, multi-layer coating applied to the surface of the end mill. Think of it as a microscopic armor that protects the cutting tool.
Extreme Hardness: TIALN is significantly harder than the carbide or steel it’s applied to. This makes the tool much more resistant to abrasion.
High Heat Resistance: This coating is excellent at withstanding very high temperatures. It forms a protective oxide layer when exposed to heat, which further reduces friction and wear. This is critical for cast iron.
Reduces Friction: The smooth nature of the TIALN coating helps chips slide off more easily, reducing the tendency for them to weld onto the cutting edge (known as built-up edge or BUE).
Extended Tool Life: Combined, these properties lead to a dramatic increase in how long the end mill can be used effectively.
Why TIALN + Ball Nose is Perfect for Cast Iron 3D Surfacing
When you combine the geometry of a ball nose end mill with the protective power of TIALN coating, you get a tool that’s tailor-made for cast iron 3D surfacing.
Smooth Surface Finish: The ball nose shape allows for small stepovers in 3D contouring, and the TIALN coating ensures a clean cut with minimal friction, leading to those sought-after smooth, consistent surfaces.
Superior Wear Resistance: The hardness and heat resistance of TIALN directly combat the abrasive nature of cast iron, drastically extending the life of your end mill. You’ll get more parts out of each tool.
Higher Cutting Speeds: Because the tool is so well protected and efficient, you can often run at higher speeds and feeds than you could with uncoated tools, speeding up your production time.
Reduced Heat: The coating helps dissipate heat, which is crucial for preventing thermal damage to both the tool and the workpiece.
Effective with Dry Machining: While coolant is always beneficial, TIALN coatings allow for effective dry machining in many cast iron applications, which can be a big advantage in certain workshop setups.
Key Features to Look For in a TIALN Ball Nose End Mill for Cast Iron
When you’re out shopping for the right tool, there are a few specific features that will make your TIALN ball nose end mill even more effective for machining cast iron.
Material of the End Mill
While the TIALN coating is vital, the base material of the end mill also matters.
Solid Carbide: This is the most common and recommended material for this type of application. Solid carbide offers excellent rigidity, heat resistance, and strength, providing a robust platform for the TIALN coating. It’s significantly harder and more rigid than High-Speed Steel (HSS).
Sub-micron Carbide: For even better performance and edge retention, look for end mills made from sub-micron grade carbide. This refers to the grain size of the carbide particles, with smaller grains generally leading to a harder, tougher tool.
Helix Angle and Flute Count
These geometric features also play a role in how the end mill cuts.
Helix Angle (e.g., 30°, 45°, 60°): A moderate helix angle (often around 30-45 degrees) generally offers a good balance of rigidity and chip evacuation for cast iron. Very high helix angles can be too flexible, while zero helix can lead to poor chip breaking. For general 3D surfacing on cast iron, a 30° or 45° helix is a safe bet.
Flute Count (2, 3, or 4 flutes):
2 Flutes: These are excellent for high-speed machining and deep slotting, offering good chip clearance. They are often preferred for softer materials but can work well for cast iron at appropriate speeds.
3 Flutes: A very common choice, offering a good balance between chip clearance and rigidity. They can handle moderate cutting forces well and are suitable for general 3D surfacing.
4 Flutes: These provide the most rigidity and are best suited for high-volume material removal and finishing when rigidity is paramount. However, they can have reduced chip clearance, which might not be ideal for very gummy materials.
For cast iron 3D surfacing with a ball nose, 3-flute end mills are a popular and versatile choice, offering a good compromise.
The mention of “40 degree” in the keyword “tialn ball nose end mill 40 degree for cast iron for 3d surfacing” likely refers to the helix angle. A 40-degree helix angle is indeed a common and effective choice for achieving a good balance of cutting performance and tool rigidity when machining cast iron with a ball nose end mill.
Corner Radii and Ball Nose Radius
Corner Radius: For a true ball nose, the radius is the same as the radius of the end mill’s diameter. For example, a 1/2″ ball nose end mill has a 1/4″ radius at its tip.
Ball Nose Radius Size: Choose a radius that suits the details of your 3D model. Smaller radii are for finer details, while larger radii are for broader sweeping motions.
Shank Features
Weldon Shank: Some end mills have a flats ground into their shank (Weldon flats), which provides a secure grip in the collet or tool holder, preventing any possibility of the tool slipping. This is good for higher torque applications.
Vibration Dampening Grooves: Some premium end mills feature special grooves on the shank designed to reduce vibration, leading to a better surface finish and longer tool life.
Step-by-Step Guide: Using Your TIALN Ball Nose End Mill on Cast Iron
Let’s walk through the practical steps to get your TIALN ball nose end mill cutting cast iron smoothly for your 3D surfacing projects. Safety first, always!
Step 1: Prepare Your Machine and Workpiece
1. Secure the Workpiece: Ensure your cast iron workpiece is firmly clamped to the milling table. Use appropriate workholding devices such as vises, clamps, or fixtures. Cast iron is heavy and abrasive, so solid clamping is essential to prevent movement during machining.
2. Clean the Machine: Make sure your machine’s spindle, tool holder, and collet are clean and free of debris. Dust and chips can cause runout and affect accuracy.
3. Lubrication (Optional but Recommended): While TIALN coatings allow for dry machining, using a lubricant like a mist coolant or a cutting fluid specifically formulated for cast iron can still improve surface finish and tool life. If using coolant, ensure your machine is set up for it.
Step 2: Select and Load the End Mill
1. Choose the Right Size and Radius: Select a TIALN coated ball nose end mill with a diameter and radius appropriate for your part’s geometry and the desired stepover. For smaller details, a smaller diameter (e.g., 1/8″, 1/4″) with a corresponding radius will be needed.
2. Properly Load into Tool Holder: Insert the end mill shank into a clean collet. Ensure it’s seated fully and tighten the collet nut securely using a torque wrench if available, or by feel if not. Then, insert the collet into the spindle/tool holder. If using a Weldon shank, ensure it’s properly seated and clamped to meet the set screw in your tool holder.
Step 3: Set Up Machining Parameters
This is where things get crucial for cast iron. You’ll need to find a good starting point for your speeds and feeds. It’s always best to consult the end mill manufacturer’s recommendations if available. If not, here are some general guidelines for TIALN coated carbide ball nose end mills on cast iron.
Surface Speed (SFM or m/min): For TIALN coated carbide on cast iron, a good starting point for surface speed is around 200-400 SFM (60-120 m/min). This will vary based on the specific grade of cast iron and the end mill.
Spindle Speed (RPM): Calculate your initial spindle speed using this formula:
`RPM = (SFM x 3.82) / Tool Diameter (inches)`
Or `RPM = (m/min x 1000) / (π x Tool Diameter (mm))`
Example: For a 1/2″ (0.5″) end mill at 300 SFM: `RPM = (300 x 3.82) / 0.5 = 2292 RPM`.
Feed Rate (IPM or mm/min): Feed rate is often expressed as chip load (chip thickness per tooth). A good starting chip load for a 3-flute ball nose end mill on cast iron is typically between 0.001″ – 0.003″ per tooth (0.025 – 0.075 mm/tooth).
Calculate your initial feed rate: `Feed Rate (IPM) = RPM x Number of Flutes x Chip Load (inches)`
Example: Using the 2292 RPM from above, with 3 flutes and a chip load of 0.002″ per tooth: `Feed Rate = 2292 x 3 x 0.002 = 13.75 IPM`.
Depth of Cut (DOC) and Stepover:
Depth of Cut: For 3D surfacing, you’ll often use a relatively shallow DOC to improve surface finish. Start with 0.02″ – 0.08″ (0.5mm – 2mm) depending on the tool diameter and machine rigidity.
Stepover: This is the distance the tool moves sideways between passes. For a good surface finish, a stepover of 10-20% of the tool diameter is common for finishing. For example, on a 1/2″ end mill, a stepover of 0.05″ to 0.1″ would be typical.
Important: These are starting points. Always listen to your machine and the cut. If you hear excessive chattering, see smoke, or the tool seems to be struggling, reduce your speed, feed, or depth of cut.
Step 4: Execute the 3D Surfacing Program
1. Load Your CAM Program: Load your G-code program generated from your CAM software into your CNC controller. Ensure the tool geometry and offsets are correctly set.
2. Dry Run: Always perform a dry run (machining without the workpiece or with the spindle raised) or a air cut to verify the toolpath and ensure no collisions.
3. Initiate the Cut: Start the program. Monitor the machining process closely, especially during the initial passes.
4. Observe and Adjust:
Sound: Listen for a clean, consistent cutting sound. Grinding or screaming noises indicate issues.
Chips: Look at the chips being produced. They should be relatively small and consistent, not long and stringy or dusty.
Surface Finish: Periodically pause the machine (safely) to inspect the surface finish.
Temperature: If you can safely measure, avoid excessive heat build-up.
5. Fine-Tuning: If the surface finish isn’t ideal, you can adjust:
Stepover: A smaller stepover will yield a smoother finish but take longer.
Spindle Speed: Adjusting RPM can sometimes eliminate chatter.
Feed Rate: Incremental adjustments to feed rate can refine the chip load.
Step 5: Post-Machining Inspection
1. Clean the Part: Thoroughly clean the cast iron part to remove any coolant or chips.
2. Inspect the Finish: Examine the machined surface for smoothness, accuracy, and any signs of tool marks or defects. Compare it against your design specifications.
3. Tool Inspection: After the job is complete, inspect the TIALN ball nose end mill for wear. Noticeable dulling of the cutting edges or chipping indicates it’s nearing the end of its life for this type of work.
Best Practices for Machining Cast Iron with TIALN Ball Nose End Mills
Beyond the basic steps, a few key practices will ensure you get the most out of your TIALN end mills and achieve repeatable, high-quality results when machining cast iron.
Table of Recommended Cutting Parameters for TIALN Ball Nose End Mills on Cast Iron
Here’s a general table to give you a starting point. Remember that actual parameters will vary based on the machine rigidity, coolant, specific alloy of cast iron, and the exact end mill manufacturer.
| Parameter | Starting Range (Gray Cast Iron – GCI) | Starting Range (Ductile Iron – DI) | Notes |
| :———————— | :——————————————- | :——————————————- | :————————————————————————————————- |
| Tool Diameter | 1/4″ (6mm) to 1/2″ (12mm) | 1/4″ (6mm) to 1/2″ (12mm) | Larger diameters may require lower parameters based on machine power and rigidity. |
| Flute Count | 3 Flutes | 3 Flutes | 3 flutes often provide a good balance of chip clearance and rigidity. |
| Coating | TIALN | TIALN | Essential for heat and abrasion resistance on cast iron. |
| Material | Solid Carbide (Sub-micron grade preferred) | Solid Carbide (Sub-micron grade preferred) | Provides the necessary hardness and toughness for cast iron. |
| **