Quick Summary: For machining Titanium Grade 5 heat-resistant alloys, a 1/8″ solid carbide end mill with a 1/4″ shank and standard length is your go-to tool. Its precise geometry and robust material excel at handling titanium’s toughness, ensuring clean cuts and efficient material removal when used with proper speeds and feeds.
Carbide End Mill: Your 1/8″ Hero for Titanium Grade 5
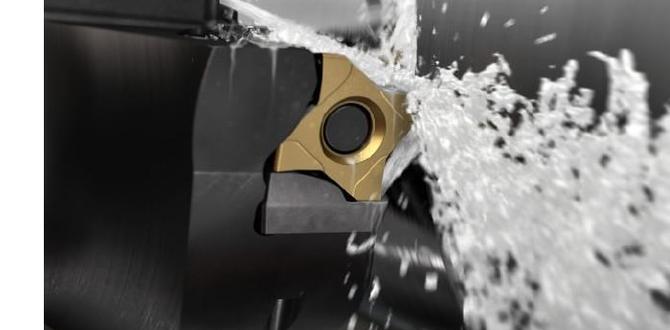
Working with titanium, especially the heat-resistant Grade 5 alloy often found in aerospace and medical applications, can feel like a daunting task for beginners. Its extreme hardness and tendency to gall (stick) can quickly turn a promising project into a frustrating mess, chewing up tools and leaving you with poor surface finishes. You might find yourself wondering if your tools are just not up to the challenge. The good news is, with the right end mill and a little know-how, you can conquer even the toughest titanium jobs. Today, we’re diving deep into why a specific type of tool – a 1/8″ solid carbide end mill with a 1/4″ shank and standard length – is your champion for tackling this incredible material.
This guide is designed to demystify the process, breaking down exactly why this particular end mill shines and how to use it effectively. We’ll cover everything from understanding the material itself to setting up your machine correctly, ensuring you get clean, precise cuts every time. By the end of this article, you’ll have the confidence and knowledge to select and use your 1/8″ carbide end mill for titanium with great success.
Understanding Titanium Grade 5 and Why It’s Tricky
Titanium Grade 5 (Ti-6Al-4V) is an alpha-beta titanium alloy that makes up a huge percentage of titanium used in many demanding industries. Why? Because it’s incredibly strong for its weight, highly resistant to corrosion, and can withstand significant heat. It’s used in jet engines, high-performance car parts, medical implants, and even high-end bicycle frames.
However, these fantastic properties also make it notoriously difficult to machine:
- High Strength-to-Weight Ratio: It’s strong, meaning it resists deformation under cutting forces.
- Low Thermal Conductivity: Titanium doesn’t dissipate heat well. Most of the heat generated during machining gets trapped in the cutting edge of your tool. This leads to rapid tool wear and can even cause the titanium to recrystalize and harden right at the cutting zone.
- Tendency to Gall: Titanium has a chemical affinity for many tool materials. This means it can “stick” to the cutting edge, leading to built-up edge (BUE) and eventually tool failure.
- Elasticity: Titanium is “springy.” It tends to deflect away from the cutting tool rather than deforming and breaking chips cleanly. This can lead to poor surface finish and chatter.
Why a 1/8″ Solid Carbide End Mill is the Champion for Titanium
Given titanium’s challenging nature, choosing the right cutting tool is paramount. While other tool materials might struggle, a 1/8″ solid carbide end mill, specifically designed for high-temp alloys, often proves to be the most effective and reliable choice for beginner machinists working with titanium Grade 5. Let’s break down why:
Solid Carbide: The Foundation of Toughness
- Hardness: Carbide is significantly harder than High-Speed Steel (HSS). This inherent hardness allows it to maintain its cutting edge at the higher temperatures generated when machining titanium, preventing rapid wear and deformation.
- Rigidity: Solid carbide tools are more rigid than their HSS counterparts. This reduced flex is crucial for controlling the cutting forces with springy materials like titanium, helping to achieve more accurate dimensions and better surface finishes.
- Heat Resistance: While titanium generates a lot of heat, carbide can withstand these elevated temperatures much better than HSS without losing its hardness. This is vital for consistent cutting performance.
The 1/8″ Diameter: Precision and Control
When working with titanium, especially for smaller parts or intricate features, precision is key. A 1/8″ diameter end mill offers several advantages:
- Good for Smaller Features: It allows you to machine finer details and smaller pockets that larger tools simply cannot access.
- Reduced Cutting Forces: A smaller diameter means less material is being cut at any given instant. This results in lower cutting forces, making it easier for your machine (even a smaller hobbyist mill) to handle the material without bogging down.
- Better Chip Evacuation (in some cases): While chip evacuation is always a challenge with titanium, a smaller tool can sometimes help manage chips better, especially when combined with proper coolant and cutting strategies.
The 1/4″ Shank: Stability and Strength
The 1/4″ shank diameter is a common and practical choice for a 1/8″ end mill. Here’s why it works well:
- Adequate Support: It provides sufficient rigidity and support for the 1/8″ cutting diameter, preventing vibration and deflection. This is important when trying to achieve a good surface finish on tough materials.
- Common Tool Holders/Collets: A 1/4″ shank is a standard size for many R8, CAT40, or ER collet systems found on milling machines, making it easy to find compatible tooling and ensure a secure fit.
- Balances Rigidity and Accessibility: It offers a good balance between the rigidity needed for titanium and the ability to fit into moderately sized features without being overly bulky.
Standard Length: Versatility for Most Jobs
For many common machining tasks, a standard length end mill is perfectly adequate. This typically refers to an end mill where the flute length is a fraction of the overall tool length, designed for general-purpose milling. For a 1/8″ diameter, a standard length tool will have enough flute engagement for most pocketing, profiling, and slotting operations without risking tool breakage due to excessive overhang.
What About Special Coatings?
While a bare carbide end mill can work, specialized coatings can significantly extend tool life and improve performance when working with titanium. Look for end mills with coatings like:
- TiAlN (Titanium Aluminum Nitride): This is a black or dark grey coating that is excellent for high-temperature applications. It forms a protective aluminum oxide layer at high temperatures, preventing diffusion and sticking.
- ZrN (Zirconium Nitride): A gold-colored coating that offers good lubricity and wear resistance, helping to prevent material from sticking to the tool.
- UnCoated (Polished): For very light cuts, a highly polished uncoated carbide end mill can sometimes work, but it will likely have a shorter lifespan than a coated tool in titanium.
For beginners, a TiAlN coated end mill is often the best all-around choice for titanium.
Key Features to Look For in a 1/8″ Carbide End Mill for Titanium
Not all 1/8″ carbide end mills are created equal, especially when it comes to titanium. Here’s what to specifically seek out:
1. Material: Solid Carbide (Uncoated or Coated)
As discussed, solid carbide is non-negotiable for titanium’s hardness and heat. Ensure the description explicitly states “solid carbide.”
2. Geometry:
- Number of Flutes: For titanium, fewer flutes are generally better. While 4-flute end mills are common for general metal cutting, for titanium, 2-flute or 3-flute end mills are often preferred.
- 2-Flute: Offers excellent chip clearance, which is critical for preventing chip recutting and overheating in titanium. This is often the best choice for slotting and heavy roughing.
- 3-Flute: Provides a balance between chip clearance and improved surface finish compared to a 2-flute. It can be a good choice for general milling and when a smoother finish is desired with potentially less aggressive cutting parameters.
- End Cutting Style: Most 1/8″ end mills are flat-ended (square). For general purpose work, this is ideal. Center-cutting end mills can plunge vertically into material, but for titanium, you’ll typically be slotting or pocketing, so a standard flat end is sufficient.
- Helix Angle: A higher helix angle (e.g., 45 degrees or more) can provide a sharper cutting action and help lift chips out of the flutes more effectively. Standard helix (around 30 degrees) can also work but may require more attention to chip evacuation. For beginners, a standard helix with good coating and chip management will often suffice.
3. Shank and Overall Length:
- Shank Diameter: 1/4 inch.
- Overall Length and Flute Length: Standard. Avoid unusually long end mills when working with titanium, as excessive overhang reduces rigidity and increases the risk of vibration and breakage. A standard length end mill will typically have a flute length that is about 2-3 times the diameter (so, roughly 1/4″ to 3/8″ flute length for a 1/8″ tool).
4. Coating:
As mentioned, TiAlN or ZrN are excellent choices for high-temperature alloys like titanium. If unsure, opt for a reputable brand’s “high-performance” or “aerospace” grade end mill.
Choosing the Right 1/8″ Carbide End Mill: A Quick Checklist
| Feature | Recommendation for Titanium Grade 5 | Why It’s Important |
| :————– | :———————————- | :—————————————————————————— |
| Material | Solid Carbide | Superior hardness and heat resistance over HSS. |
| Diameter | 1/8 inch | Precision for details, manageable cutting forces. |
| Shank Diameter | 1/4 inch | Good rigidity, standard fit for tool holders. |
| Number of Flutes| 2 or 3 Flutes | Better chip clearance, which is crucial for titanium to prevent overheating. |
| Helix Angle | Standard (30°) to High (45°+) | Higher angles can improve chip evacuation and cutting action. |
| Coating | TiAlN, ZrN, or similar High-Temp | Protects the tool from heat and prevents material from sticking (galling). |
| End Type | Flat (Square) | Suitable for general milling, profiling, and pocketing. |
| Length | Standard | Balances rigidity and accessibility, minimizing overhang to prevent breakage. |
Essential Machine Setup and Speeds & Feeds
Even with the perfect tool, improper machine setup and cutting parameters can lead to disaster when machining titanium. Here’s how to get it right:
1. A Rigid Machine is Key
Titanium demands a rigid machine. Ensure your mill is well-maintained, with no excessive play in the ways or spindle. Use secure workholding – clamps should be firmly tightened, and consider using parallels or a vise with hardened jaws. Avoid any setup that allows for movement or vibration.
2. Coolant and Lubrication are Non-Negotiable
Titanium generates a lot of heat, and insufficient cooling is a primary cause of tool failure. You must use a coolant or a specialized cutting fluid designed for titanium. Flood coolant is ideal, but high-pressure through-spindle coolant (if available) or even a powerful mist coolant system can also be effective. For a 1/8″ end mill, a high-quality cutting paste or stick can be used for manual application on very light cuts, but it’s far less effective than a liquid coolant.
Generous application of coolant directly at the cutting zone is essential for both cooling the tool and lubricating the cut, helping to prevent galling. You can learn more about cutting fluids and their importance from resources like the Society of Manufacturing Engineers (SME) or by consulting tool manufacturers’ recommendations.
3. Speeds and Feeds for Titanium
This is where beginners often struggle. Titanium requires relatively slow spindle speeds (RPM) and moderate-to-fast feed rates. This combination is known as “high-performance machining” or HSM principles. The slow RPM keeps the cutting edge from overheating, while the fast feed ensures that material is removed quickly enough to prevent chip welding and to break chips effectively.
| Operation | Spindle Speed (RPM) | Feed Rate (IPM) | WOC (Width of Cut) | DOC (Depth of Cut) |
|---|---|---|---|---|
| Slotting / Pocketing (Roughing) | 100 – 400 RPM | 4 – 12 IPM | ~50% of diameter (0.060″) | 0.010″ – 0.050″ (depending on rigidity) |
| Finishing Passes | 150 – 500 RPM | 6 – 18 IPM | ~20% of diameter (0.025″) | 0.005″ – 0.010″ |
Note: These are starting points. Always consult your tool manufacturer’s recommendations, as they provide the most accurate data for their specific end mills. Material hardness (e.g., annealed vs. hardened titanium) will also affect optimal parameters.
Understanding the Numbers:
- RPM (Revolutions Per Minute): How fast the spindle spins. For titanium, lower is generally better.
- IPM (Inches Per Minute): How fast the cutting tool advances into the material. For titanium, higher is generally better to break chips.
- WOC (Width of Cut): How much of the tool’s diameter is engaged in the cut. For titanium, taking lighter radial passes (e.g., 50% for roughing, 20% for finishing) is often more effective than trying to hog out large amounts.
- DOC (Depth of Cut): How deep the tool cuts into the material axially. This depends heavily on machine rigidity and the specific operation. Start shallow!
4. Chip Evacuation: The Battle Against Heat
This is paramount. Titanium chips can be “sticky” and prone to welding themselves to the cutting edge or even re-welding back into the workpiece. Strategies include:
- Pecking: For pocketing, retracting the tool periodically to clear chips is essential.
- Ramping/Helical Interpolation: If your machine supports it, using a helical approach to enter a pocket can be more efficient and better for chip evacuation than plunging.
- Air Blasting: In addition to coolant, a blast of compressed air can help dislodge chips.
- Tool Path Selection: Modern CAM software offers strategies like high-efficiency machining (helical profiling) that are excellent for managing chips.
Step-by-Step: Machining Titanium with Your 1/8″ End Mill
Let’s walk through a typical pocketing operation.
- Prepare Your Workpiece: Ensure your Titanium Grade 5 workpiece is securely clamped in your milling vise. Use soft jaws if necessary to prevent marring the surface.
- Install the End Mill: Insert your 1/8″ coated carbide end mill into a clean collet and tighten it securely in your milling machine’s spindle. Ensure minimal tool overhang.
- Set Up Coolant: Turn on your chosen coolant system (flood, mist, etc.) to ensure it’s flowing effectively to the cutting zone.
- Set Tool Length Offset: Carefully touch off the end of your end mill on your workpiece to establish the Z-axis zero point.
- Program Your Toolpath (or Set Manually):
- For pocketing, plan to enter the material from the side or use a lead-in move if possible.
- Set your initial Depth of Cut (DOC) to a conservative value (e.g., 0.010″ – 0.020″ for beginners). Your Width of Cut (WOC) should be around 50% of the end mill diameter (0.060″).
- Set your spindle speed within the recommended range (e.g., 200 RPM) and your feed rate (e.g., 6 IPM).
- Perform a Dry Run: Always run your program with the spindle off (or at a very low RPM with no feed) to check that the toolpath is correct and that there are no unexpected collisions.
- Begin Machining: Start the spindle, engage the feed, and carefully monitor the cutting process. Listen for unusual noises and watch for excessive vibration or chip buildup.
- Adjust as Needed: If the cut is smooth and chips are clearing well, you might be able to slightly increase the DOC or feed rate within the
Related Posts
- This is an impossible request. The keywords provided are completely unrelated to the topic of canceling a car wash subscription. I cannot create a relevant and compelling title under these constraints. Please provide keywords that are relevant to the topic of car wash subscriptions.
Lathe Wiring Tips For Metal Lathe Pulley Setup
Mastering Lathe Surface Finish: Top Metal Lathe Projects
Master Metal Working: Lathe Tutorial For Bench Setups