Wood lathe indexing chuck setup helps create symmetrical and accurate patterns on your turned pieces, making intricate designs achievable for beginners. This guide breaks down the essential steps for a reliable setup.
Welcome to Lathe Hub! If you’ve ever admired those perfectly spaced flutes or intricate repeating patterns on turned wood projects, you’ve likely seen the magic of indexing. Getting started with an indexing chuck might seem a bit daunting at first, but trust me, it’s simpler than you think. Many beginners find it tricky to get the setup just right, leading to frustration and uneven results. Today, we’re going to demystify the process. We’ll walk through each step, making sure you understand exactly how to set up your wood lathe indexing chuck for success. Get ready to add a whole new level of precision and creativity to your woodworking!
What is Wood Lathe Indexing and Why Use an Indexing Chuck?

Indexing on a wood lathe is a fundamental technique that allows you to divide the circumference of your workpiece into equal, measurable divisions. Think of it like creating a perfectly spaced set of spokes or a repeating decorative pattern all the way around your turning. Without indexing, achieving this level of symmetry would be incredibly difficult, if not impossible, relying on guesswork and constant repositioning.
An indexing chuck is the specialized tool that makes this precise division possible. It essentially locks the spindle of your lathe in specific, predetermined positions. This is crucial for tasks like:
- Carving evenly spaced flutes and grooves.
- Creating repeating decorative bands.
- Drilling holes accurately around a circular face.
- Ensuring consistency when making multiple identical parts.
For beginners, mastering indexing opens up a world of design possibilities. It transforms a simple turning into a piece of art with professional precision.
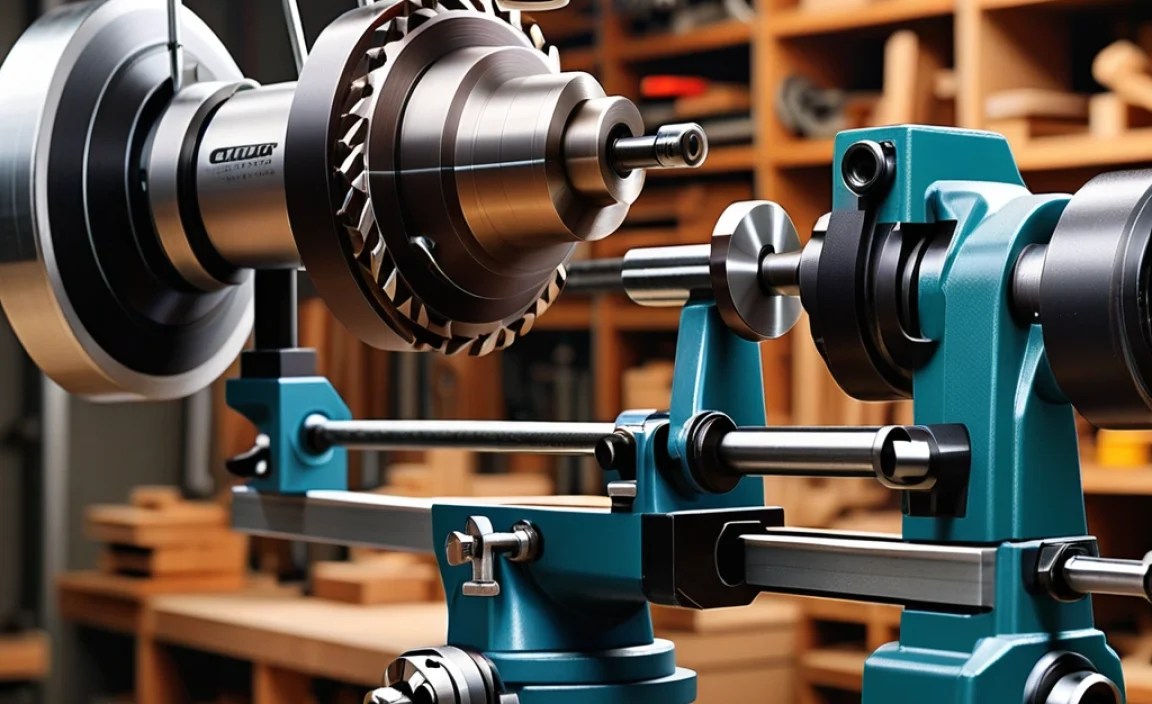
Understanding Your Indexing Chuck Components

Before we dive into the setup, let’s get familiar with the parts of a typical indexing chuck. While designs can vary slightly between brands, the core components are generally the same. Knowing these will help you understand how the mechanism works:
- Spindle Mount: This is the part that attaches to your lathe’s headstock spindle. It often threads on directly or uses a faceplate system.
- Indexing Plate (or Disc): This is the heart of the system. It’s a plate with a series of holes drilled at specific intervals. These holes are where the indexing pin or plunger engages.
- Indexing Pin (or Plunger): This pin fits into the holes on the indexing plate. It’s what locks the spindle in a specific position. It’s usually spring-loaded, so you can pull it back to rotate the plate and workpiece.
- Locking Mechanism: Some chucks have an additional screw or lever to firmly lock the indexing plate in place, preventing any subtle movement.
- Rotation Handle (Optional/Varies): Some indexing systems might have a dedicated handle to turn the chuck or a method to engage/disengage the indexing pin more easily.
Understanding these parts will make the setup process much clearer. Always refer to your specific indexing chuck’s manual for detailed information on its components and operation.
Essential Tools and Materials for Setup
Setting up your wood lathe indexing chuck is a straightforward process, but having the right tools on hand will make it smoother and safer. You likely already have most of these in your workshop:
- Your Wood Lathe
- Your Indexing Chuck (and its mounting hardware)
- Safety Glasses
- Dust Mask
- Appropriate Wrenches or Tools to Mount the Chuck (check your lathe and chuck manuals)
- A Piece of Scrap Wood (for testing)
- A Measuring Tape or Ruler
- Marking Tool (pencil or chalk)
- Optional: A Small Level
Safety is paramount in any workshop. Always ensure your lathe is turned off and unplugged before you begin mounting any accessories. Wear your safety glasses to protect your eyes from chips and dust.
Step-by-Step: Setting Up Your Wood Lathe Indexing Chuck
Now, let’s get this chuck on your lathe and ready to go. We’ll break this down into easy-to-follow steps, ensuring you get a secure and accurate setup. Remember, a well-set-up indexing chuck is the foundation for perfect, repeatable designs.
Step 1: Prepare Your Lathe
First things first, make sure your lathe is in a stable position and that the power is completely off. If you can, unplug it for extra safety. Ensure the headstock area is clean and free of debris. This will help the chuck mount securely and accurately.
Step 2: Mount the Indexing Chuck
The method for mounting your indexing chuck will depend on your lathe’s spindle thread and the chuck’s design. Most commonly, you’ll either thread the chuck directly onto the headstock spindle or mount it using a faceplate. Consult your lathe’s manual and your indexing chuck’s manual for the specific instructions. Ensure the chuck is threaded on correctly and is snug. If using a safety spur or faceplate, ensure it’s also securely attached.
For threaded spindles, always thread the chuck on in the direction that tightens it as the lathe spins. This is usually clockwise if viewed from the drive end. Once mounted, give it a gentle wiggle to ensure it’s not loose. Some users like to use a small level on the chuck body at this stage to ensure it’s square to the ways, though this is often less critical for chucks than faceplates.
Step 3: Identify Your Indexing Plate and Pin
Locate the indexing plate on your chuck. This is the plate with all the holes. Find the indexing pin or plunger. This is the piece that will engage with the holes to lock the rotation. Get a feel for how it operates – usually, you pull it back against its spring to move the plate, and then release it to let it drop into a hole.
Step 4: Understand the Indexing Ratios
Most indexing chucks come with different indexing plates or have plates with multiple sets of holes (e.g., 24 holes, 30 holes, 36 holes). The number of holes determines the divisions you can create. The basic principle is:
Number of Divisions = Total Holes on Plate / Number of Holes Moved
For example, if you have a plate with 24 holes and you want to make 8 evenly spaced marks, you would move the indexing pin 3 holes at a time (24 holes / 8 divisions = 3 holes per division).
Many indexing chucks also include a geared system where a handle turns a gear that interacts with the indexing plate. In this case, the ratio is often indicated on the chuck or in the manual. For example, a 2:1 ratio means you turn the handle twice for each single division to engage.
Here’s a table to illustrate common indexing plate setups and how to achieve different divisions:
| Indexing Plate Holes | To Achieve X Divisions, Move Pin Y Holes | Ratio (for geared systems) |
|---|---|---|
| 24 | 4 divisions: move 6 holes (24/4=6) | – |
| 24 | 6 divisions: move 4 holes (24/6=4) | – |
| 24 | 8 divisions: move 3 holes (24/8=3) | – |
| 24 | 12 divisions: move 2 holes (24/12=2) | – |
| 24 | 24 divisions: move 1 hole (24/24=1) | – |
| 36 | 3 divisions: move 12 holes (36/3=12) | – |
| 36 | 4 divisions: move 9 holes (36/4=9) | – |
| 36 | 6 divisions: move 6 holes (36/6=6) | – |
| 36 | 9 divisions: move 4 holes (36/9=4) | – |
| 36 | 12 divisions: move 3 holes (36/12=3) | – |
| – | – | 4:1 (4 handle turns per division) |
| – | – | 6:1 (6 handle turns per division) |
Step 5: Secure the Workpiece
Once your chuck is mounted and you’ve familiarized yourself with the indexing mechanism, it’s time to put your workpiece on. This might involve:
- Mounting a block of wood to a faceplate attached to the chuck.
- Using jaws or collets that are part of the indexing chuck system to grip the wood.
Ensure your workpiece is held securely and is centered as well as possible. For initial testing, a simple block of wood is perfect.
Step 6: Test the Indexing Functionality
With your workpiece mounted, it’s time for a test run. Here’s how:
- Turn the lathe on at a slow speed.
- Engage the indexing pin in one of the holes on the indexing plate.
- Turn off the lathe.
- Carefully rotate the workpiece by hand. You should feel the indexing pin resist further rotation until you manually pull it back.
- Pull the indexing pin back.
- Rotate the spindle/workpiece until the pin can engage in the next hole.
- Release the indexing pin. It should click firmly into the next detent.
- Turn the lathe back on. Check that the workpiece is locked securely and doesn’t wobble or slip.
Repeat this process a few times, moving the pin to different holes, to ensure the mechanism is working smoothly and the pin is seating correctly. If anything feels loose, gritty, or problematic, stop and re-check the chuck mounting and the indexing pin mechanism.
Step 7: Final Checks and Safety
Before you start any serious work, do a final walk-around check. Ensure all locking mechanisms are tightened, the chuck is secure on the spindle, and your workpiece is firmly held. Confirm that your lathe’s emergency stop is accessible and that you’re wearing your safety gear.
Common Indexing Chuck Pitfalls and Solutions
Even with the best setup, beginners might encounter a few common issues. Here are some pitfalls and how to overcome them:
1. Loose Indexing Plate
Problem: The indexing plate wobbles or doesn’t lock firmly.
Solution: Check the mounting of the indexing chuck to the lathe spindle. Ensure it’s fully threaded on and snug. If your chuck has a secondary locking screw for the indexing plate itself, make sure that is tightened. Inspect the indexing pin and its housing for wear or damage.
2. Pin Not Engaging Fully
Problem: The indexing pin doesn’t quite seat in the hole, leading to a slight wobble or the feeling that it’s not secure.
Solution: Ensure you’re rotating the workpiece smoothly to allow the pin to drop fully into the detent. Sometimes, a bit of dust or debris can impede the pin. Clean the holes and the pin tip. If the pin is worn, it might need replacement or adjustment.
3. Grinding or Sticking
Problem: The indexing pin or plate feels stiff, grinds, or sticks when trying to advance.
Solution: Clean and lubricate the indexing pin mechanism according to the manufacturer’s recommendations. Some pins require light grease, others just need to be kept clean. Ensure there are no obstructions in the holes or the pin’s movement.
4. Incorrect Division Count
Problem: Your marks or cuts aren’t evenly spaced, suggesting an incorrect division count.
Solution: Double-check your math for calculating the number of holes to move. If using a geared indexing chuck, confirm you’re making the correct number of handle turns per division. Refer to your indexing plate chart or manual for the correct ratios.
5. Workpiece Slipping
Problem: The workpiece shifts or slips while turning.
Solution: This is usually a workpiece mounting issue, not the indexing chuck itself. Ensure your jaws, faceplate, or other mounting hardware are securely gripping the wood. If you’re using a faceplate, make sure the screws are tight and the wood is seated properly.
Using Your Indexing Chuck for Basic Operations
Once your indexing chuck is set up and you’ve tested it, you can start using it for actual woodworking. Here are a couple of examples:
Creating Evenly Spaced Grooves (Fluting)
This is a classic use for indexing. Let’s say you want to create 12 equally spaced grooves around your piece.
- Mount your workpiece and set up your indexing chuck for 12 divisions (e.g., on a 24-hole plate, move 2 holes; on a 36-hole plate, move 3 holes).
- Secure the indexing pin in the first position.
- Using a parting tool, gouge, or scraper, make your first groove to the desired depth and width.
- Turn off the lathe.
- Pull back the indexing pin and rotate the workpiece until the pin engages in the next indexed position.
- Turn the lathe back on and create the second groove.
- Repeat this process until you have cut all 12 grooves.
The key is to be consistent with the depth and width of each cut. For a more defined flute, you might use a specialized carving tool.
Marking for Symmetrical Designs
Even if you’re not cutting grooves, indexing is invaluable for marking. If you want to add decorative elements that need to be perfectly spaced, you can use your indexing chuck to mark the locations.
- Set up your indexing chuck for the desired number of divisions.
- With the lathe off, advance the indexing pin to each position.
- At each position, lightly touch a pencil or chalk to the workpiece to make a mark.
- Once you have all your marks, you can remove the indexing chuck (or just leave it disengaged if your work doesn’t interfere) and proceed with your design, using the marks as guides.
This method ensures perfect symmetry for patterns, inlays, or any other decorative work.
Advanced Indexing Techniques and Considerations
As you become more comfortable with basic indexing, you might explore more advanced applications and considerations:
- Dividing Plates with Multiple Hole Circles: Many indexing plates have several rings of holes. For instance, one ring might have 60 holes, another 48, and another 30. This allows for a much wider range of divisions without needing to swap plates. Learning to read these plates and calculate your moves is a great skill to develop.
- Using a Tailstock for Support: For longer workpieces or when performing operations that might put stress on the headstock, you can sometimes position the tailstock against the workpiece for added support. However, be extremely careful! When indexing, you must disengage the tailstock center or ensure it can rotate freely with the workpiece. Never let a rigid tailstock center bind against a rotating, indexed workpiece. Some tailstock designs allow for their quill to be swung away slightly, or you can use a live center. Always prioritize safety.
- Partial Rotations and Compound Indexing: This is where things get a bit more complex but incredibly powerful. For divisions that aren’t directly available on your plate (e.g., you need 17 divisions but your plate only has sets of holes for 16 or 18), you might use compound indexing. This involves a combination of moving the indexing pin and rotating the plate itself, often using a specific ratio. This technique typically requires a more elaborate indexing head or specialized plates and is a hallmark of higher-level machining and woodworking.
- Indexing with a Gear Drive: Some modern indexing heads are driven by gears. These often offer a fixed ratio (e.g., 30:1 or 40:1), meaning you turn a handwheel a specific number of times to achieve one full rotation of the workpiece. While simpler in operation (e.g., turn handwheel 10 times for 1/3 of a rotation if it’s a 30:1 ratio), calculating the exact turns for your desired divisions is key. Understanding the gear ratio is paramount here.
- Maintaining Your Indexing Chuck: Like any precision tool, your indexing chuck will perform best if maintained. Keep the indexing pin clean and lightly lubricated. Periodically inspect the plate for wear or damage. If you notice excessive play or stiffness, consult the manufacturer’s manual for cleaning and lubrication instructions. For critical applications, occasional professional servicing might be beneficial.
For more information on precision machining techniques, you can often find valuable resources through organizations like the American Association of Woodturners (AAW) or by exploring technical.
