Learn wood lathe spindle turning with essential tips for a smooth, safe, and successful project. This guide simplifies the process, helping beginners create beautiful spindles with confidence, from choosing wood to finishing.
Turning spindles on a wood lathe is a rewarding skill that lets you create everything from table legs to decorative accents. If you’re new to it, the lathe might seem a bit daunting, and getting that perfect spindle can feel like a challenge. But don’t worry! With the right approach and a few key tips, you’ll be turning smooth, symmetrical spindles in no time. We’ll walk through everything you need to know, making this fundamental woodworking technique accessible and enjoyable. Get ready to transform a simple piece of wood into something truly special!
What is Wood Lathe Spindle Turning?

Wood lathe spindle turning is a foundational woodworking technique where a long, relatively slender piece of wood is rotated on a lathe, and then shaped using cutting tools. Unlike faceplate turning (where you work on the end grain of a wide piece), spindle turning focuses on shaping the length of the wood. This process is used to create items like table legs, chair spindles, stair balusters, tool handles, and decorative moldings. It requires precision, safety awareness, and a good understanding of your tools and the wood itself.
Essential Tools and Materials for Spindle Turning

Before you even touch the lathe, gathering the right tools and materials will make your spindle turning experience much smoother and safer. Think of this as setting yourself up for success.
1. The Wood Lathe
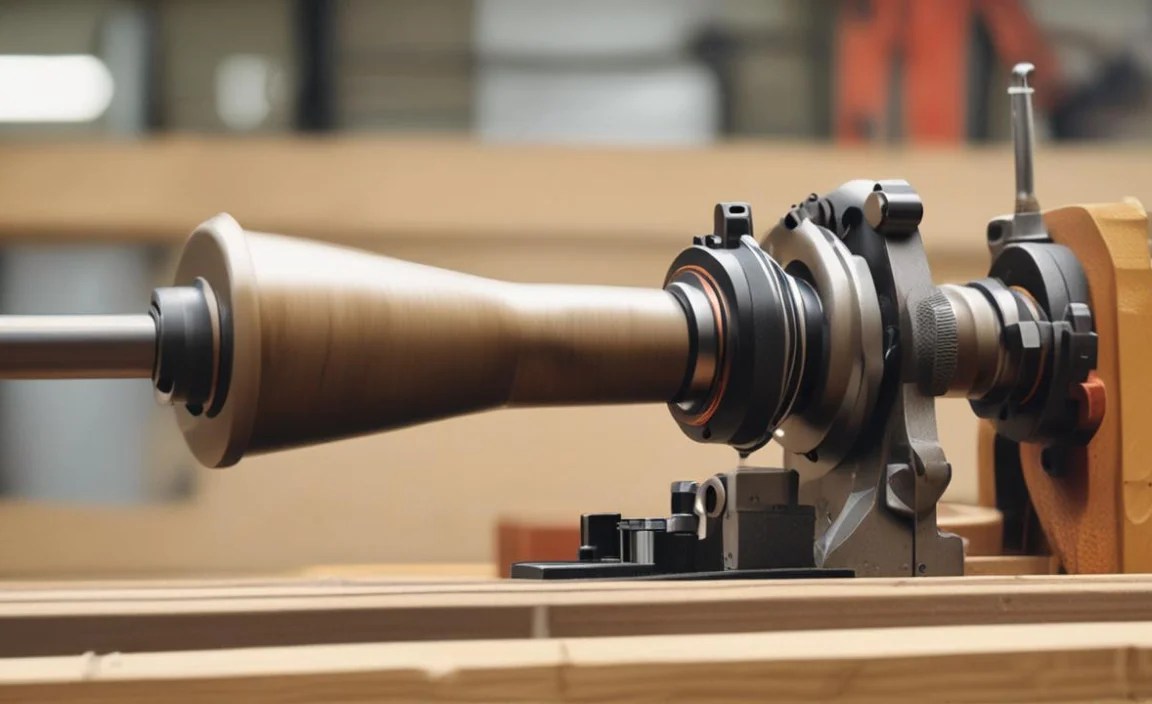
For spindle turning, you need a wood lathe. There are various types, from small benchtop models perfect for hobbyists to larger floor-standing machines. For beginners, a benchtop or a smaller floor-standing lathe with variable speed control is ideal. Look for one with a sturdy bed, a reliable motor, and a quill that extends smoothly.
2. Lathe Tools (Chisels)
You don’t need a massive set of tools to start. A few key chisels are essential for spindle turning:
- Spindle Gouge: This is your workhorse for roughing out the basic shape and creating curves. A 1/2-inch or 3/4-inch spindle gouge is a good starting point.
- Skew Chisel: Used for smoothing, creating crisp details, and cutting bevels. A 1/2-inch or 3/4-inch skew is versatile.
- Parting Tool: Essential for cutting grooves and preparing to part off the finished spindle. A 1/4-inch or 3/8-inch parting tool works well.
- Scraper (Optional but helpful): For final surface smoothing, especially on end grain or difficult wood. A round-nose scraper is useful.
3. Safety Gear – Non-Negotiable!
Your safety is paramount. Never compromise on this. Mandatory safety gear includes:
- Safety Glasses or Face Shield: Protect your eyes from flying wood chips. A full face shield offers more protection.
- Dust Mask or Respirator: Wood dust can be harmful to your lungs.
- Hearing Protection: Lathes can be noisy.
- No Loose Clothing or Jewelry: Anything that can snag the rotating workpiece is a major hazard.
4. Other Helpful Items
- Wood: Choose a stable softwood like pine or a hardwood like maple or cherry. Ensure it’s dry and free from major cracks. For beginners, softwoods are more forgiving.
- Clamps or Centers: To hold the wood securely between the headstock and tailstock. (e.g., spur drive center and live center).
- Measuring Tools: Tape measure, calipers.
- Pencils: For marking.
- Sharpening System: Lathe tools must be sharp to cut effectively and safely. A sharpening jig and stones or a grinder are necessary.
- Sanding Supplies: Sandpaper in various grits (e.g., 80, 120, 180, 220).
- Wood Finish: Oil, wax, or lacquer for the final touch.
Preparing Your Wood for Spindle Turning

Getting the wood ready is the first critical step. A well-prepared blank will make the turning process much easier and safer.
Choosing the Right Wood
For your first spindle turning projects, it’s best to start with stable, easy-to-turn woods. Softwoods like pine, poplar, or even basswood are forgiving and cut easily. As you gain confidence, you can move on to hardwoods like maple, cherry, or walnut. Always ensure your wood is dry; wet or green wood can be unpredictable and difficult to control.
Cutting and Mounting the Blank
Cut your wood blank slightly longer than your finished spindle and wide enough to accommodate the design. For spindle turning, the blank is typically mounted between the headstock and the tailstock using drive centers and spur drive centers.
- Mark the Centerlines: Draw diagonal lines on both ends of the blank. The intersection of these lines is the center.
- Mark for Drive Centers:
- Headstock End (Drive Spur): Using a pencil, mark a point slightly off-center towards one side. This will be the point where the drive spur of the headstock digs into the wood. This offset is crucial to ensure the entire blank rotates without any part of it hitting the lathe bed.
- Tailstock End (Live Center): Mark the exact center on this end. The live center will spin with the wood, reducing friction.
- Drill Pilot Holes (Optional but Recommended): For hardwoods, or if you’re using a robust drive spur, drilling a small pilot hole where the drive spur will go can make it easier to seat.
- Mount the Blank:
- Insert the drive spur into the headstock.
- Position the blank so the drive spur point aligns with your marked offset point.
- Advance the tailstock so the live center point aligns with the center mark on the other end of the blank.
- Tighten the tailstock ram and ensure it has a small amount of travel left to account for wood expansion/contraction.
- Engage the lathe and gently bring the tailstock up to the blank, applying enough pressure to seat the centers securely. The tailstock should be firmly in place.
Prepare the Lathe Speed
Crucially, start with the slowest speed your lathe offers. As you turn and shape the wood, you can gradually increase the speed if safe. A good rule of thumb is that as the wood becomes more balanced (i.e., more round), you can spin it faster safely. For a rough 4×4 blank, start very slow.
The Spindle Turning Process: Step-by-Step
Now that your wood is mounted and the lathe is ready, it’s time to start shaping. Remember to always stand to the side of the rotating blank, never directly in front of it.
Step 1: Roughing Out the Cylinder
This is where you remove the corners of the square blank and begin to create a basic cylinder. Your spindle gouge is the primary tool here.
- Position the Tool Rest: Place the tool rest close to the wood blank, about 1/4 inch away, and slightly above the center line.
- Grip the Spindle Gouge: Hold the gouge handle firmly with both hands.
- Start the Cut: With the lathe running at a slow speed, bring the bevel of the spindle gouge in contact with the wood, just past the square corner. Don’t dig in hard; let the tool shear the wood.
- Move Across the Blank: Gradually move the gouge across the blank, removing the corners. Work from the tailstock end towards the headstock, or vice-versa. You’ll be removing high spots until you achieve a roughly round shape.
- Check for Roundness: Stop the lathe periodically and check with your hand or a ruler to see if you have a consistent diameter. Aim for a consistent cylinder before proceeding.
Step 2: Shaping the Spindle (Using the Gouge and Skew)
Once you have a basic cylinder, you can start to add your design. This is where you’ll use both the spindle gouge for curves and the skew chisel for details and smoothing.
-
- Using the Spindle Gouge for Curves and Beads:
- Maintain the tool rest as close as possible.
- Hold the gouge with the bevel rubbing on the wood, using a slicing or shearing cut.
- For concave shapes (like beads), you can deepen the cut by rolling the gouge.
- For convex shapes (like tapers), a scraping cut with the gouge can work well.
- Using the Skew Chisel for Tapers and Smoothing:
- Tapers: Aim the skew to make a scraping cut. Position the cutting edge at a slight angle to the wood, so it’s slicing rather than digging in.
- Bevel Cuts/Shoulders: A well-honed skew is excellent for creating crisp shoulders or small bevels where different diameters meet.
- Surface Smoothing: For a very smooth finish, the skew can be used to shear the wood, leaving a clean surface. This takes practice.
- Marking and Measuring: Stop the lathe frequently to measure your diameters and mark out where changes in diameter will occur. This ensures symmetry.
- Work Gradually: Don’t try to remove too much material at once. Make multiple light passes rather than one aggressive cut.
- Using the Spindle Gouge for Curves and Beads:
Here’s a visual guide of common spindle shapes you can achieve:
| Shape | Description | Primary Tool |
|---|---|---|
| Cylinder | Uniform diameter along its length. | Spindle Gouge |
| Taper | Diameter decreases consistently from one end to the other. | Skew Chisel, Spindle Gouge |
| Bead | A concave, rounded section. | Spindle Gouge |
| Scallop | A series of concave sections with convex dividers. | Spindle Gouge (with specific cuts) |
| Shoulder / Fillet | A short transition zone between different diameters or a sharp step. | Skew Chisel, Parting Tool |
Step 3: Cutting Details and Recesses
This is where you add the distinctive features of your spindle, like beads, coves, and tapers.
-
-
- Beads: Use the tip of your spindle gouge, or a small skew chisel, to push into the wood and create a rounded, concave shape. Start with a shallow cut and deepen it gradually.
- Coves: Similar to beads, but often wider and shallower. Use the spindle gouge with a scraping action.
- Tapers: Use the skew chisel for smooth, flowing tapers. Position its edge to shear the wood away.
- Parting Tool for Grooves: Use the parting tool to cut crisp grooves. Start shallow and increase depth carefully. This is also used to create smaller diameter sections that will eventually be cut off.
-
Step 4: Final Shaping and Smoothing
Once the design is roughed out, refine the shapes and start thinking about the surface finish.
-
-
- Refine Curves: Go back over your shapes with the spindle gouge or skew, refining the transitions and ensuring symmetry.
- Final Shearing Cuts: Use a sharp skew chisel held at a shearing angle across the grain to create a very smooth surface. This can significantly reduce sanding.
- Check for Wobble: Ensure the spindle is running true. Any wobble indicates an imbalance or uneven turning. Stop the lathe and assess.
-
Step 5: Sanding
Sanding is crucial for a professional finish. Start with a coarser grit and progressively move to finer grits.
-
-
- Start Coarse: Begin with 80 or 100 grit sandpaper to remove any tool marks.
- Progress Gradually: Move to 120, then 180, and finish with 220 grit.
- How to Sand:
- Stop the lathe and wrap the sandpaper around the spindle, applying even pressure.
- Turn the lathe back on at a medium-slow speed and let the sandpaper do the work.
- Move the sandpaper along the length of the spindle to ensure even sanding.
- Avoid holding sandpaper in one spot, as this can create flat spots or burn marks.
- Consider sanding with the lathe stopped for end grain sections.
- Dust Removal: Clean off the dust between grits with a brush or compressed air.
-
Step 6: Parting Off and Finishing
The final step is to separate the spindle from the lathe.
-
-
- Mark the Parting Point: Use your pencil to mark where you want to cut the spindle free. It’s often best to leave a small tenon or stub at each end that can be removed later.
- Use the Parting Tool:
- Mount the spindle between centers if you haven’t already, or secure it if it’s near the end.
- Adjust the tool rest to be behind the parting area.
- Start cutting with the parting tool, moving slowly and letting the tool shear.
- Listen to the lathe and the wood. If it sounds strained, back off.
- Cut a groove deep enough to nearly sever the spindle.
- Final Separation: You can often finish the cut by gently twisting the spindle or using a hand saw once the groove is deep. Removing the tenons left by the drive and live centers can be done by hand or by re-mounting the spindle briefly and carefully turning them away.
- Apply Finish: Once the spindle is off the lathe and any tenons are cleaned up, apply your chosen finish (oil, wax, lacquer, etc.) according to the product instructions.
-
Common Spindle Turning Challenges and Solutions

Even with the best intentions, beginners can run into a few hiccups. Here are some common issues and how to tackle them:
1. The Wood Wobbles or Vibrates Excessively
-
-
- Cause: The wood is not centered, the tailstock is not supporting it adequately, or the wood is out of balance because it’s not yet round.
- Solution:
- Ensure the drive and live centers are properly seated in the wood.
- Make sure the tailstock is firmly advanced and locked.
- Start at the slowest speed setting and gradually increase as the wood becomes round.
- Check for cracks or knots that might be causing imbalance.
-
2. Tools Are Chattering or Digging In
This is often the most frustrating issue for beginners.
-
-
- Cause: Dull tools are the most common culprit. It can also be caused by moving the tool too fast, not using the bevel correctly, or the tool rest being too far away.
- Solution:
- Sharpen Your Tools! This is paramount. A sharp tool cuts cleanly; a dull tool scrapes and tears. Regularly assess your tool sharpness. Refer to resources like Wood Magazine’s guide to sharpening lathe tools.
- Hold the tool with the bevel rubbing on the wood.
- Use light, shearing cuts rather than trying to hog out material.
- Ensure the tool rest is close to the wood (1/4 inch or less).
- Experiment with different angles of the cutting edge.
-
3. Difficulty Creating Smooth Curves or Beads
-
-
- Cause: Tool technique, tool sharpness, or incorrect tool angle.
- Solution:
- Practice your shearing cuts with the spindle gouge.
- Ensure your tools are razor-sharp.
- Experiment with the angle of the gouge. For beads, you want to use a more slicing action, and for coves, a scraping action.
- Try making multiple light passes instead of one deep cut.
-
4. Leaving Flat Spots or Divots
-
- Cause: Holding sandpaper in one place during sanding, or not letting the tool fully shear the wood on the final passes.
- Solution:
- When sanding, keep the sandpaper moving.
